

Cellulite affects approximately 80-90% of women post-puberty, creating that familiar dimpled appearance primarily on thighs, hips, and buttocks. If you’ve been searching for accessible, at-home solutions, foam rolling might be the technique you’ve been overlooking. This comprehensive guide walks you through everything you need to know about using a foam roller to target cellulite, from selecting the right equipment to mastering specific techniques that can help improve skin texture and circulation over time.
Foam rolling isn’t a miracle cure, but when incorporated into a consistent wellness routine, it can contribute to visible improvements in the appearance of cellulite by addressing several of the underlying factors that cause it. Understanding how to properly target affected areas will help you maximize the benefits of this simple yet effective self-massage technique.
Why Foam Rolling Actually Reduces Cellulite Appearance
Cellulite develops when fat deposits push through connective tissue bands beneath the skin, creating the characteristic dimpled effect. Foam rolling addresses these issues through multiple mechanisms that directly target cellulite formation. The sustained pressure applied during rolling helps break up the fibrous bands beneath the skin that create the dimpled appearance. This connective tissue manipulation can smooth out the underlying structure, allowing fat deposits to lie more evenly beneath the skin’s surface.
When you apply consistent pressure with a foam roller, you dramatically improve blood flow to treated areas, which helps deliver oxygen and nutrients while removing metabolic waste products that can contribute to fluid retention and inflammation. The massage-like action also stimulates your lymphatic system, which plays a crucial role in removing toxins and excess fluid from tissues. When lymphatic flow improves, puffiness decreases and the skin often takes on a smoother, more toned appearance. Many practitioners report that regular foam rolling creates cumulative improvements in skin texture, with best results appearing after several weeks or months of consistent practice.
How Long Until You See Results from Foam Rolling?
Most people begin noticing subtle improvements in skin texture after 3-4 weeks of consistent foam rolling. For more significant changes in cellulite appearance, commit to at least 8-12 weeks of regular sessions. The timeline varies based on factors like your genetics, body composition, and how consistently you maintain your routine. Those who combine foam rolling with strength training and proper hydration typically see the best results.
Choosing the Best Foam Roller for Cellulite Reduction

Selecting appropriate equipment makes a significant difference in your foam rolling success for targeting cellulite. High-density foam rollers provide firmer pressure and hold their shape well under body weight, making them ideal for targeting dense tissue in the thighs and buttocks where cellulite commonly appears. These rollers allow you to apply sufficient force to effectively break up connective tissue without the roller collapsing entirely under your weight. Look for rollers at least 18 inches long to comfortably target multiple areas without repositioning constantly.
Textured or ridged foam rollers offer additional benefits for cellulite work. The raised patterns create more intense, localized pressure that can better target the specific bands and knots associated with cellulite formation. However, textured rollers may be too intense for beginners or those with sensitive skin, so starting with a smooth high-density roller and progressing to textured options after building tolerance is often the better approach.
Vibrating Foam Rollers: Worth the Investment?
Vibrating foam rollers represent a more advanced option that adds percussion therapy to traditional foam rolling. The vibration helps penetrate deeper into tissues and may enhance circulation benefits beyond what manual rolling provides. While more expensive, many users find the enhanced effectiveness justifies the investment, particularly when targeting stubborn areas of cellulite. If budget allows, consider starting with a standard high-density roller and upgrading to vibrating once you’ve established your technique.
Essential Preparation Steps Before Foam Rolling
Proper preparation maximizes the benefits of your foam rolling routine while minimizing discomfort. Begin by finding an appropriate space where you can comfortably stretch out and roll without interruption. A clean, flat surface like a yoga mat or carpeted floor works well. Avoid rolling on hard surfaces like concrete or hardwood, as these don’t provide enough cushioning and can increase bruising risk.
Warm up your muscles before targeting cellulite-prone areas. Spend five to ten minutes on light cardio such as walking or gentle cycling to increase blood flow and muscle temperature. You might also shower with warm water beforehand, as heat makes connective tissue more responsive to manipulation. Hydration plays an often-overlooked role in foam rolling effectiveness—drink water throughout the day of your session, and consider having a glass about 30 minutes before rolling.
Targeting Outer Thighs for Saddlebag Reduction
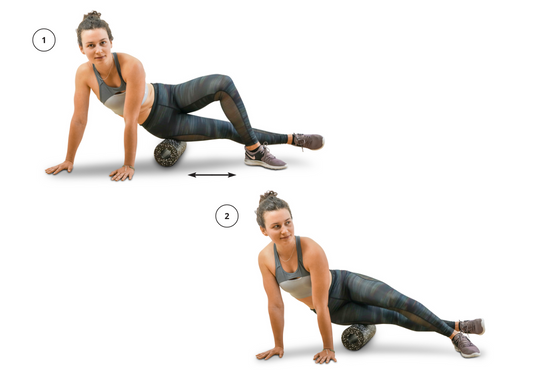
The outer thighs frequently harbor stubborn fat deposits and prominent cellulite. Begin by lying on your side with the foam roller positioned beneath the outer edge of your thigh. Support your upper body with your forearm and the hand of your lower arm, keeping your bottom leg extended for stability and your top leg bent forward for balance.
Roll slowly from just below your hip bone down toward your knee, then return to the starting position. Move at a pace of approximately one inch per second, which gives your tissues time to respond to the pressure. Spend at least two minutes on each outer thigh, working through the entire length of the muscle.
When you find a tender spot, pause and hold sustained pressure for 30-90 seconds. Breathe deeply and try to relax into the pressure rather than tensing up. The sensation should be intense but manageable—not sharp or stabbing pain. For deeper work, try crossing your top leg over the bottom leg, which rotates the hip and changes which tissues are engaged.
Smoothing Buttock Cellulite with Proper Glute Techniques
The buttock region often shows some of the most pronounced cellulite, and dedicating significant time to this area yields noticeable improvements. Begin by sitting on the foam roller with your feet flat on the floor in front of you, knees bent. Roll slowly forward and backward, shifting your weight slightly from side to side to cover the entire gluteal region.
The figure-four position provides more intense glute work. Sit on the roller, cross one ankle over the opposite knee, then lean slightly toward the crossed leg. This rotates your hip and exposes the outer portion of your glutes for targeted rolling. Roll slowly across this area, working from the top of your hip bone down toward the center of your buttocks. Switch sides and repeat, spending extra time on any areas that feel particularly tight or knotty.
Pro tip: Place a towel under your sit bones if you experience excessive pressure. This modification reduces intensity while still allowing effective tissue work.
Optimal Foam Rolling Frequency for Cellulite Results
:max_bytes(150000):strip_icc()/foam-roller-cellulite_0-07e96a8d7c0e4c56af8b1f9d8b44ce7f.jpg)
For beginners, start with sessions of five to ten minutes, focusing on major areas without spending excessive time on any single spot. As your tolerance builds over one to two weeks, gradually extend sessions to 15-20 minutes. Aim for three to five sessions per week for best results with cellulite reduction.
Each individual area should receive 30 seconds to two minutes of focused attention. The total time spent on any single muscle group during a session shouldn’t exceed five minutes. Track your sessions and note any changes in how areas feel over time—this helps you identify progress and adjust your technique as needed.
Common Foam Rolling Mistakes That Reduce Effectiveness
Rolling too quickly defeats the purpose of the technique. Force yourself to slow down and focus on quality of movement rather than covering ground quickly. Ignoring pain signals leads to injury and setbacks—while foam rolling should feel intense, it shouldn’t cause sharp, stabbing pain. Skipping warm-up increases injury risk and reduces effectiveness. Always spend five to ten minutes warming up before targeting cold muscles.
Combining Foam Rolling with Complementary Strategies
Foam rolling works best as part of a comprehensive approach. Dry brushing before foam rolling enhances the effects of your session by stimulating skin cells and improving surface circulation. Following foam rolling with a quality moisturizer or anti-cellulite cream can help lock in moisture and deliver active ingredients to the areas you’ve just worked.
Strength training two to three times per week complements foam rolling by building muscle tone beneath the skin. Focus on compound movements that target the legs, hips, and glutes, such as squats, lunges, hip thrusts, and deadlifts. Cardiovascular exercise supports circulation and lymphatic drainage—aim for at least 150 minutes of moderate cardio per week.
Safety Guidelines for Effective Cellulite Reduction
Avoid foam rolling directly over joints, bones, or injured tissues. People with blood clotting disorders, diabetes-related circulatory issues, or vascular conditions should consult their healthcare provider before beginning foam rolling. If you have skin infections, open wounds, or severe varicose veins in areas you want to target, avoid foam rolling those regions until healing is complete.
Pregnant women should approach foam rolling cautiously and avoid intense pressure on the abdomen, lower back, and certain pressure points. Many pregnant people find gentle foam rolling helpful for managing discomfort, but working with a prenatal fitness specialist ensures you use safe modifications.
Maintaining Long-Term Cellulite Reduction Results
Schedule your foam rolling sessions at consistent times to build the habit. Track your progress with photos taken every two to four weeks under consistent lighting conditions. Visual documentation helps you notice gradual changes that might be imperceptible day-to-day and provides motivation to continue when results feel slow.
Periodically reassess and update your technique as your body changes. Gradually increase pressure intensity, extend session duration, or incorporate textured rollers to continue challenging your tissues and producing continued improvement. Combine your ongoing foam rolling practice with hydration, a balanced diet rich in anti-inflammatory foods, strength training, and stress management for optimal results.
Foam rolling for cellulite requires patience and consistency, but the accessibility and simplicity of this approach make it worth incorporating into your wellness routine. By targeting the thighs, hips, and buttocks with sustained pressure and deliberate movements, you can improve circulation, break up connective tissue bands, and gradually improve the appearance of dimpled skin. Start conservatively, listen to your body, and commit to regular sessions for the best chance of seeing meaningful results over time.


