
You slump at your desk daily, your shoulders rounding forward, neck jutting ahead like a turtle emerging from its shell. By evening, tension headaches throb behind your eyes, your lower back aches, and your breathing feels shallow—all symptoms of poor posture that affects 85% of office workers. The good news? You don’t need expensive treatments or professional intervention. A simple foam roller, used correctly for just 15 minutes daily, can release the muscle tension pulling your skeleton out of alignment and restore your natural posture. This guide reveals the exact foam rolling techniques backed by biomechanics research to fix forward head posture, rounded shoulders, and anterior pelvic tilt—starting today.
Poor posture creates a self-reinforcing cycle where tight muscles pull bones out of position, causing opposing muscles to weaken from constant stretching. Tight chest muscles drag shoulders forward, short hip flexors tilt the pelvis, and restricted thoracic spine reduces breathing capacity. Foam rolling interrupts this cycle by releasing fascial restrictions, resetting muscle length, and restoring natural alignment. Unlike stretching alone, foam rolling improves flexibility without compromising the muscle strength needed for postural support. The key lies in targeting specific muscle groups with precise techniques that address your unique postural pattern.
Why Tight Muscles Ruin Your Posture (And How Foam Rolling Fixes It)
Your body adapts to positions you hold most frequently—this is why desk workers develop rounded shoulders and forward head posture. When you spend hours daily with shoulders rolled forward, your pectoralis major and minor muscles gradually shorten, physically pulling your skeleton into misalignment. Simultaneously, the opposing muscles (rhomboids, middle trapezius) stretch and weaken from constant elongation. This creates visible postural distortions that affect everything from breathing capacity to joint health.
Foam rolling corrects these imbalances through two primary mechanisms. First, it breaks down fascial restrictions—those sticky adhesions in connective tissue that bind muscles together and limit movement. The fascia surrounding tight muscles becomes dehydrated and stuck, literally pulling your skeleton out of position. Applying controlled pressure with a foam roller mechanically separates these layers, restoring tissue pliability. Second, foam rolling triggers neurological changes: pressure on tight muscles stimulates Golgi tendon organs, causing reflexive relaxation through autogenic inhibition. This allows chronically contracted fibers to lengthen, releasing the tension patterns that maintain poor posture.
Research confirms foam rolling increases joint range of motion without reducing muscle strength—unlike static stretching which can temporarily compromise force production. This makes it ideal for posture correction because it improves flexibility while maintaining the tension necessary for postural support. Regular practice also enhances proprioception, your body’s internal awareness of joint position, helping you recognize and correct poor positions throughout the day.
Identify Your Specific Postural Imbalance Before Rolling
Pinpoint Your Dominant Posture Pattern
Trying to fix all postural issues simultaneously wastes time and effort. Most people exhibit elements of multiple patterns, but one usually predominates and should guide your foam rolling focus. Stand sideways in front of a mirror and analyze these key markers:
Forward head posture: If your ear sits more than 1 inch in front of your shoulder joint, you have forward head posture. This condition develops from smartphone use and computer work, adding 10 pounds of effective weight for every inch your head moves forward. Consequences include chronic neck pain, tension headaches, and jaw problems.
Rounded shoulders: Check if your elbows sit in front of your torso when arms hang naturally. Tight pectoralis muscles pull shoulders forward while weak rhomboids and middle trapezius fail to counteract this pull. This pattern impairs shoulder stability, reduces athletic performance, and restricts breathing capacity by up to 30%.
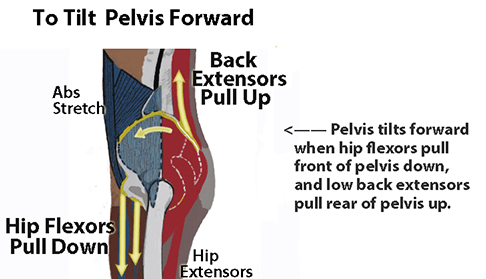
Anterior pelvic tilt: Place your hands on your hip bones—do your thumbs point significantly downward? This indicates an anterior pelvic tilt where tight hip flexors (iliopsoas, rectus femoris) pull the pelvis forward, creating an exaggerated lower back curve. This common desk worker’s condition leads to lower back pain, hip problems, and altered gait patterns.
Chest Release: Eliminate Rounded Shoulders in 5 Minutes
Pectoralis Major Release Protocol
Tight chest muscles are the #1 contributor to rounded shoulders. Releasing them requires specific positioning to access different portions of the muscle. Begin by placing your foam roller horizontally across your upper back just below the shoulder blades. Lie back with knees bent, feet flat, and extend arms outward at 45 degrees, palms facing up.
Step 1: Slowly rotate your body from side to side, allowing chest muscles to roll over the cylinder. Focus on the sternal portion of pectoralis major (center chest) where tension most affects shoulder position.
Step 2: When you encounter a tender spot (likely near the sternum), pause and apply sustained pressure for 30-90 seconds while taking deep diaphragmatic breaths. Inhale through the nose for 4 seconds, exhale through pursed lips for 6 seconds—this activates the parasympathetic nervous system for deeper release.
Step 3: Modify arm position by bending elbows and bringing hands together above your chest (“hands on hips” position) to target the clavicular portion of pectoralis major. Roll slowly in this position, pausing on tender spots.
Pro Tip: Place a lacrosse ball beneath your chest near the armpit to access the pectoralis minor—a deep muscle often responsible for stubborn shoulder rounding. Apply 60-90 seconds of sustained pressure on tender spots while breathing deeply.
Thoracic Spine Mobility: Fix Hunchback Posture Step-by-Step
Complete Upper Back Release Routine
A restricted thoracic spine (mid-back) forces the neck and lower back to compensate, creating the classic “hunchback” appearance. Restoring mobility here allows shoulders to retract naturally and the head to position properly above the spine.
Positioning: Place the foam roller horizontally across your upper back between the shoulder blades. Bend knees with feet flat, hands behind head to support the neck.
Step 1: Slowly lower your upper back over the roller, allowing your spine to arch over the cylinder. At end range, pause and breathe deeply for 20-30 seconds. Return to start position and repeat 8-10 times.
Step 2: Roll vertically along the spine from mid-back to base of neck. Unlike leg rolling, move slowly—4-6 seconds per spinal segment—and pause on restrictions. Never force movement; encourage gradual release through sustained pressure and deep breathing.
Step 3: Combine rolling with arm movements—reach arms overhead during holds or cross arms over chest—to enhance release of specific muscle fibers. Each position targets different portions of the erector spinae and trapezius.
Time Saver: Perform this routine during commercial breaks while watching TV—just 3-4 minutes daily creates noticeable improvements in posture within 2 weeks.
Hip Flexor Release: Correct Anterior Pelvic Tilt Now
Targeted Iliopsoas and Rectus Femoris Protocol
Anterior pelvic tilt—the exaggerated arch in your lower back—stems primarily from tight hip flexors pulling the pelvis forward. Releasing these muscles is crucial for restoring natural spinal curves.
Step 1: Lie face down with foam roller positioned beneath thighs just above knees. Support your body on forearms and slowly roll from knee toward hip. Focus on the upper portion near the hip bone where rectus femoris attaches.
Step 2: When you find tension (common about 2 inches below hip bone), pause and apply sustained pressure for 45-60 seconds while breathing deeply. Rotate toes inward to target lateral hamstring or outward for medial hamstrings.
Step 3: For deeper psoas release, place a lacrosse ball at front of hip just inside hip bone. Lie face down with ball in position and opposite leg extended for stability. Apply gradual pressure for 30-60 seconds—stop immediately if sharp pain occurs.
Critical Mistake to Avoid: Don’t roll directly over the hip bone (ASIS) or pubic bone—this causes bruising without effective release. Stay 1-2 inches away from bony landmarks.
Complete 15-Minute Posture Reset Routine (Daily Protocol)
This science-backed sequence addresses all major postural imbalances in minimal time. Perform daily for 2 weeks, then maintain with 3 sessions weekly.
Upper Back & Chest (5 minutes):
– Thoracic extension over roller: 8-10 reps, 20-30 seconds hold
– Chest release with arms at 45 degrees: 2 minutes
– Chest release with hands above chest: 1 minute
– Pectoralis minor with lacrosse ball: 1 minute per side
Shoulders & Neck (3 minutes):
– Side-lying shoulder roll: 45 seconds per side
– Upper trapezius release with lacrosse ball: 60 seconds per side
– Scalene release along neck side: 45 seconds per side
Lower Body (7 minutes):
– Hip flexor/quad roll: 2 minutes per side
– Gluteal release in figure-4 position: 90 seconds per side
– Hamstring roll with rotation: 60 seconds per side
– Calf release: 30 seconds per side
Pro Tip: Perform this routine immediately after a warm shower when tissues are most receptive. Pair with 5 minutes of postural strengthening exercises (face pulls, bridges) for accelerated results.
Combine Foam Rolling with Stretching for Lasting Results
Foam rolling prepares tissues for effective stretching by reducing tension and increasing blood flow. Perform these stretches immediately after rolling for maximum benefit:
Doorway Chest Stretch: Stand in doorway with forearms on frame, step forward while keeping spine neutral. Hold 45-60 seconds. Modify arm height to target different chest portions.
Kneeling Hip Flexor Stretch: With back knee on ground, tuck pelvis under and lean forward until stretch is felt deep in front of hip. Hold 60-90 seconds per side with deep breathing.
Thoracic Extension on Roller: Lie on roller positioned horizontally across upper back, extend arms overhead while arching upper back. Hold 60-90 seconds while breathing deeply into ribcage.
Critical Timing: Stretch within 5 minutes of foam rolling when tissues remain warm and pliable. Waiting longer reduces effectiveness by 40-60% as tissues begin to re-tighten.
Posture Maintenance: Keep Your Gains Beyond Foam Rolling
Correcting poor posture requires ongoing attention—not a one-time fix. Maintain your improvements with these science-backed strategies:
Ergonomic Optimization: Position computer screen at eye level to prevent forward head posture. Place small lumbar support in chair to maintain natural spinal curves. Set phone reminders to check posture every 30 minutes.
Movement Breaks: Stand and walk for 2 minutes every 30-45 minutes of sitting. Perform 5 “standing tall” resets daily: stand against wall with head, shoulder blades, and buttocks touching surface, hold 30 seconds while breathing deeply.
Strengthening Protocol: Perform daily face pulls (3 sets of 15 reps) and bridges (3 sets of 20 reps) to build the muscular support necessary for maintaining proper alignment. Weak muscles cannot hold corrected positions regardless of tissue release.
Consistency beats intensity—daily 15-minute sessions produce better long-term results than infrequent hour-long marathons. Track your progress with weekly posture photos to stay motivated. Within 4-6 weeks of consistent practice, you’ll stand taller, breathe deeper, and move with greater ease—proof that your body can reset its postural defaults with the right approach.


