
Nothing ruins your workout momentum like tight, aching thighs that make even simple movements uncomfortable. If you’ve ever wondered how to use a foam roller for thighs to relieve that stubborn tightness, you’re not alone—millions of fitness enthusiasts and desk workers struggle with thigh tension daily. Whether you’re a runner battling quad fatigue, a cyclist dealing with hamstring strain, or someone who spends hours seated at a desk, targeted foam rolling can transform how your legs feel and function. This guide delivers precise, step-by-step instructions for rolling every thigh muscle group effectively, so you can unlock greater mobility, reduce pain, and recover faster after physical activity.
Choose the Right Foam Roller for Thigh Work

Selecting appropriate equipment makes or breaks your foam rolling experience. For most thigh work, a standard 18-inch cylindrical roller provides optimal coverage without requiring constant repositioning. Beginners should start with a soft density roller that delivers gentle pressure while still providing tissue release. As your tolerance builds, progress to medium or firm rollers that penetrate deeper into dense thigh muscles. Avoid expensive vibrating rollers initially—master basic technique before adding complexity.
Check your roller’s surface texture before purchasing. Smooth rollers work well for general use, while textured rollers with ridges or bumps target specific trigger points in stubborn thigh muscles. If you have particularly tight quads or IT bands, consider a dual-grid roller that provides deeper tissue release without excessive pain. Store your roller horizontally when not in use to prevent warping that could create uneven pressure points during your sessions.
Position Yourself Correctly for Effective Quad Rolling
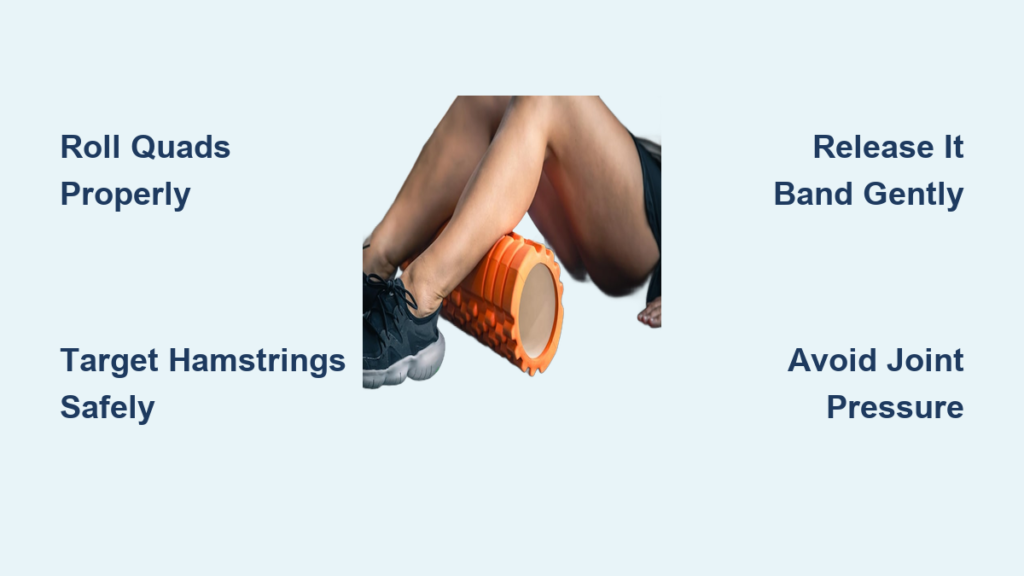
Your positioning determines whether foam rolling provides relief or causes unnecessary pain. To target your quadriceps properly, lie face down with the roller positioned just above your kneecap. Place your hands directly beneath your shoulders to lift your upper body while keeping your core engaged. Shift your weight to the leg being rolled by bending your opposite knee and placing that foot flat on the floor for stability.
Slowly roll from just above your knee toward your hip bone, moving only 1-2 inches per second. When you locate a tender spot—often on the outer quad near your hip—pause and breathe deeply for 30-60 seconds until the intensity decreases by about 50%. Never roll directly over your knee joint, as this can damage sensitive structures. Complete 3-4 slow passes along each quad, spending no more than 90 seconds total per leg to avoid tissue inflammation.
How to Modify Quad Rolling for Sensitive Muscles
If standard quad rolling causes excessive pain, reduce pressure by supporting more weight through your arms. You can also bend your rolling leg slightly at the knee to decrease tension in the quadriceps. For severe tightness, try the “knee-bent” variation: lie on your side with the roller under your quad, bend your top leg, and place your foot flat on the floor in front of you. This position targets the rectus femoris muscle without overstretching your entire quad group. Always compare both legs—you’ll likely discover significant tension differences between sides that require extra attention.
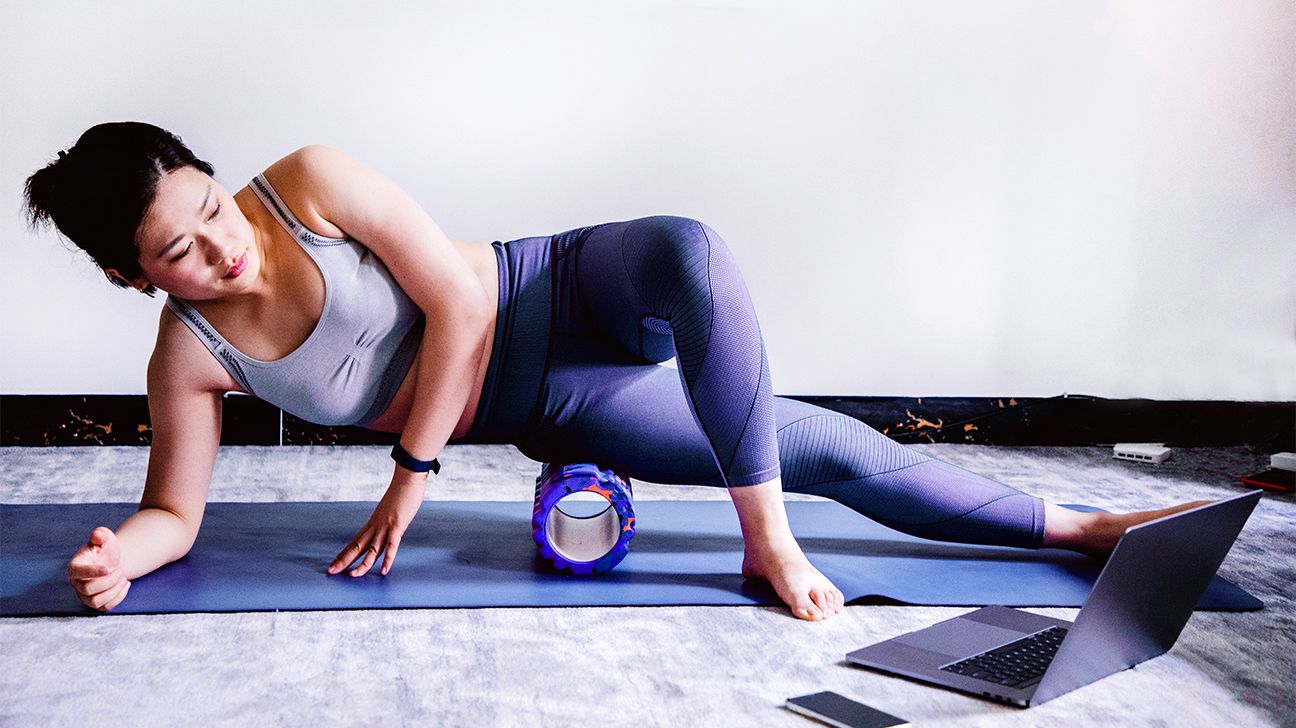
Master Hamstring Foam Rolling Without Back Strain
Hamstring rolling often causes lower back discomfort when performed incorrectly. Sit with the roller positioned just below your glutes, hands planted firmly behind you, and legs extended straight. Lift your hips slightly off the floor to apply pressure, then slowly roll from your sit bones toward your knees. Keep your feet flexed to engage the hamstrings rather than letting them relax completely.
When targeting the upper hamstring near your glutes—the area most prone to tension—cross your right ankle over your left knee if working the left leg (and vice versa). This position isolates the muscle fibers responsible for many cases of sciatica-like pain. Roll for only 60-90 seconds per hamstring to avoid overstimulating these sensitive muscles. If you experience tingling or nerve pain, immediately stop and adjust your position—never work through nerve symptoms.
Solve Common Hamstring Rolling Problems
Many people struggle with balance during hamstring rolling. Place a yoga block under your hands for additional support, or bend your knees slightly to reduce the stretch on your hamstrings. If you can’t reach tender spots near your glutes, try the “seated roll” variation: sit in a chair with the roller positioned under your thigh, then gently shift your weight side-to-side while applying downward pressure with your hands. This modified approach works well for those with limited mobility or significant hamstring tightness.
Release IT Band Tension Without Excessive Pain
Foam rolling the IT band often causes unnecessary agony when performed incorrectly. Lie on your side with the roller positioned under your outer thigh, bottom leg slightly bent for stability, and top foot resting on the floor in front of you. Support your upper body with your forearm while keeping your hips lifted to control pressure. Roll slowly from your hip bone toward your knee, stopping just above the joint.
Focus on the area midway between hip and knee where most IT band tension resides. When you find a tender spot, bend your top knee and place your foot flat on the floor behind your rolling leg. This position rotates your hip slightly, exposing different tissue fibers for more comprehensive release. Spend no more than 30 seconds on particularly sensitive spots—the IT band responds better to brief, frequent sessions than prolonged pressure. Remember that discomfort should feel like a deep ache, not sharp pain.
Why Most People Roll Their IT Band Wrong
The biggest mistake people make is rolling directly over the knee joint, which provides no therapeutic benefit and can cause injury. Another common error is using excessive body weight too soon—start with minimal pressure by supporting most of your weight through your arms, then gradually increase as your tissue adapts. If traditional side-lying IT band rolling causes hip discomfort, try the “half-kneeling” position: kneel on one knee with the roller positioned under your outer thigh, then gently shift your weight side-to-side while supporting yourself with your hands.
Optimize Your Thigh Foam Rolling Schedule
Timing and frequency determine how quickly you’ll see results from your foam rolling efforts. For general maintenance, roll your thighs 2-3 times weekly—more often if recovering from intense activity. The optimal time is post-workout when muscles are warm, though morning sessions can relieve overnight stiffness. Each muscle group needs only 60-90 seconds of targeted rolling; longer sessions provide diminishing returns and may cause inflammation.
Pair foam rolling with static stretching for maximum flexibility gains. Roll your quads first, then immediately perform a kneeling quad stretch. Roll your hamstrings, then follow with a seated toe touch. This sequence takes advantage of the temporary increase in tissue pliability from foam rolling to achieve greater range of motion during stretching. Drink 16-24 ounces of water within 30 minutes after rolling to help flush released metabolic waste from your muscles.
Avoid These Critical Foam Rolling Mistakes
Rolling too quickly ranks as the #1 foam rolling mistake that renders the practice ineffective. Your muscles need time to respond to pressure—moving faster than 1 inch per second prevents proper tissue release. Another common error involves rolling directly over joints or bones instead of muscle tissue. Never roll your knee cap, hip bone, or the sensitive area behind your knee—these structures require different treatment approaches.
Many people mistakenly believe more pressure equals better results. Excessive force triggers your muscles to tense up defensively, counteracting the relaxation you’re trying to achieve. Start with lighter pressure and gradually increase as your tissue adapts over multiple sessions. Finally, neglecting to breathe properly sabotages your efforts—deep, rhythmic breathing helps your nervous system relax into the pressure, making the experience more productive and less painful.
Integrate Foam Rolling Into Your Daily Routine
Consistency matters more than perfection when learning how to use a foam roller for thighs. Attach your roller to your workout bag so it’s always available post-exercise, or keep it beside your desk for quick tension relief during work breaks. Even just 5 minutes daily targeting your tightest areas delivers better results than sporadic 20-minute sessions.
Combine foam rolling with activities you already do: roll your quads while watching TV, work on your hamstrings while listening to a podcast, or address IT band tension while catching up on emails. This habit stacking makes foam rolling feel less like an additional chore and more like a natural extension of your existing routine. Track your progress by noting how specific movements feel before and after rolling—you’ll quickly recognize improvements in your squat depth, running stride, or simple stair climbing.
Mastering how to use a foam roller for thighs transforms leg tightness from a constant annoyance to a manageable condition. By applying these precise techniques to your quads, hamstrings, IT bands, and inner thighs, you’ll unlock greater mobility, reduce pain, and enhance your overall physical performance. Start with just 5-7 minutes daily, focusing on proper form rather than duration, and you’ll notice significant improvements within two weeks. Remember that consistency beats intensity—gentle, regular rolling delivers better long-term results than infrequent, aggressive sessions. Your thighs power nearly every movement you make; give them the regular care they deserve through smart, targeted foam rolling.


