
Tight muscles and stubborn knots can derail your day, whether you’re an athlete pushing limits or someone who spends hours at a desk. Trigger point massage balls deliver concentrated pressure exactly where you need it, breaking up muscle adhesions and restoring natural movement without expensive therapy sessions. When your shoulders feel like concrete after a long workday or your calves tighten from weekend hikes, knowing how to use trigger point massage ball techniques properly transforms pain into relief—often within minutes. This guide reveals precise methods to target problem areas safely and effectively, helping you reclaim mobility and prevent recurring tension from controlling your life.
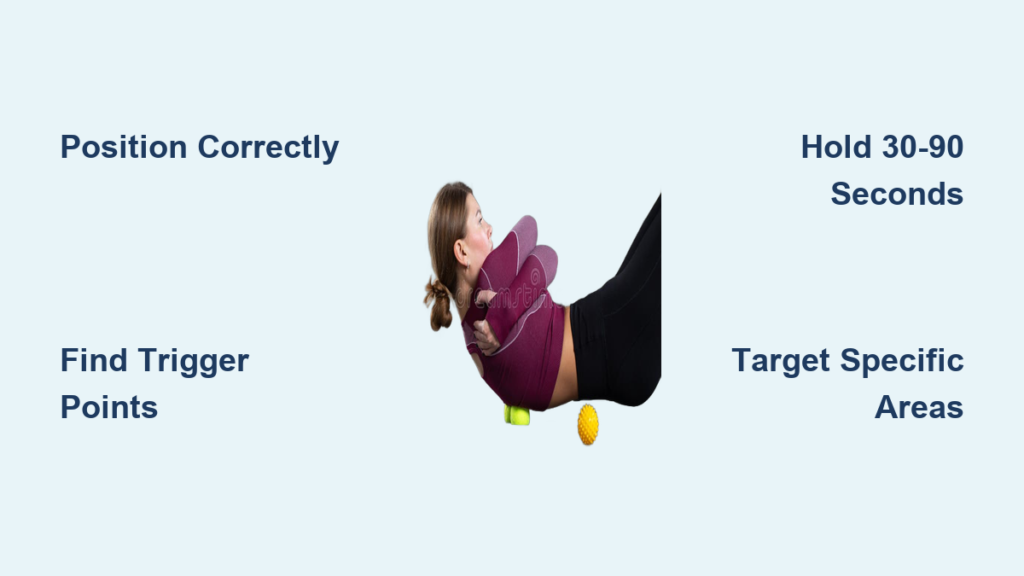
Position Yourself Correctly for Maximum Effect
Your body positioning determines whether you’ll achieve deep tissue release or merely skate across the surface of your muscles. Proper alignment creates controlled pressure that reaches deep into stubborn knots while protecting your joints from unnecessary strain.
Start by identifying whether you need wall-based or floor-based positioning based on the target area. For upper body work like shoulders and upper back, stand with the massage ball between your trigger point and a solid wall—your body weight becomes your pressure control. Press gently at first, then slowly lean in until you feel a deep, manageable ache. Your feet should be shoulder-width apart with one foot slightly forward for stability as you gently shift your weight to increase or decrease pressure.
For lower body treatment on hips, glutes, or hamstrings, floor positioning works best. Lie on your back or side with the ball placed precisely under the tender spot, using your arms and opposite leg to control how much body weight presses down. When targeting your piriformis muscle (a common source of sciatic pain), sit directly on the ball with one ankle crossed over the opposite knee, then gently rock side to side while maintaining steady pressure. Keep your core engaged throughout to prevent rolling unexpectedly and maintain control.
Never position yourself where you can’t quickly remove pressure. If working on your back against a wall, keep one hand free to catch yourself if you lose balance. On the floor, ensure you have space to roll off the ball immediately if discomfort becomes sharp or unbearable. Your safety and control always trump deeper pressure.
Identify Trigger Points Without Guesswork

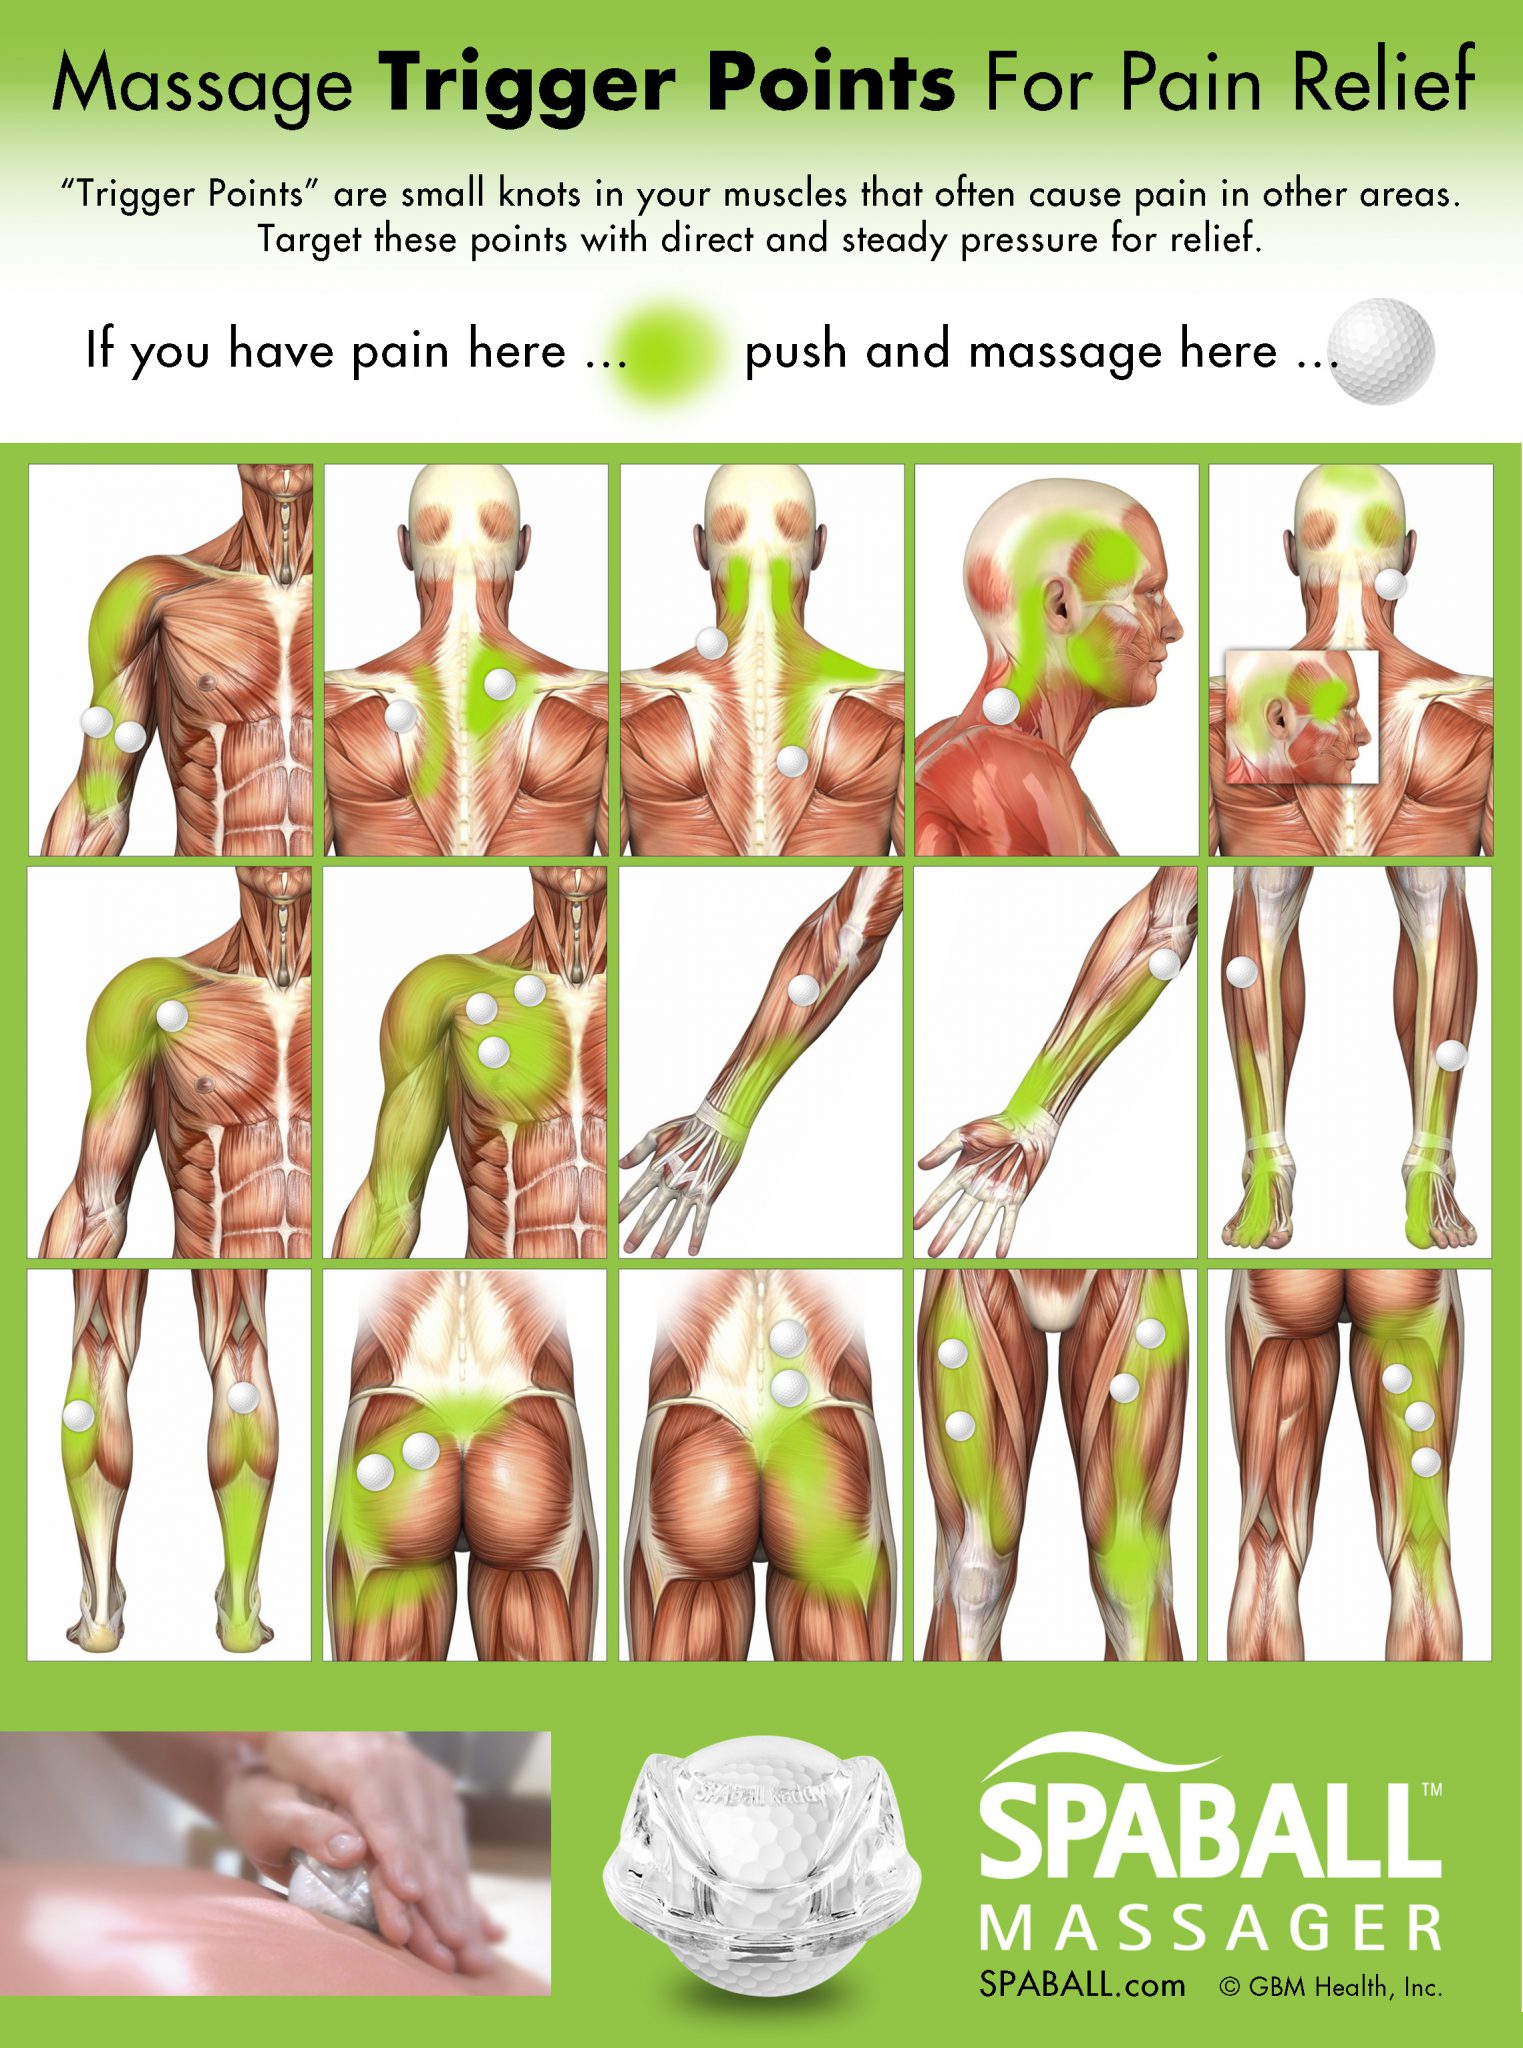
Finding the exact spot that needs attention separates effective treatment from random poking that yields minimal results. Trigger points create specific patterns of referred pain—pressing the right spot might cause familiar discomfort in a seemingly unrelated area, revealing the true source of your pain.
Begin your search with light pressure using your fingers, systematically scanning the muscle in small circular motions. When you locate a potential trigger point, apply firm but gentle pressure for 10-15 seconds. If it’s the real culprit, you’ll notice one or more telltale signs: the spot feels distinctly harder than surrounding tissue, pressing it reproduces your familiar pain pattern, or you experience referred pain in another area. For example, a trigger point in your upper trapezius might cause pain to radiate down your arm or into your temple.
What to Watch For During Assessment
- The twitch response: A visible or palpable jump in the muscle when pressure is applied
- Referred pain patterns: Discomfort that travels to a predictable location (charts exist for common patterns)
- Range of motion changes: Improved movement after releasing the point
- Temperature differences: Some active trigger points feel slightly warmer
Document your findings by marking tender spots with a washable marker or taking mental notes about which positions reproduce your symptoms. This tracking helps you distinguish between primary trigger points (the actual source) and satellite points (reactive spots that develop later).
Apply Pressure Using the 30-90 Second Rule
Most people make the critical mistake of rolling rapidly over muscles or holding pressure too briefly, never allowing the tissue to fully release. Effective trigger point therapy follows a simple but precise timing principle that maximizes results while minimizing soreness.
When you locate a trigger point, position the ball directly on the spot and apply steady pressure until you feel a deep ache—about a 7 on a 1-10 pain scale where 10 is unbearable. Maintain this pressure for 30 to 90 seconds without moving, breathing deeply throughout. During this time, you’ll typically experience three distinct phases: initial sharp discomfort (5-15 seconds), a plateau of sustained ache (15-45 seconds), and finally a noticeable softening or release (beyond 45 seconds).
Adjusting Pressure for Different Muscle Groups
- Delicate areas (neck, feet): 30-45 seconds at lighter pressure
- Medium muscles (shoulders, arms): 45-60 seconds at moderate pressure
- Large muscles (glutes, quads): 60-90 seconds at deeper pressure
If the pain exceeds an 8 or causes muscle guarding (involuntary tightening), reduce pressure immediately—you’re triggering protective tension that works against your goal. Wait 15 seconds, then try again at a lower intensity. Remember: effective trigger point release should feel challenging but never cause you to hold your breath or tense other muscles.
Target Problem Areas with Precision Techniques
Generic rolling won’t resolve stubborn trigger points—you need specialized approaches for different body regions that account for muscle depth, surrounding structures, and common pain patterns.
Relieve Shoulder Tension Without Harming Your Neck
The upper trapezius and levator scapulae muscles commonly develop trigger points from desk work and stress. Stand with the ball against the wall at shoulder height, then lean in while turning your head slightly away from the ball. This positioning isolates the muscle fibers without compressing your neck arteries. Hold for 45 seconds while taking slow diaphragmatic breaths, then gently rotate your head in small circles to encourage release.
Eliminate Plantar Fascia Pain in Your Feet
Sit in a chair with the massage ball under your arch, placing your other foot on top for added pressure. Roll slowly forward and back just 1-2 inches—not the entire foot—to target the plantar fascia origin near the heel where most pain originates. Apply moderate pressure for 30 seconds on the most tender spot, then flex and point your toes 5 times to reset the tissue. Repeat twice daily for chronic heel pain.
Release Hip Flexors That Cause Lower Back Pain
Kneel on the floor with the ball placed just inside the front hip bone, then slowly lower onto it while supporting yourself with your hands. Shift your weight to find the exact tender spot, then maintain pressure for 60 seconds while gently straightening and bending your back leg. This targets the psoas muscle directly—a common culprit behind “unexplained” lower back pain.
Prevent Common Mistakes That Worsen Pain

Even with proper technique, these frequent errors sabotage your trigger point therapy results and can actually intensify muscle tension.
Rolling too quickly creates superficial friction that heats the tissue without releasing deep adhesions. Instead, move incrementally—just 1-2 inches at a time—and pause on tender spots. Imagine you’re ironing out a crumpled piece of paper rather than sweeping a broom across the surface.
Over-treating the same area causes microtrauma that leads to increased inflammation. Limit sessions to 90 seconds per trigger point maximum, and wait 48 hours before re-treating the same spot. If you’re sore the next day, you’ve gone too deep or too long.
Ignoring referred pain patterns makes you treat symptoms rather than causes. That knee pain might actually stem from a trigger point in your quadriceps—learn common referral patterns to target the real source.
Integrate Daily Maintenance for Lasting Results
Trigger point therapy works best as preventive maintenance rather than emergency treatment when pain becomes unbearable. Incorporate these simple daily practices to keep muscles supple and prevent knots from forming.
Spend just 5 minutes each morning rolling major muscle groups while watching the news or having coffee. Focus on areas prone to tension for your activity level—calves and hips for runners, shoulders and neck for desk workers. Follow with 30 seconds of gentle stretching in the same muscle group to lock in the improved flexibility.
After workouts, spend 3-5 minutes addressing the muscles you just stressed before they cool down and tighten. This post-activity window delivers dramatically better results than waiting hours or days. Pair this with proper hydration to flush metabolic waste released during the release process.
Keep your massage ball visible as a visual reminder—on your desk, next to your yoga mat, or in your bedside table. Out of sight means out of mind, and consistency creates the cumulative benefits that transform occasional relief into permanent tension reduction.
Mastering how to use trigger point massage ball techniques transforms occasional pain relief into lasting muscle health. By positioning yourself correctly, identifying true trigger points, applying precise pressure for optimal duration, targeting problem areas with specialized techniques, avoiding common pitfalls, and integrating daily maintenance, you gain control over your body’s tension patterns. Start with just two key areas each day for 5 minutes total, focusing on quality over quantity, and notice improved mobility within a week. The most effective users treat their massage ball like a toothbrush—small, consistent sessions prevent major problems before they start. Keep your ball accessible, listen to your body’s feedback, and soon you’ll recognize the subtle signs of developing tension before it escalates into debilitating pain.


