
You’ve probably seen resistance bands hanging in gyms or tucked into travel bags, but many people struggle to use them effectively. These stretchy workout tools offer incredible versatility for strength training anywhere, yet most beginners waste their potential by using improper form or selecting the wrong resistance level. When used correctly, resistance bands can build muscle, improve flexibility, and enhance athletic performance without bulky equipment. In this guide, you’ll learn exactly how to use resistance bands for maximum results—covering proper techniques, common mistakes to avoid, and specific exercises targeting every major muscle group.
Selecting the Right Resistance Band for Your Fitness Level
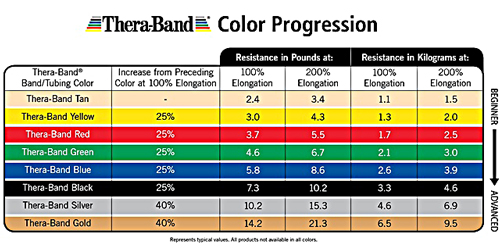
Choosing an inappropriate resistance level is the most common mistake beginners make with resistance bands. Too light provides minimal challenge, while too heavy compromises form and increases injury risk. Most bands use color-coding to indicate resistance levels, but these vary by manufacturer—always check the specific tension measurement in pounds.
Determine Your Starting Resistance Level
Begin with lighter resistance than you think you need. Test bands by performing 15 controlled repetitions of a basic exercise like bicep curls. If you can complete all reps with perfect form but feel significant tension on the last 3-5 repetitions, that’s your ideal starting point. For most beginners, this means yellow or green bands (light to medium resistance).
Recognize When to Progress to Stronger Bands
Track your workout performance to determine when to increase resistance. When you can complete all sets with proper form while feeling only moderate effort, it’s time to move up. A good rule is progressing when you can perform 25% more repetitions than your target with the same band. This typically happens every 4-6 weeks with consistent training.
Proper Grip and Anchoring Techniques for Maximum Effectiveness
How you hold and secure resistance bands dramatically impacts workout effectiveness. Many users unknowingly reduce tension by gripping too tightly or anchoring improperly, sabotaging their results.
Master the Closed-Loop Band Grip
For looped resistance bands, position the band slightly away from your joints where leverage is strongest. When performing squats, place the band just above your knees—not on your shins—to maximize glute activation. Maintain a relaxed grip with your hands (if using handles) to prevent forearm fatigue from stealing energy from your target muscles.
Create Secure Anchor Points for Door Attachments
Door anchors should sit in the closed door’s hinge side, not the handle side, for maximum stability. Close the door firmly on the anchor strap, then test by pulling gently before adding tension. Never anchor to loose objects or unstable furniture—this creates dangerous recoil risks when the band snaps free.
Essential Resistance Band Exercises for Upper Body Strength
Upper body training with resistance bands requires specific techniques to mimic free weight resistance while accommodating the unique tension curve of elastic resistance.
Build Wider Shoulders with Lateral Raises
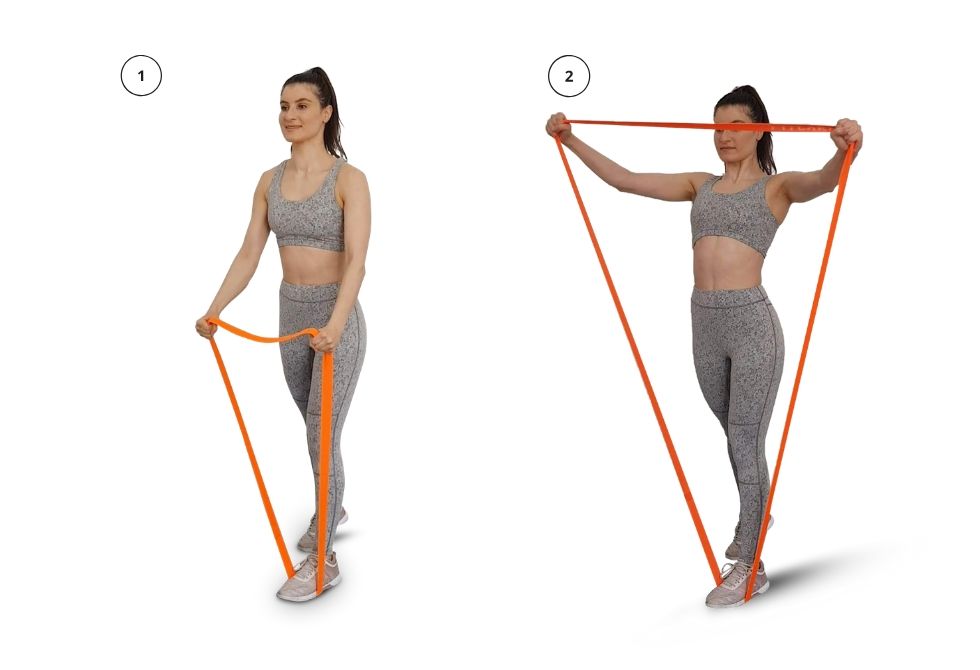
Stand with feet hip-width apart, placing the band under both feet. Hold the band ends with palms facing your body. Keeping a slight bend in elbows, raise arms out to sides until they reach shoulder height. Focus on leading with your elbows rather than hands to maximize deltoid engagement. Complete 3 sets of 12-15 repetitions with controlled lowering.
Why Most People Fail at Band Lateral Raises
The most common mistake is using momentum by swinging the torso. Keep your core tight and imagine holding a pencil vertically between your shoulder blades to maintain proper posture. If you can’t complete reps without swinging, reduce resistance immediately.
Lower Body Resistance Band Workouts That Actually Build Muscle
Resistance bands excel at lower body training by providing accommodating resistance that increases as muscles get stronger through the movement range.
Activate Glutes with Banded Hip Thrusts
Sit on the floor with your upper back against a stable bench or sofa. Place a medium resistance band just above your knees and roll a mat under your shoulders for comfort. Drive through your heels to lift hips until your body forms a straight line from shoulders to knees. Squeeze glutes hard at the top for two seconds before lowering. Perform 4 sets of 15 repetitions with 60 seconds rest between sets.
Strengthen Quads with Banded Squats
Stand with the band looped above your knees, feet slightly wider than hip-width. Initiate the movement by pushing hips back as if sitting in a chair, keeping knees tracking over toes. Descend until thighs are at least parallel to the floor, then drive through heels to return to start. The band creates outward pressure that forces your glutes to work harder throughout the movement.
Core Training Secrets With Resistance Bands

Most people overlook resistance bands for core work, missing out on their unique ability to challenge rotational stability and anti-movement patterns.
Build Functional Core Strength with Pallof Presses
Anchor a band at chest height and stand sideways to the anchor point. Grab the band with both hands at your sternum. Step away to create tension, then press the band straight out in front of you while resisting the band’s pull to rotate your torso. Hold for 5 seconds, return slowly, and repeat 10 times per side for 3 sets. Maintain a rigid torso throughout—any rotation means the band is too heavy.
Avoid These 5 Critical Resistance Band Mistakes
Even experienced fitness enthusiasts commonly make errors that reduce effectiveness and increase injury risk when using resistance bands.
Never Snap or Release Tension Suddenly
Releasing a stretched band creates dangerous recoil that can cause serious eye injuries or muscle strains. Always maintain control when returning to the starting position. If a band snaps during use, stop immediately and inspect for damage—frayed bands should be discarded.
Don’t Overstretch Beyond 2.5x Length
Most bands maintain proper resistance properties up to 2.5 times their resting length. Stretching further dramatically increases breakage risk and creates unsafe tension spikes. If you’re consistently stretching bands to their maximum, you need a stronger resistance level.
Create a Progressive Resistance Band Training Program
Building strength with bands requires systematic progression strategies different from traditional weight training.
Implement the Double-Band Method for Advanced Lifters
When single bands become too easy, combine two bands of different resistances for compound tension. For example, use a light band for the bottom portion of a movement and a medium band for the top portion where you’re stronger. This accommodates your natural strength curve better than fixed weights.
Track Progress With the RPE Scale
Rate of Perceived Exertion (RPE) works better than rep counting for band training. After each set, rate how many more reps you could have completed with perfect form. Aim for RPE 8-9 (leaving 1-2 reps in reserve) on working sets. When you can achieve RPE 7 with the same band, it’s time to progress.
Resistance Band Safety Checklist Before Every Workout
Prevent injuries by following these essential safety protocols that most users overlook.
Inspect Bands for Microtears Before Each Use
Hold bands up to light and stretch gently to reveal small nicks or thinning areas. Pay special attention to where bands contact metal door anchors. Any visible damage means immediate replacement—microtears rapidly expand under tension.
Maintain Proper Band Alignment During Exercises
Ensure bands run straight from anchor point to your body without twisting. Twisted bands create uneven tension and increase snap-back risk. During rotational movements, consciously keep the band flat against your body to maintain consistent resistance.
Transform Your Fitness Routine With Portable Resistance Training
Resistance bands deliver gym-quality results without the equipment footprint when used with proper technique. By selecting the right resistance level, mastering anchoring techniques, and implementing progressive overload strategies, you’ll build functional strength that translates to real-world movement. The most effective resistance band users treat them as serious training tools rather than just warm-up accessories—focusing on controlled tempos, full range of motion, and progressive challenges. Start with lighter resistance than you think you need, prioritize perfect form over intensity, and systematically advance as your strength improves. Within weeks, you’ll notice improved muscle tone, greater joint stability, and enhanced athletic performance—all from a set of bands that fits in your suitcase. Keep your bands accessible and incorporate short band sessions whenever time allows—consistency with proper technique beats occasional intense sessions with poor form every time.


