
If your resistance bands are gathering dust in a closet or you’re unsure how to maximize their potential, you’re missing out on one of the most versatile fitness tools available. Elastic resistance bands deliver professional-grade strength training anywhere—no gym required—and cost a fraction of traditional equipment. Unlike free weights that provide constant resistance, bands offer accommodating resistance that increases as you stretch them, matching your natural strength curve for safer, more effective muscle engagement. This guide reveals exactly how to use elastic resistance bands to build strength, improve flexibility, and enhance your overall fitness without expensive equipment or complicated setups. You’ll discover proper techniques that prevent common injuries, targeted exercises for every major muscle group, and progression strategies that keep your workouts challenging as you get stronger—all within the first 15 minutes of reading.
Selecting the Right Resistance Band Type for Your Goals
Choosing appropriate resistance bands makes the difference between effective training and frustrating plateaus. Not all bands serve the same purpose, and understanding which type matches your current fitness level ensures immediate results from your first workout.
Match Resistance Levels to Your Strength Capacity
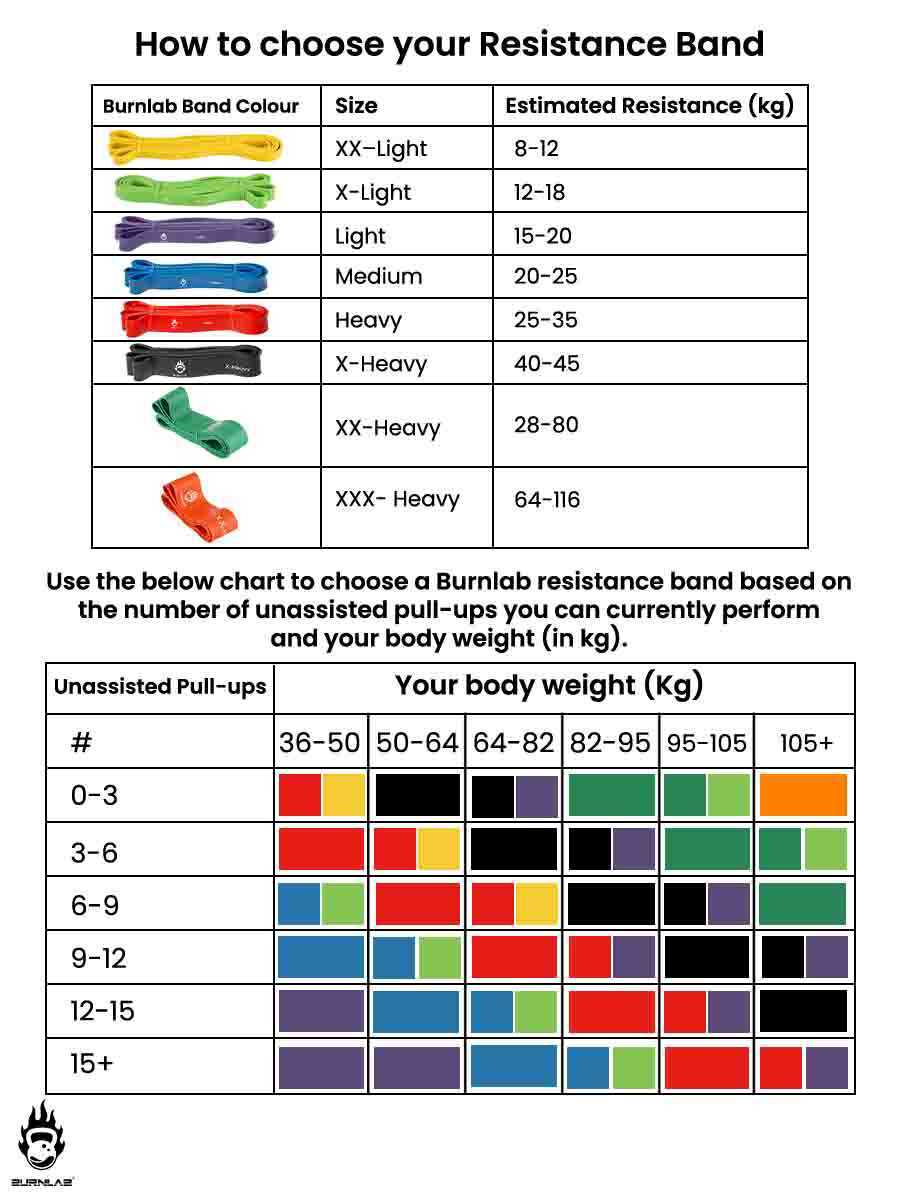
When learning how to use elastic resistance bands properly, selecting the correct tension level proves crucial for building strength without compromising form. Most resistance bands follow a color-coded system where yellow indicates extra-light resistance (2-5 lbs), green represents light resistance (5-15 lbs), red offers medium resistance (15-30 lbs), blue provides heavy resistance (30-50 lbs), and black delivers extra-heavy resistance (50-80+ lbs). Begin with a band that allows you to complete 10-15 repetitions of each exercise while maintaining perfect form—the last 2-3 reps should feel challenging but still controlled. If you can easily complete 20+ reps, step up to the next resistance level; if you struggle to reach 8 reps with proper technique, downgrade to a lighter band. Progressive strength gains occur when you consistently train at the edge of your current capacity, not by using the heaviest band possible with compromised movement quality.
Identify Which Band Styles Deliver Maximum Results
Different resistance band styles serve distinct training purposes, making your selection process more strategic than simply grabbing the nearest option. Loop bands (continuous circles without handles) excel at lower body activation exercises like glute bridges and lateral walks where consistent tension matters most. Tube bands with ergonomic handles mimic cable machine movements for upper body exercises like rows and presses, providing comfortable grip points that reduce hand fatigue during extended sets. Flat bands (long, straight strips without handles) offer maximum versatility—they can anchor to doors for pull-downs, wrap around limbs for stretching, or double up for increased resistance during advanced movements. For most home gyms, a set containing loop bands in three resistance levels and one tube band with door anchor provides comprehensive coverage for 95% of resistance band exercises.
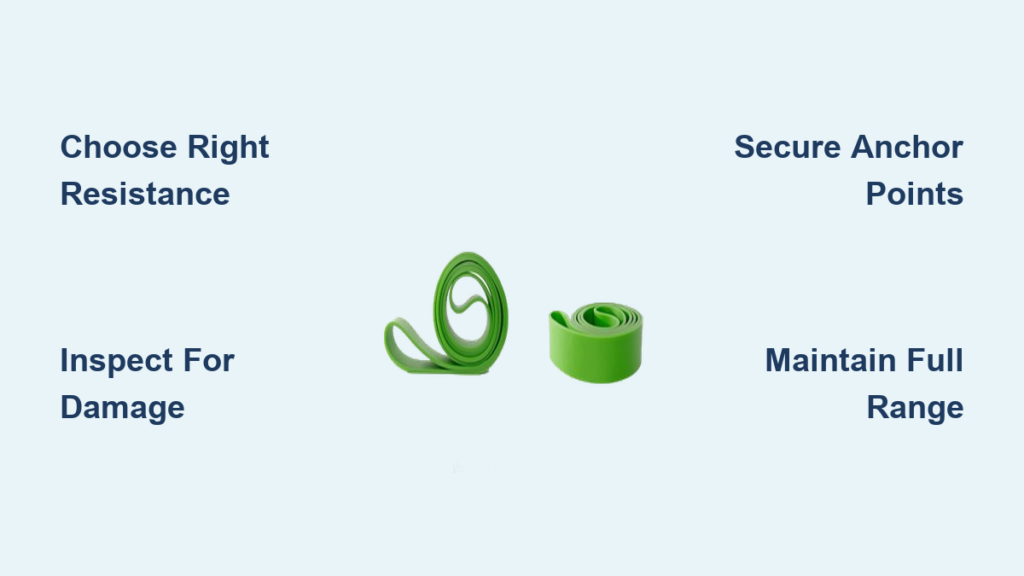
Critical Safety Practices When Using Resistance Bands

Many beginners overlook essential safety protocols when starting with resistance bands, creating unnecessary injury risks that could derail their fitness progress. Proper safety practices ensure your bands remain effective training tools rather than potential hazards.
Conduct Thorough Pre-Workout Band Inspections
Before each training session, spend 30 seconds inspecting your bands for signs of wear that could lead to sudden failure. Stretch each band gently while examining it for small nicks, cuts, or thinning areas—especially near attachment points where stress concentrates. Pay special attention to where your hands or feet contact the band repeatedly, as these high-friction zones deteriorate fastest. If you notice any discoloration, sticky residue, or permanent stretching in specific sections, retire that band immediately. A snapped band under tension can recoil with enough force to cause serious eye injuries or skin lacerations, making regular inspection non-negotiable for safe resistance band usage.
Maintain Proper Body Mechanics During Exercises
Your body positioning while using elastic resistance bands determines whether you’re effectively targeting muscles or straining vulnerable joints. Always maintain a neutral spine during exercises—avoid excessive arching in your lower back during rows or rounding forward during presses. When performing standing exercises, keep your feet shoulder-width apart with knees slightly bent to absorb tension forces and prevent loss of balance. Never lock your joints at the end range of motion; maintain a soft bend in elbows and knees to protect connective tissues from sudden stress. If you feel strain in your joints rather than muscle engagement, reduce the resistance level and focus on perfecting your form before progressing to heavier bands.
Mastering Essential Grip and Anchor Techniques
How you hold and secure resistance bands fundamentally impacts exercise effectiveness. Many beginners waste valuable training time struggling with slipping bands or ineffective anchor points that compromise their workout results.
Secure Hand Placement for Maximum Control
For loop bands, step firmly onto the center with both feet hip-width apart, ensuring the band sits securely across your arches without slipping sideways. Pull the upper portion up around your hands or shoulders depending on the exercise, maintaining even tension on both sides. When using tube bands with handles, wrap your thumb around the outside of the handle for maximum security—this “suicide grip” prevents accidental release during explosive movements. For flat bands requiring manual gripping, fold the band over itself at your desired tension point before grasping to create a thicker, more secure hold that won’t slip through your fingers during challenging sets.
Create Reliable Anchor Points for Upper Body Exercises
The door anchor attachment provided with most tube band sets transforms any standard door into a stable anchor point for upper body exercises. Insert the anchor strap through the door opening and close the door firmly on the strap portion—never rely solely on the door handle for anchoring. Position the anchor at appropriate heights: chest height for rows, overhead for pull-downs, and waist height for core exercises. Test the anchor’s security by applying gradual tension before beginning your set. For floor-level anchoring during exercises like banded pull-throughs, loop the band under your feet with feet positioned shoulder-width apart to create stable resistance that won’t slide during movement.
Effective Upper and Lower Body Resistance Band Exercises
Your resistance band workout should target all major muscle groups with exercises that maximize the unique benefits of elastic resistance compared to traditional weights.
Upper Body Strength Builders
The standing resistance band chest press develops functional pushing strength while engaging your core for stability. Step on the band with both feet, bring handles to chest height with elbows out, then press forward until arms extend fully. Squeeze your chest at full extension before slowly returning to start position over 3 seconds. For back development, the seated band row—performed with the band anchored at waist height—allows you to focus purely on scapular retraction without balance demands. Pull handles toward your lower ribs while keeping elbows close to your body, squeezing shoulder blades together at peak contraction.
Lower Body Power Movements
Banded squats with a loop band above your knees activate dormant glute muscles often neglected in traditional squats. Position the band above your knees, then squat while actively pushing knees outward against the band’s resistance throughout the movement. This technique corrects common knee cave-in issues while building functional leg strength. For hamstring development, the resistance band Romanian deadlift provides continuous tension through the entire range of motion. Stand on the band with feet hip-width apart, hinge at your hips while maintaining a neutral spine, and feel the stretch in your hamstrings before returning to standing position with controlled tension.
Avoiding Common Resistance Band Mistakes
Even experienced fitness enthusiasts make preventable errors when using resistance bands that limit results or increase injury risk.
Never Sacrifice Form for Resistance Level
The most frequent mistake among beginners involves using bands that are too heavy, leading to compromised form and reduced muscle activation. If you find yourself swinging your body, arching your back excessively, or unable to control the return phase of each repetition, immediately switch to a lighter band. Quality repetitions with proper form build more strength than sloppy repetitions with excessive resistance. Focus on the mind-muscle connection—consciously feeling the target muscles working throughout each movement—rather than simply completing repetitions.
Maintain Full Range of Motion Consistently
Many users unknowingly limit their range of motion by only moving through portions where the band provides maximum tension. True strength development requires working muscles through their complete functional range. During chest presses, extend arms fully (without locking elbows) before returning to a stretched position with elbows bent outward. For rows, pull until handles touch your lower ribs, then extend arms fully in front of you while maintaining light tension. This complete range of motion maximizes muscle fiber recruitment and delivers superior strength gains compared to partial movements.
Developing Progressive Resistance Band Workouts

Structured progression ensures continuous improvement rather than spinning your wheels with the same routine week after week.
Implement Systematic Progression Strategies
When learning how to use elastic resistance bands for long-term results, implement progressive overload through multiple methods beyond simply switching to heavier bands. Increase time under tension by slowing the eccentric (return) phase of each repetition to 3-4 seconds. Add sets gradually—from 2 sets to 3 sets per exercise—once you can complete all prescribed repetitions with perfect form. Incorporate advanced techniques like isometric holds (pausing at peak contraction for 2-3 seconds) or variable resistance (using two bands for the concentric phase and one band for the eccentric phase). Track your workouts to ensure consistent progression—when an exercise becomes too easy, it’s time to increase the challenge through one of these methods.
Design Balanced Weekly Training Programs
An effective resistance band program includes push, pull, and lower body movements performed with appropriate frequency. Beginners should start with full-body workouts 2-3 times weekly, allowing at least one rest day between sessions. Each workout should include 1-2 exercises per major muscle group: chest press or push-up for pushing, row or pull-down for pulling, squat variation for quads, hip hinge for hamstrings, and overhead press for shoulders. As you advance, consider upper/lower splits (4 days weekly) or push/pull/legs splits (6 days weekly) to increase volume for each muscle group while maintaining adequate recovery.
Proper Resistance Band Care and Maintenance
Extending the lifespan of your resistance bands saves money and prevents dangerous failures during workouts.
Store Bands Correctly to Maximize Durability
Store resistance bands in a cool, dry place away from direct sunlight and heat sources that accelerate material degradation. Never tightly coil bands—loosely drape them over hooks or store them flat to prevent stress lines from forming at fold points. Keep bands away from sharp objects and chemicals that could compromise material integrity. After sweaty workouts, wipe bands with a dry cloth before storage to prevent moisture buildup that weakens elastic fibers over time.
Recognize When to Replace Worn Bands
Even with proper care, resistance bands eventually lose elasticity and become safety hazards. Replace bands showing permanent stretching (they don’t return to original length when relaxed), surface cracking, or significant discoloration. If a band requires noticeably more stretch to achieve the same resistance level it previously provided, it’s time for replacement. For regular users, plan to replace loop bands every 3-6 months and tube bands every 6-12 months to maintain consistent resistance and prevent unexpected failures during training.


