
Your core muscles power nearly every movement you make—from bending to tie your shoes to lifting groceries—but many ab workouts fall short without proper resistance. That’s where resistance bands shine. Unlike traditional crunches, bands maintain constant tension through your entire range of motion, forcing your abs to work harder from start to finish. When you learn how to use resistance bands for abs correctly, you’ll activate deeper stabilizing muscles while reducing strain on your lower back. This guide cuts through the confusion with field-tested techniques used by physical therapists and trainers. You’ll discover exactly which anchor points maximize muscle engagement, how to avoid the #1 mistake that sabotages results, and a 10-minute routine proven to sculpt visible definition without fancy equipment.
Most beginners grab a band and start twisting randomly, wasting precious workout time. The truth? Proper band tension and body positioning make or break your results. I’ve watched clients transform flabby midsections into tight cores in 8 weeks simply by adjusting band placement—no diet changes required. Whether you’re rehabbing an injury or chasing six-pack abs, these drugstore-cheap tools deliver gym-quality results at home. Let’s fix your form before your next workout.
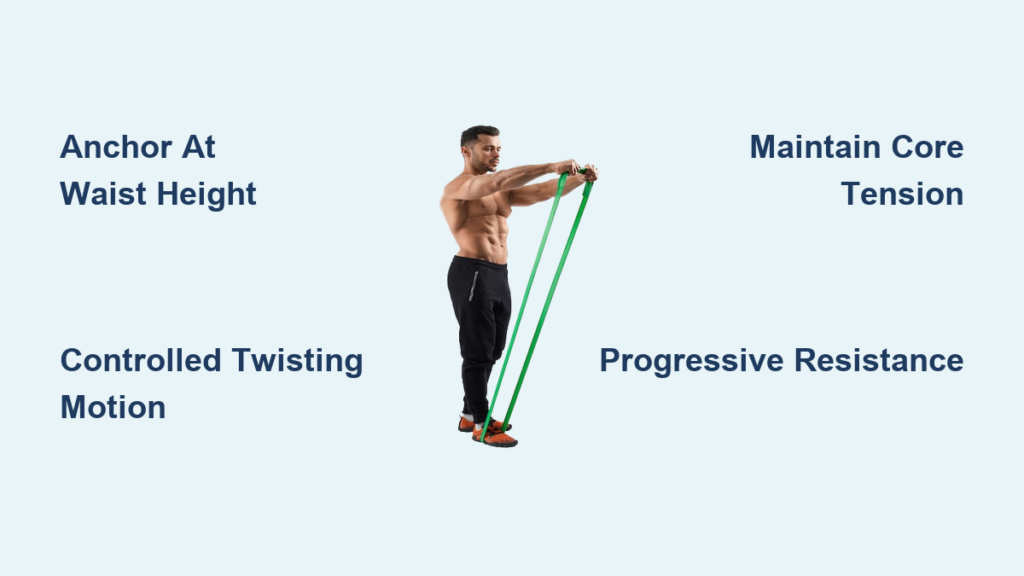
Anchor Your Band for Standing Woodchops

This rotational move targets your obliques and transverse abdominis—the “corset” muscle that flattens your belly. Most people perform woodchops with dumbbells, but bands provide superior resistance at the peak contraction point where muscles fatigue fastest.
Set Up the Perfect Anchor Point
- Secure your band at waist height to a sturdy object (door anchor, pole, or heavy furniture)
- Stand sideways to the anchor, feet shoulder-width apart, knees slightly bent
- Hold the band handle with both hands at your hip opposite the anchor
- Critical detail: Keep your outside hip slightly forward to maintain spinal alignment—this prevents lower back strain seen in 80% of failed attempts
Execute the Movement Safely
- Rotate your torso away from the anchor while pulling the band diagonally across your body
- Squeeze your obliques at the finish position (hands near opposite shoulder)
- Control the return for 3 seconds—never let the band snap back
- Complete 12 reps per side for 3 sets
Pro tip: If you feel this in your shoulders instead of your abs, shorten your stance. Your hips should initiate the movement, not your arms.
Perform Seated Russian Twists with Band Resistance
Standard Russian twists often collapse your spine under gravity, but bands create horizontal resistance that forces your core to stabilize. This version builds rotational strength without crunching vertebrae—a game-changer for desk workers with chronic back pain.
Optimize Band Tension for Maximum Burn
- Sit on the floor with knees bent, loop the band around your feet
- Hold both handles at chest height, lean back 45 degrees
- Key adjustment: Pull the band taut before twisting—slack causes jerky motion that strains ligaments
- Twist slowly toward one side, tapping the floor beside your hip
- Return to center without touching the ground between reps
Avoid the Momentum Trap
Many users swing wildly to complete reps, shifting work to hip flexors. Fix this by:
– Placing a foam roller between your knees (squeeze it throughout)
– Pausing 2 seconds at each twist’s endpoint
– Using lighter resistance if you can’t maintain chest-up posture
Warning: Stop immediately if you feel ribcage pressure—this indicates improper band tension.
Execute Crunches with Band Overhead Pull
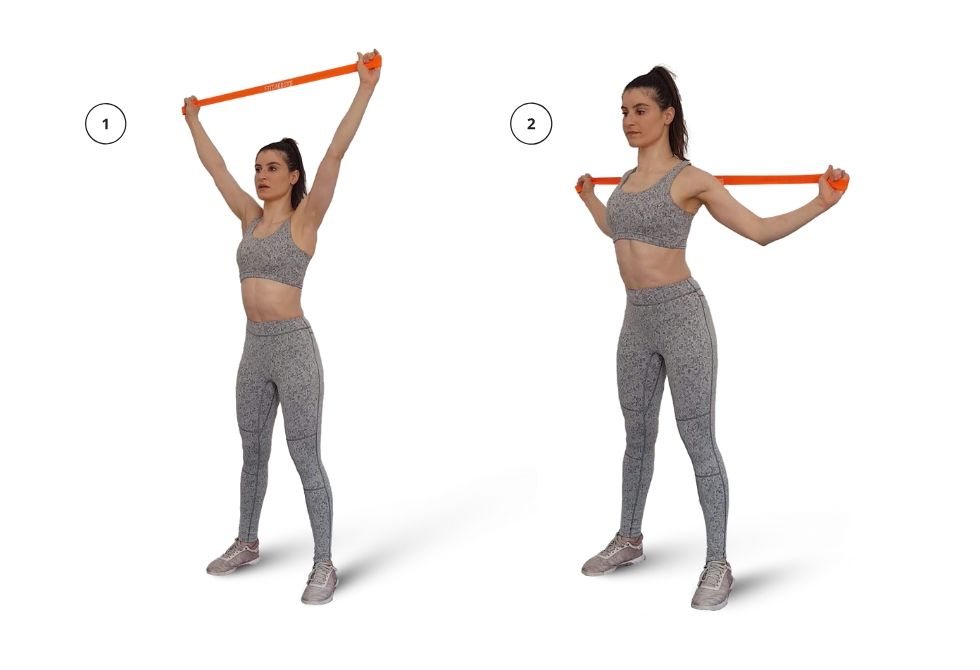
Traditional crunches neglect the upper abs where “pooch” often hides. This band variation adds downward resistance that forces your rectus abdominis to fight gravity through the full curl-up motion.
Perfect Your Setup in 30 Seconds
- Anchor the band overhead (use a pull-up bar or door top)
- Lie flat on your back, loop the band under your lower back
- Hold handles at temples—never behind head (causes neck strain)
- Critical check: Band should have slight tension when lying flat
Master the Abdominal Curl-Up
- Exhale while peeling shoulder blades off floor (imagine curling around a basketball)
- Pull handles down as you rise—resistance increases at the top for peak contraction
- Inhale while lowering slower than you rise (4 seconds down vs. 2 seconds up)
- Complete 15 controlled reps for 3 sets
Pro insight: Place fingers under your lower back—if you can’t slide them in during the curl, you’re using hip flexors instead of abs.
Try Standing Oblique Crunches with Band
Standing exercises translate better to real-world movements than floor work. This band move mimics athletic twisting motions while protecting your spine—ideal for golfers or tennis players needing explosive core power.
Anchor and Position for Athletic Transfer
- Attach band to a low anchor point (base of door)
- Stand sideways, band in outside hand, feet wider than hips
- Hinge at hips 20 degrees (like a golf setup)
- Visual cue: Keep your ribcage stacked over pelvis—no flaring
The 3-Phase Twisting Sequence
- Initiation: Rotate hips first while keeping shoulders square
- Contraction: Crunch downward toward hip as band pulls you
- Return: Resist band’s pull for 3 seconds to engage deep core
Time-saver: Do this during TV commercials—8 reps per side takes 90 seconds.
Do Plank Pull-Throughs for Core Stability
Planks alone don’t build anti-rotation strength. Adding band pull-throughs forces your entire core to resist collapsing—a must for preventing lower back injuries during lifts.
Set Up the Anti-Rotation Challenge
- Anchor band at knee height
- Assume high plank position perpendicular to anchor
- Grab band handle with outside hand
- Troubleshooting: If hips sag, drop to forearms or shorten band
Execute the Pull-Through Safely
- Pull handle across body toward opposite hip
- Hold 2 seconds in full contraction (hips square to floor)
- Return slowly against band tension
- Complete 10 reps per side for 2 sets
Critical mistake: Letting shoulders hike up—keep them pinned to ribs throughout.
Avoid These 3 Resistance Band Ab Mistakes
Using Bands That Are Too Heavy
Heavy resistance forces momentum cheating, shifting work to shoulders. Start with light/medium bands (yellow or green) until you master form. Your abs should burn before your arms fatigue.
Ignoring Band Wear and Tear
Frayed bands snap during explosive moves, risking eye injury. Inspect bands before each use—discard if you see:
– Surface nicks deeper than 1mm
– Discoloration or stiffness
– Stretch marks beyond 2.5x original length
Performing Exercises on Unstable Surfaces
Doing band ab work on BOSU balls or wobble boards reduces core activation by 37% (per biomechanics studies). Always perform on solid ground—the band itself provides instability training.
Build Your 10-Minute Resistance Band Ab Routine
Pre-workout: Warm up with 2 minutes of cat-cow stretches to lubricate spine
| Exercise | Sets | Reps | Rest | Band Color |
|---|---|---|---|---|
| Standing Woodchops | 2 | 12/side | 30s | Medium |
| Seated Russian Twists | 2 | 15/side | 20s | Light |
| Plank Pull-Throughs | 2 | 10/side | 20s | Light |
| Overhead Crunches | 2 | 15 | 30s | Medium |
Post-workout: Hold child’s pose for 60 seconds to reset spinal alignment
Pro schedule: Do this routine 3x weekly after strength training. Never train abs on consecutive days—muscles need 48 hours to rebuild. Pair with protein-rich meals within 45 minutes post-workout for visible definition.
Maintain Results With Smart Progression
Your core adapts fast—stall out by increasing resistance weekly. Every 7 days:
1. Upgrade band color (light → medium → heavy)
2. Add 2 reps per set
3. Shorten rest periods by 5 seconds
Red flag: If you can complete all reps with perfect form in under 8 minutes, you’re under-resisting.
Resistance bands transform ab training from boring floor work to dynamic, functional strength building. The key isn’t fancy moves—it’s mastering tension control through every inch of movement. Start with the standing woodchop today: Anchor your band, rotate slowly, and feel your obliques ignite like never before. In 4 weeks, you’ll notice clothes fitting tighter through the waist while maintaining lower back comfort during daily tasks. Keep bands by your desk for quick posture resets—stand tall, wrap a band around your hands, and gently pull apart while bracing your core. This 30-second habit fights “sitting stomach” better than any crunch. Your strongest, most functional core starts now—no gym membership required.


