
Struggling to complete your first dip? You’re not alone. Dips rank among the most challenging upper body exercises, with many fitness enthusiasts hitting a wall before mastering even a single repetition. The good news: resistance bands transform this advanced movement into something accessible for beginners while offering continued value for experienced lifters. Learning how to use resistance bands for dips properly bridges the gap between where you are now and where you want to be—performing clean, unassisted dips with confidence. This guide reveals exactly how to set up, execute, and progress with band-assisted dips so you can build the chest and tricep strength that unlocks new levels of upper body power.
Why Your First Dip Feels Impossible (And How Bands Fix It)
Dips demand significant upper body strength relative to your body weight, requiring you to lift 70-100% of your total mass through a challenging range of motion. For beginners or those recovering from injury, this often means failing before completing a single repetition with proper form. The physics of band-assisted dips solves this problem elegantly—when you loop a resistance band over your dip station’s bar and step into it, the elastic tension creates upward force that counteracts gravity. At the bottom of the movement (where you’re weakest), the band provides maximum assistance. As you push upward (where you’re strongest), the assistance naturally decreases. This graduated resistance pattern means you’re always working at the edge of your capabilities without compromising form or risking injury.
How to Position Your Band for Optimal Assistance
The magic happens when you place the band correctly. Drape a loop band over the pull-up bar so both ends hang down evenly. Step onto the band with both feet positioned slightly forward of your body, creating a diagonal line from the bar through your feet to the floor. This forward foot placement maintains your natural dip lean while ensuring consistent band tension. Test the setup by simulating the dip motion—your feet should remain stable on the band without slipping, and the assistance should feel substantial but not overwhelming at the bottom position.
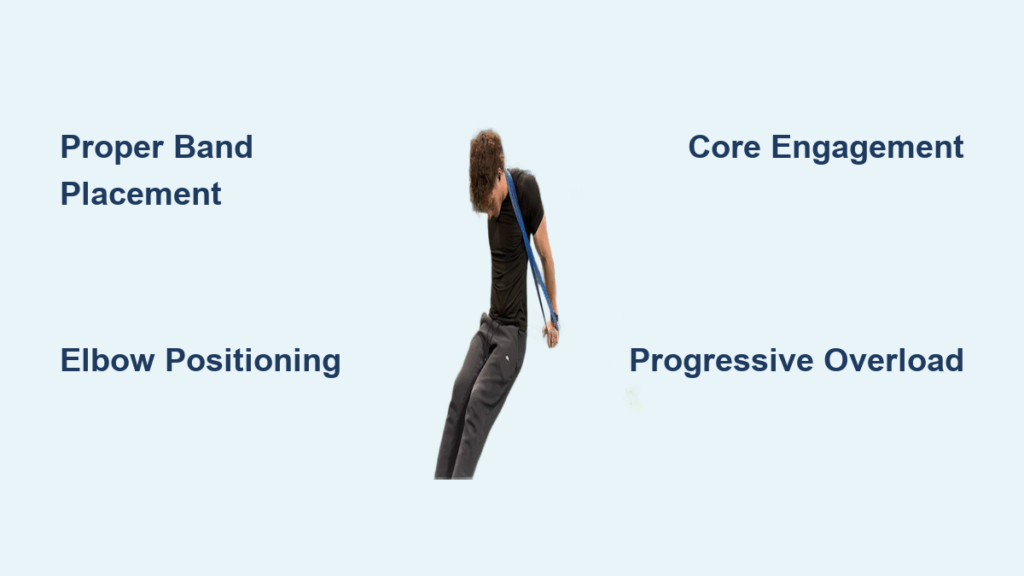
How to Use Resistance Bands for Dips Without Hurting Your Shoulders

Shoulder pain derails more dip attempts than any other issue. The key to pain-free band-assisted dips lies in precise elbow positioning. Many beginners flare their elbows outward at 90 degrees, placing dangerous stress on the shoulder joint. Instead, keep your elbows at approximately 45 degrees from your torso throughout the movement. This slight tuck protects your rotator cuff while still effectively targeting your chest muscles. Additionally, never descend below the point where your shoulders drop below your elbows if you have any history of shoulder problems—stopping at parallel provides ample stimulus for strength development while minimizing joint stress.
The Critical Core Engagement Mistake 90% of Beginners Make
Most beginners forget to brace their core during dips, allowing their lower back to arch excessively as they descend. This unstable position transfers force away from your upper body muscles and into your spine. Before starting your set, draw your belly button toward your spine and maintain this tension throughout every repetition. Imagine trying to keep a sheet of paper pinned between your lower back and a wall behind you. This subtle adjustment transforms band-assisted dips from a shaky struggle into a controlled movement that properly targets your chest and triceps.
Choosing the Right Band Strength for Your Current Ability

Selecting appropriate resistance makes the difference between productive training and wasted effort. Beginners often choose bands that provide too much assistance, allowing 20+ easy repetitions that build little strength. Your ideal starting band should let you perform 8-12 challenging reps with the last 2 requiring genuine effort while maintaining perfect form. If you weigh 150-180 pounds, a medium-thickness loop band (providing approximately 30-50 pounds of assistance) typically serves as an excellent starting point. Those above 180 pounds may need thicker bands, while lighter individuals might begin with light or medium resistance. Remember: the band should challenge you, not carry you.
Beginner-Friendly Band Dip Progression System
Your journey from band-assisted to unassisted dips follows a predictable path when you structure it correctly. Start with a band that allows 10 challenging reps. Train 2-3 times weekly for 2-3 weeks until you can perform 15 quality repetitions. Then switch to a lighter band that returns you to the 8-12 rep range. Continue this pattern, reducing band thickness every few weeks. Alternatively, perform sets with decreasing assistance: complete 5 assisted reps followed by 3 unassisted reps, gradually shifting toward more unassisted work as your strength improves. Most consistent practitioners achieve their first unassisted dip within 8-12 weeks using this systematic approach.
Why Tempo Control Accelerates Your Dip Progress
Slowing down your repetitions dramatically increases effectiveness, especially for beginners. Aim for a 3-second descent (lowering phase) and a 2-second ascent, creating nearly 5 seconds of time under tension per rep. This extended tempo builds strength in the most challenging portion of the movement while reinforcing proper muscle activation patterns. As your strength improves, gradually reduce the tempo differential until you’re moving at a more natural pace. This technique allows you to get more from lighter bands, delaying the need to switch to thinner resistance and extending the usefulness of each band in your collection.
Advanced Band Techniques for Experienced Lifters

Once you’ve mastered unassisted bodyweight dips, resistance bands still offer valuable progression tools. Band-resisted dips—where you wrap the band around your body rather than under your feet—add 10-30 pounds of progressive resistance to your standard dips. The band creates peak tension at the top of the movement (where you’re strongest), complementing your natural strength curve better than traditional weighted dips. For overcoming sticking points, try isometric band holds: set up bands that hold you at your weakest point in the dip range and maintain that position for 3-5 seconds per hold. Perform 4-6 holds per position across 2-3 weekly sessions to build strength exactly where you need it most.
Critical Band Dip Mistakes That Stall Your Progress
The most common error practitioners make when learning how to use resistance bands for dips is inconsistent setup. Moving the band slightly on the bar or changing foot position between sessions creates unpredictable assistance levels that mask your true progress. Develop a ritual: place the band at the same mark on the bar each time, step onto it identically, and establish your body position before beginning sets. Another frequent mistake involves using bands that are too long, causing the band to slip or twist during movement. Opt for standard 41-inch loop bands that provide secure tension without excess length. Finally, avoid rushing through reps just because the band makes the movement easier—each repetition should feel challenging with perfect form.
How to Program Band Dips for Maximum Results
Integrate band-assisted dips 2-3 times weekly with at least 48 hours between sessions for optimal recovery. Beginners should perform 3 sets of 8-10 reps per session, focusing entirely on mastering proper technique. Intermediate trainees working toward unassisted dips might increase to 4 sets of 6-8 reps with progressively lighter bands. Advanced lifters using bands for resistance could perform 4-5 sets of 8-12 reps with band-resisted dips. Always prioritize quality over quantity—five perfect reps beat fifteen sloppy ones. If form breaks down before reaching your target rep range, reduce volume or increase band assistance immediately.
No Dip Station? Try These Band-Assisted Alternatives
Without access to a dip station, you can still build dip-specific strength using creative alternatives. Bench dips with band assistance work exceptionally well: sit on a sturdy chair or bench, grip the edge beside your hips, slide your butt forward, and loop a band over a secure anchor point behind you. Place your feet on the band and perform standard bench dip motion. For home training, suspension trainer ring dips with band assistance offer excellent progression—anchor your TRX or similar straps securely, grip the handles, and loop a band over the anchor point for foot assistance. These alternatives maintain the vertical pressing pattern essential for developing true dip strength.
Mastering how to use resistance bands for dips creates a clear pathway from struggling beginner to confident dip performer. The key lies in selecting appropriate band resistance, maintaining strict form, and progressing systematically as your strength improves. Remember that bands serve as training tools, not permanent crutches—your goal should always be reducing assistance over time rather than finding ways to maintain comfortable dependency. By respecting the process and applying these techniques consistently, you’ll build the chest and tricep strength that unlocks new levels of upper body power. Most practitioners who commit to proper band-assisted dip training achieve their first unassisted repetition within 8-12 weeks, with continued progress toward multiple clean reps shortly after. Start today with the right band, focus on perfect technique, and watch your dip performance transform.


