
Nothing transforms your lower body workout like adding resistance bands to your squat routine. When you learn how to do squats with resistance bands properly, you’ll activate muscles traditional weights can’t reach while building functional strength that translates to everyday movement. Whether you’re working out at home with limited equipment or looking to enhance your gym routine, resistance band squats deliver glute-activating, quad-building results without heavy weights. In this guide, you’ll discover exactly where to position bands for maximum muscle engagement, avoid the most common form mistakes that undermine results, and create progressive resistance that grows with your strength—no expensive equipment required.
Why Resistance Band Squats Outperform Traditional Squats
Adding bands to your squat routine creates unique benefits that dumbbells and barbells simply can’t match. The variable resistance curve—where tension increases as you stand—targets muscles at their strongest point in the movement, something free weights can’t replicate. When you perform squats with resistance bands correctly, you’ll notice immediate improvements in hip stability and glute activation that carry over to athletic performance and daily activities.
Explosive Power Development happens naturally with banded squats because the increasing resistance forces you to drive through the sticking point with maximum effort. Unlike weights that feel heaviest at the bottom of the squat, bands create accommodating resistance that challenges your muscles most when they’re biomechanically strongest. This trains your nervous system to generate force rapidly during the concentric phase, translating to better jumping ability and sprinting speed.
Joint-Friendly Muscle Building makes resistance band squats ideal for all fitness levels. The elastic resistance creates less compressive force on your spine compared to barbell squats while still delivering significant muscle activation. Physical therapists frequently recommend banded squats for rehabilitation because the tension provides proprioceptive feedback that improves movement patterns without excessive joint loading.
Choose Your Resistance Band Type Strategically
Selecting the right band determines whether you’ll build strength or just struggle with improper equipment. Most beginners make the critical mistake of choosing bands based solely on color without understanding construction differences that affect performance.
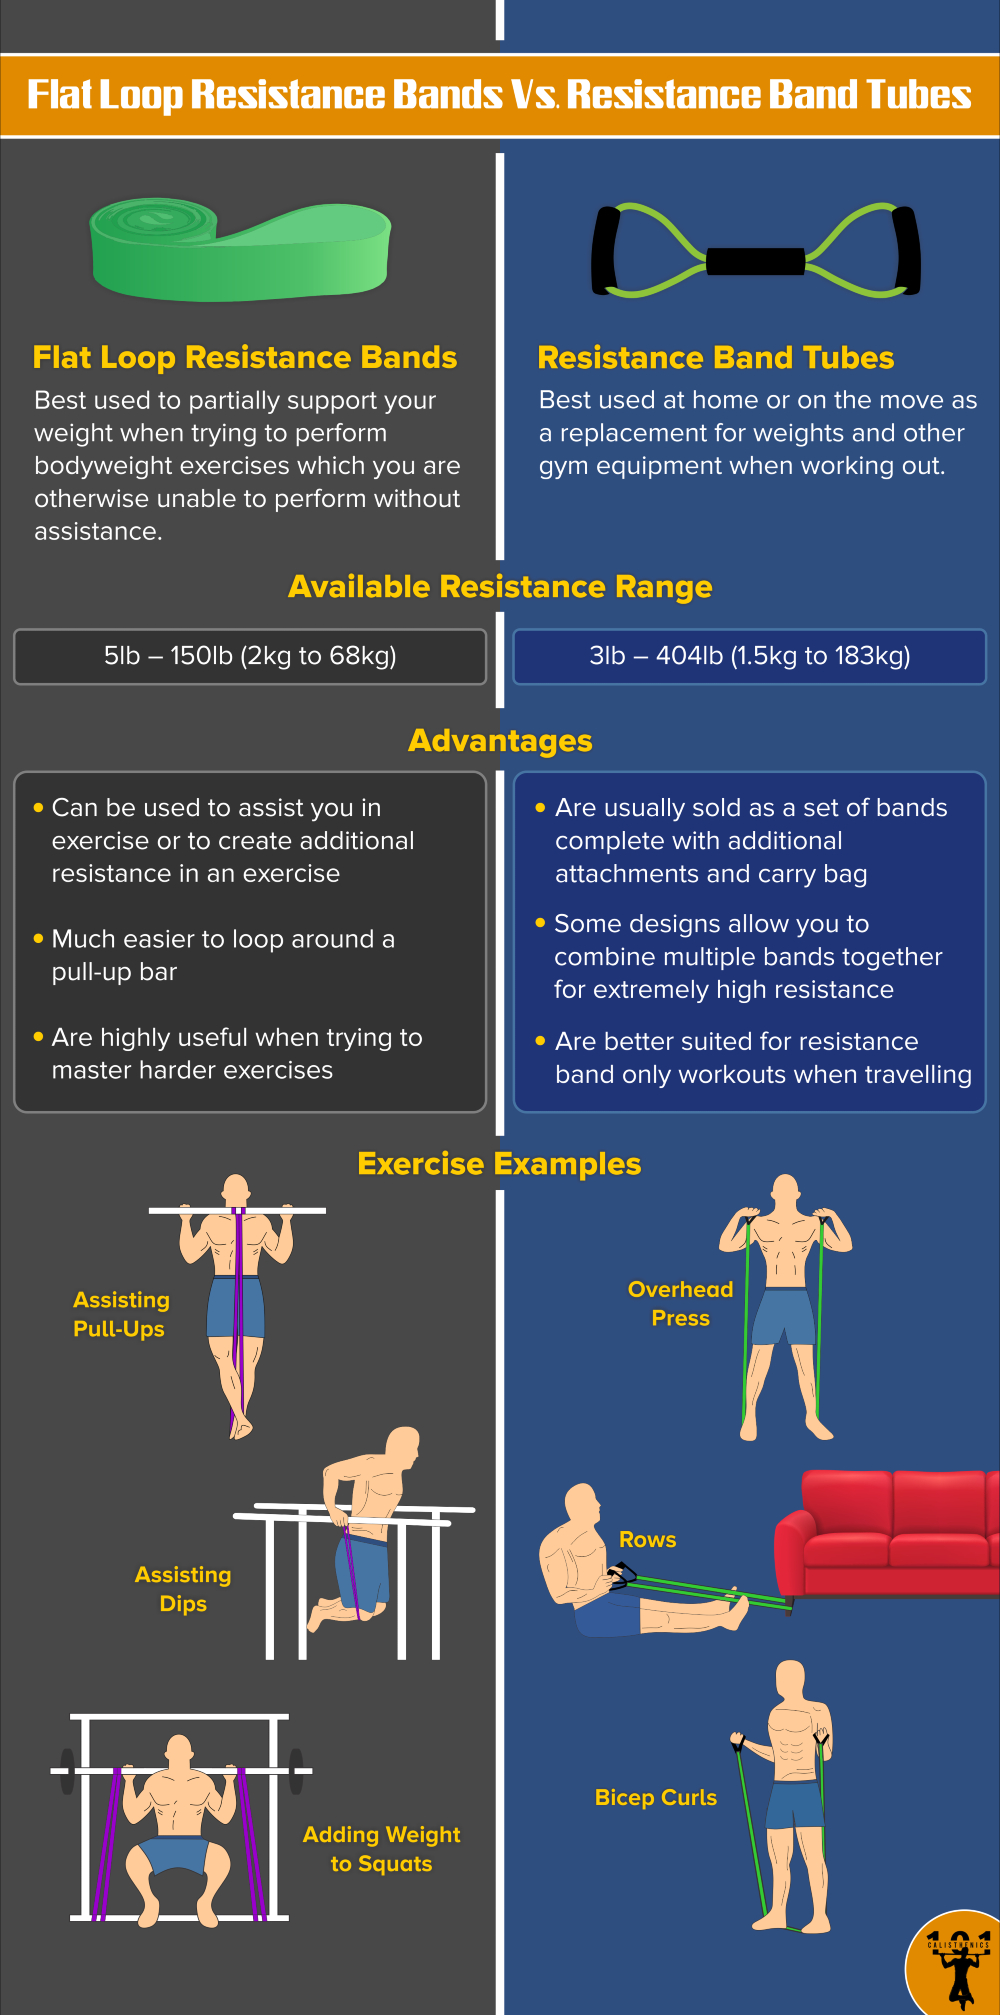
Loop Bands vs. Tube Bands: Which Works Best for Squats
Fabric loop bands with flat, non-rolling construction stay securely positioned above your knees during high-rep sets, making them ideal for glute activation work. Their wider surface area distributes pressure evenly without pinching skin, particularly important when placing bands across shoulders for loaded squats. Look for bands with textured surfaces that grip clothing during intense movement.
Latex loop bands provide stronger tension but require careful maintenance to prevent snapping. When using these for squats, position them higher on your thighs rather than directly above knees to reduce rolling. Check for nicks or thinning areas before each use—damaged latex bands can fail unexpectedly during heavy resistance work.
Tube bands with handles work best for underfoot squat variations where you anchor the band beneath your feet. The handles provide secure grip points that won’t slip during movement, though they limit your positioning options compared to loop bands. For squats, choose tubes with ankle straps rather than traditional handles for more stable foot anchoring.
Perfect Your Banded Squat Technique in 3 Key Positions
Master these three resistance band placements to target different muscle groups while building comprehensive lower body strength. Each position creates unique tension patterns that challenge your muscles differently throughout the movement.
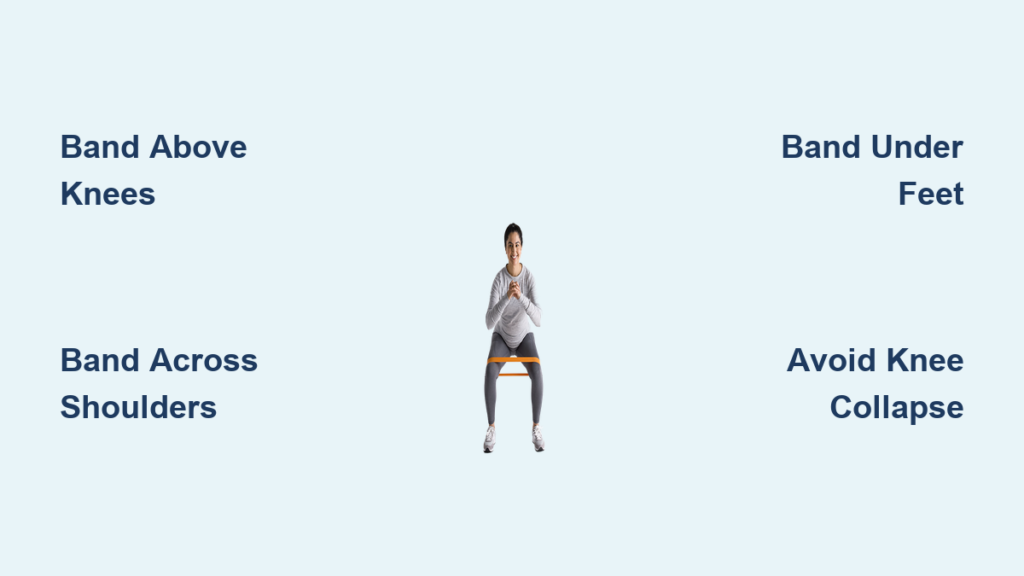
Band Above Knees: The Glute Activation Secret
This variation transforms your squat into a powerhouse glute and hip abductor exercise that corrects knee collapse—the most common squatting flaw. Place the band just above your kneecaps, ensuring it sits on your quadriceps muscle rather than directly on knee joints.
Begin your squat by pushing your hips back while actively spreading your knees against the band’s inward pull. The tension should feel strongest at the bottom position, encouraging you to drive your knees outward as you stand. Perform 3 sets of 15 repetitions with a light-to-medium band, focusing on controlled movement rather than speed. You’ll feel immediate engagement in your gluteus medius—the often-neglected muscle responsible for hip stability during walking and running.
Band Across Shoulders: Barbell Alternative for Quad Development
When you position the band across your upper back like a barbell, you create resistance that increases as you rise from the squat—perfect for building quad strength. Stand with feet shoulder-width apart and step onto the center of the band, then pull the ends up and cross them behind your neck.
Hold the band securely across your trapezius muscles with both hands, maintaining a neutral spine throughout. As you descend, the band tension decreases, making the bottom position slightly easier—this allows you to achieve greater depth safely. Drive upward powerfully against increasing resistance, squeezing your quads at the top. Use medium resistance for 3 sets of 12 repetitions, ensuring your knees track over your toes without collapsing inward.
Band Under Feet: Progressive Overload Without Heavy Weights
Anchoring the band beneath your feet creates resistance that challenges your entire squat movement pattern similarly to traditional weights. Stand with feet hip-width apart on the center of the band, gripping the ends at your shoulders.
Maintain constant tension throughout the movement—never let the band go slack at the bottom position. This variation particularly benefits those recovering from injury because it allows precise resistance control throughout the range of motion. Start with light resistance for 3 sets of 10-12 repetitions, focusing on smooth transitions between phases. As you get stronger, simply step wider on the band to increase resistance without changing equipment.
Fix These 3 Critical Banded Squat Mistakes Immediately

Even experienced lifters make these form errors that reduce effectiveness and increase injury risk when performing squats with resistance bands.
Knee Valgus Collapse During Ascent occurs when your knees cave inward against the band’s resistance, particularly at the transition from descent to ascent. This dangerous position stresses knee ligaments while reducing glute activation. Fix it by consciously driving your knees outward through the entire movement—imagine spreading the floor apart with your feet.
Inconsistent Band Tension happens when you lose resistance at the bottom of the squat, creating “dead spots” where muscles relax. Maintain constant tension by controlling your descent speed and avoiding bouncing at the bottom position. If you notice tension release, reduce your squat depth until you build sufficient strength to maintain tension throughout.
Improper Hip Hinge Mechanics undermine band effectiveness by shifting too much weight forward onto your toes. Keep your weight balanced across your entire foot with particular emphasis on your heels—this allows proper hip engagement that protects your knees and maximizes glute activation. Practice in front of a mirror to ensure your shins stay relatively vertical during descent.
Create Your Progressive Banded Squat Routine

Transform your lower body in just 15 minutes three times weekly with this scientifically designed resistance band program. Start with lighter resistance than you think you need to master technique before progressing.
Beginner Protocol (Weeks 1-2): Perform 2 sets of 12 band-above-knee squats, focusing on perfect knee tracking. Rest 60 seconds between sets. Follow with 2 sets of 10 band-under-foot squats to build foundational strength. Complete this routine twice weekly.
Intermediate Progression (Weeks 3-4): Add band-across-shoulders squats for 3 sets of 10 repetitions after your knee-band work. Increase knee-band sets to 3 with 15 repetitions, maintaining perfect form. Introduce pulsing squats (small up-and-down movements at the bottom position) for the final set of each variation to increase time under tension.
Advanced Challenge (Week 5+): Implement single-leg banded squats for 3 sets of 8 per leg after your standard variations. Use heavier resistance that challenges your final repetitions while maintaining perfect form. Add 5-second pauses at the bottom position of your band-under-foot squats to build strength in the stretched position.
Maximize Results With These Pro Tips
Track Your Progress Systematically by recording which band color you use, how many repetitions you complete, and how the set felt. Every 2 weeks, test whether you can perform the same workout with the next resistance level up—this measurable progression prevents plateauing.
Combine Band Positions for ultimate muscle activation—place one band above your knees while performing band-under-foot squats. The dual resistance creates comprehensive tension that targets both stabilizers and prime movers simultaneously.
Time Your Eccentric Phase by taking 3 full seconds to descend into each squat. This controlled negative phase builds more muscle and connective tissue strength than rushing through the movement, particularly important when using elastic resistance.
Learning how to do squats with resistance bands properly unlocks a versatile training method that builds functional strength without heavy equipment. By implementing these precise techniques and avoiding common pitfalls, you’ll develop lower body power that enhances athletic performance and daily movement. Start with lighter resistance than expected, prioritize perfect form over intensity, and watch your squat strength transform within weeks. The beauty of resistance bands is their scalability—your progress continues indefinitely simply by upgrading resistance as you grow stronger.


