
Have you ever wondered why your thigh workouts aren’t delivering the sculpted, powerful results you’re after? Resistance bands might be the missing element in your fitness routine. These simple yet powerful tools create constant tension throughout every movement, engaging more muscle fibers than traditional weights alone. When used correctly for thigh training, resistance bands can help you build stronger, more defined legs regardless of your fitness level or available space. Whether you’re recovering from an injury, traveling frequently, or simply prefer home workouts, mastering how to use resistance bands for thighs will transform your lower body results without requiring expensive gym equipment or complex setups.
Why Your Thigh Workouts Need Resistance Bands
Resistance bands provide unique tension patterns that traditional weights can’t replicate, making them essential for comprehensive thigh development. Unlike dumbbells that rely solely on gravity, bands increase resistance as they stretch, matching your natural strength curve where muscles are strongest at full extension. This means your quadriceps receive maximum challenge exactly when they can handle it, leading to better muscle activation and growth. The elastic nature of bands also allows for multi-directional resistance, targeting hard-to-reach inner and outer thigh muscles that often get neglected in standard workouts.
The portability factor makes resistance band thigh training accessible anywhere—your living room, hotel room, or even a park. A single set costing less than $30 can replace hundreds of dollars in gym equipment while taking up virtually no storage space. For those with joint concerns, the controlled resistance of bands creates less impact than heavy weights while still delivering effective muscle stimulation. When you learn how to use resistance bands for thighs properly, you’ll discover they provide safer, more versatile training that adapts perfectly to your current fitness level and goals.
Selecting the Perfect Resistance Band for Thigh Exercises
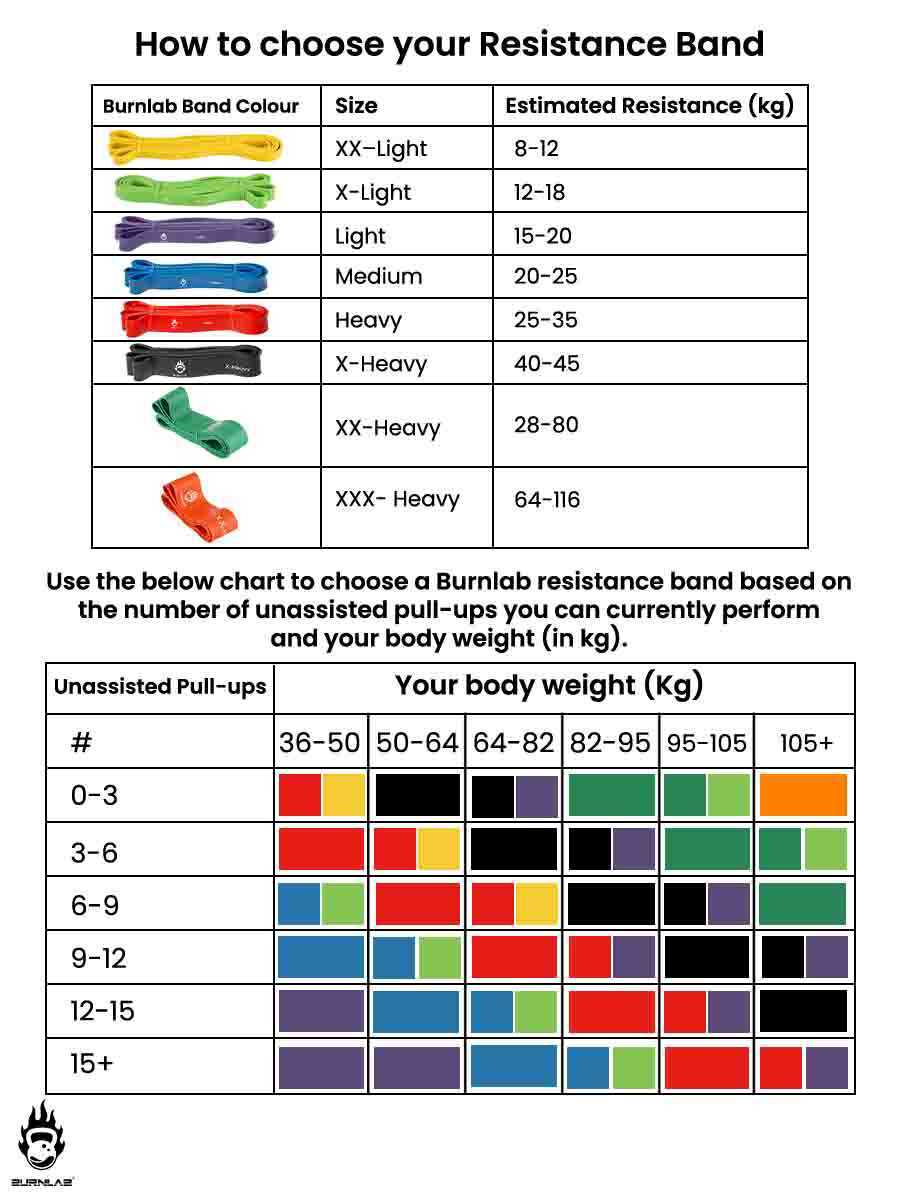
Choosing the right resistance band makes or breaks your thigh workout effectiveness. Flat loop bands (also called booty bands) work best for most thigh exercises because they stay securely in place without rolling up your legs. Look for bands made from natural latex with reinforced stitching—these withstand repeated stretching better than cheaper alternatives. Resistance levels typically range from extra light (yellow) to extra heavy (purple), with most thigh exercises requiring medium to heavy resistance for optimal muscle engagement.
Before purchasing, consider your current strength level and specific goals. If you’re new to resistance training, start with light and medium bands to master proper form before progressing. Experienced lifters should begin with medium and heavy options to ensure sufficient challenge. Always inspect bands before use for small tears or weak spots—damaged bands can snap during exercises, potentially causing injury. Store your bands away from direct sunlight and sharp objects to maximize their lifespan, and keep a backup set available to avoid interrupting your training routine.
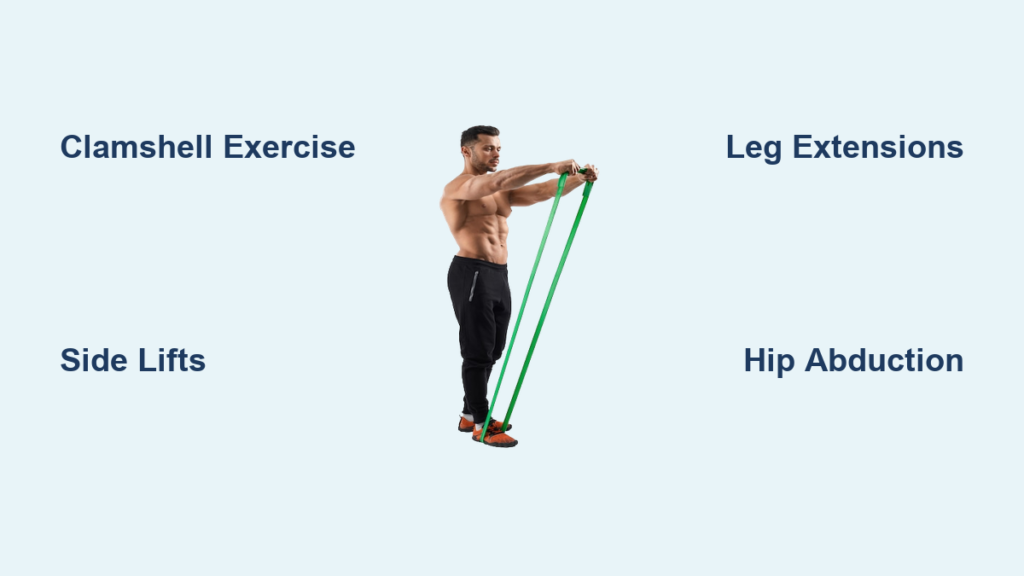
Master the Clamshell Exercise for Outer Thigh Definition
The clamshell exercise specifically targets your hip abductors and gluteus medius, muscles that shape your outer thighs and create that coveted “sweep” along your hip line. To perform this correctly: Lie on your side with knees bent at 45 degrees and a resistance band looped just above your knees. Keep your feet together while lifting your top knee against the band’s tension, stopping when your knee reaches hip height. Hold for one second at the top, then slowly lower back down without letting your knees touch.
Focus on initiating the movement from your hip rather than your lower back, and avoid rolling your hips backward during the exercise. Complete 3 sets of 15-20 repetitions per side, resting 45 seconds between sets. If you feel this primarily in your lower back instead of your outer thigh, you’re likely using too much resistance—switch to a lighter band and concentrate on proper muscle engagement. For added challenge, pause at the top position for 3 seconds before lowering.
Perfect the Standing Side Lift for Functional Thigh Strength
The standing side lift builds functional strength in your outer thighs that translates directly to improved balance and stability in daily activities. Anchor your resistance band at ankle height to a sturdy object, then stand sideways to the anchor point with the band attached to your working leg. Keep your standing leg slightly bent and your torso upright as you lift your working leg out to the side against the band’s resistance.
Maintain a straight line from head to heel throughout the movement, and avoid leaning your upper body for momentum. Lift only as high as you can while keeping proper form—typically 12-18 inches off the ground. Complete 3 sets of 12-15 controlled repetitions per leg, focusing on the slow return phase where muscles grow strongest. If balance proves challenging, perform near a wall for light fingertip support. This exercise becomes significantly more effective when you learn how to use resistance bands for thighs with perfect form rather than excessive resistance.
Execute the Seated Leg Extension for Quadriceps Development
While traditional leg extension machines cost thousands, resistance bands replicate this quadriceps-building exercise perfectly at home. Sit on a sturdy chair with your back straight and loop the band behind the chair legs. Place the band behind one ankle, then extend your leg straight out against the resistance until your knee is fully locked. Squeeze your thigh muscle at the top position for two seconds before slowly lowering back down.
Maintain constant tension throughout the movement—never let the band go slack at any point. Perform 3 sets of 15 repetitions per leg with a 2-second pause at full extension. If the band slips during movement, wrap it twice around your ankle or use a band with a wider loop. For greater intensity, extend both legs simultaneously once you’ve mastered single-leg form. This movement isolates your quadriceps like few others, creating that defined “teardrop” appearance above your knee when performed consistently.
Perform the Lying Hip Abduction for Complete Thigh Activation
The lying hip abduction targets often-neglected outer thigh muscles while eliminating balance requirements that can compromise form. Lie on your side with legs straight and a resistance band looped around both ankles. Lift your top leg vertically against the band’s tension while keeping your hips stacked and your lower back pressed into the floor. Raise only as high as you can maintain proper alignment—typically 6-12 inches.
Control the return phase for three full seconds to maximize muscle engagement, and avoid letting your leg drop all the way down between repetitions. Complete 3 sets of 12-15 repetitions per side with 60 seconds rest between sets. If you experience lower back discomfort, place a small pillow under your waist for support. This exercise delivers exceptional muscle burn in your outer thighs when performed with appropriate resistance and perfect form.
Structure Your Resistance Band Thigh Workout Routine

Create maximum results by sequencing exercises strategically rather than randomly. Begin each session with a 5-minute warm-up of light cardio and dynamic stretches to increase blood flow to your thigh muscles. Start your resistance band thigh workout with lying hip abductions to gently activate outer thigh muscles, followed by seated leg extensions for quadriceps isolation. Perform standing side lifts next while your balance is still fresh, and finish with clamshells as a burnout set for outer thighs.
Train your thighs 2-3 times weekly with at least one rest day between sessions. Beginners should use lighter resistance for higher repetitions (15-20), while advanced users benefit from heavier bands with lower reps (8-12). Track your progress by recording which band color you use and how many repetitions you complete—this data helps you objectively measure improvement and know when to progress to stronger resistance.
Avoid These Common Resistance Band Thigh Mistakes
Most people unknowingly sabotage their thigh results with these preventable errors. Using bands that are too strong forces your body to recruit secondary muscles and compromises form, significantly reducing effectiveness. Start lighter than you think necessary and focus on perfect technique—muscle growth comes from controlled tension, not maximum resistance. Rushing through the lowering phase wastes 50% of your workout’s potential; always lower with control for 2-3 seconds to maximize muscle fiber recruitment.
Poor anchoring creates inconsistent resistance that disrupts proper muscle engagement. Test your anchor point before each set—door anchors should be fully closed against the frame, and furniture anchors must be immovable. Never anchor bands to door handles or fragile objects. Additionally, neglecting the mind-muscle connection drastically reduces workout effectiveness—consciously focus on feeling your thigh muscles working throughout each repetition for dramatically better results.
Maximize Results with These Proven Strategies
Progressive overload remains essential for continued thigh development—gradually increase resistance, repetitions, or decrease rest periods every 2-3 weeks. When you can comfortably complete all sets with perfect form, it’s time to progress to the next resistance level. Combine resistance band training with proper nutrition by consuming adequate protein within 90 minutes post-workout to support muscle repair and growth.
Incorporate supersets (performing two exercises back-to-back with no rest) to increase workout density and metabolic stress for faster results. Try pairing clamshells with lying hip abductions for outer thigh specialization. Stay hydrated before, during, and after workouts—dehydrated muscles fatigue faster and recover more slowly, limiting your training capacity. Most importantly, be patient and consistent; noticeable thigh transformation typically requires 8-12 weeks of dedicated training.
Mastering how to use resistance bands for thighs delivers remarkable results when you prioritize proper technique over resistance level. Start with lighter bands to perfect your form, progressively increase difficulty as you gain strength, and remain consistent with your training schedule. Within weeks, you’ll notice improved muscle definition, greater strength in daily activities, and enhanced lower body aesthetics. The beauty of resistance band training lies in its simplicity—grab your bands, follow these proven techniques, and transform your thighs anywhere, anytime. Your journey to stronger, more sculpted legs begins with that first controlled repetition.


