

Imagine turning your daily stroll into a powerful strength-building session without changing your routine. Adding a weighted vest transforms ordinary walking into a full-body workout that builds muscle, burns more calories, and improves bone density—all while maintaining the low-impact benefits of walking. When you’re learning how to start using a weighted vest for walking, the key is proper progression to avoid injury while maximizing results. This simple piece of equipment—essentially a cropped vest filled with removable weights—forces your muscles to work harder with every step, engaging your entire body from head to toe.
Unlike regular walking, the extra load targets muscles throughout your body. Your quads, hamstrings, and glutes work overtime with each stride, while your core muscles engage continuously to maintain balance and posture. The result? A comprehensive fitness boost disguised as your favorite low-impact activity. Whether you’re looking to improve your walking routine or build functional strength for daily activities, weighted vest walking delivers impressive benefits when approached correctly.
This guide walks you through everything from selecting your first vest to building a sustainable routine that delivers real results without risking injury.
Choose Your First Weighted Vest

Weight Selection Formula
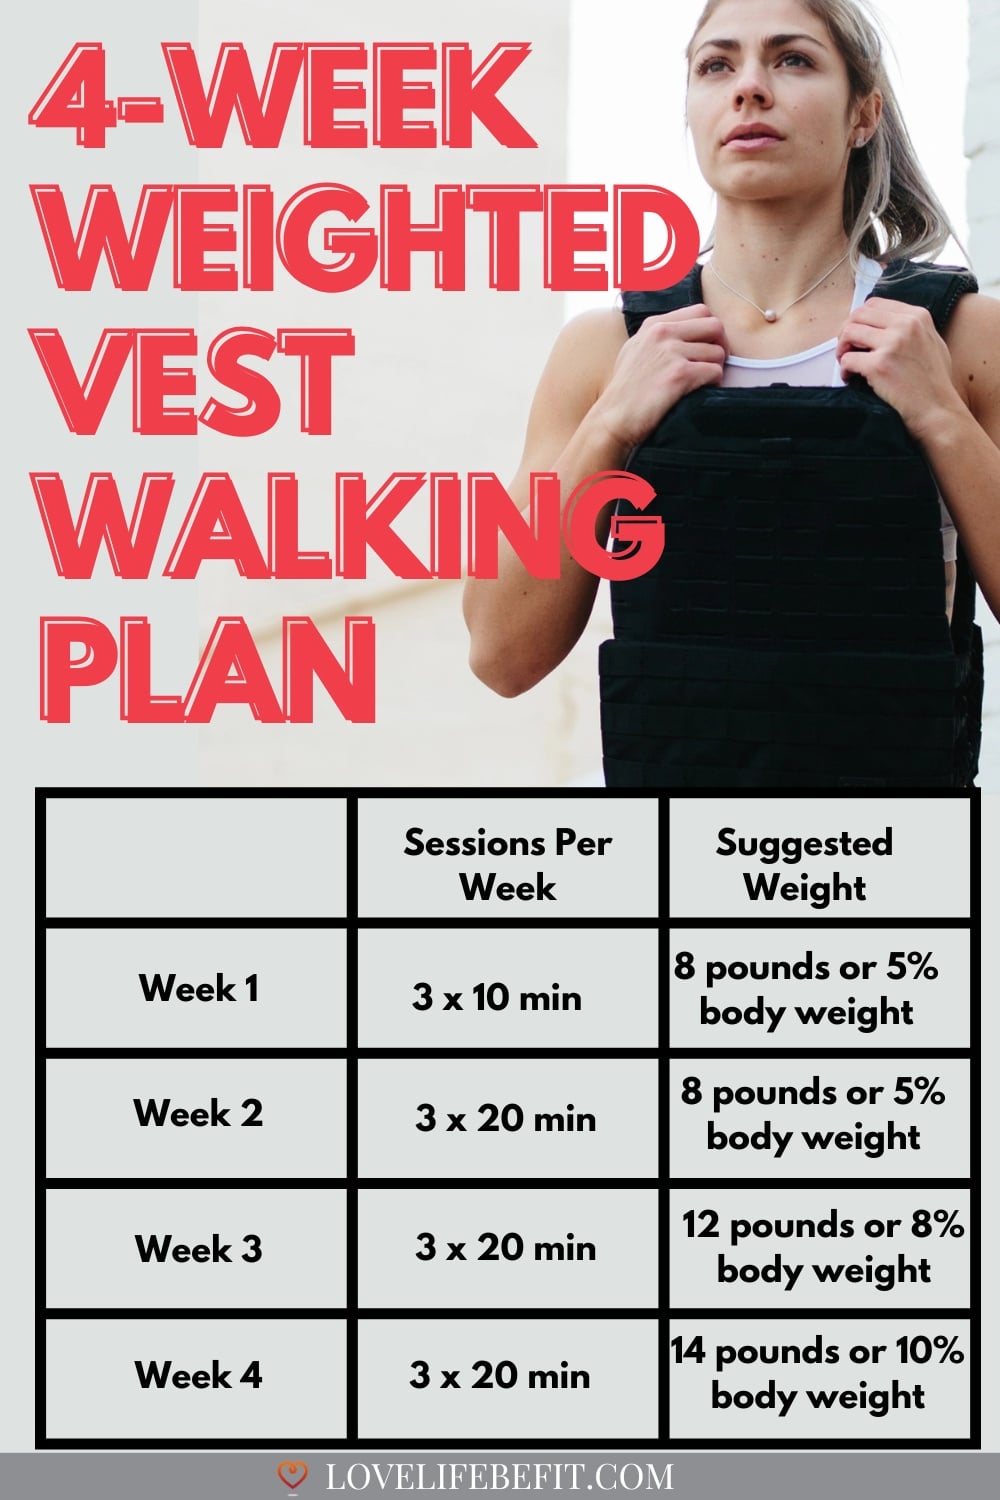
Begin your weighted vest walking journey with conservative weight selection—your body needs time to adapt to the new load. Start with just 5% of your body weight as your baseline, never exceeding 10% as a beginner. This gradual approach prevents strain while allowing your muscles and joints to strengthen progressively.
Quick Reference Guide:
– For a 150 lbs person: Begin with 7.5-15 lbs total weight
– For a 200 lbs person: Start with 10-20 lbs total weight
– For a 120 lbs person: Begin with 6-12 lbs total weight
Essential Vest Features
Must-Have Specifications for Beginners:
– Adjustable weights with removable 2.5-lb plates or sandbags
– Snug fit featuring multiple adjustable side straps
– Neoprene padding at shoulders and chest to prevent chafing
– Front-clip design for easy on/off compared to pullover styles
Avoid These Features Initially:
– Fixed-weight vests that limit your progression
– Bulky military-style designs that restrict movement
– Vests exceeding 20 lbs capacity for beginners
Budget Recommendations
Starter Options (£25-50):
– ProsourceFit Adjustable (6-20 lbs capacity)
– Zelus Neoprene Vest (5-20 lbs adjustable)
– Davina McCall 3kg Vest for lighter beginners
Save premium options like the Omorpho G-Vest for later when you’re committed to long-term training and need better weight distribution for heavier loads.
First Week: Vest Acclimation
Day 1-3: Home Testing
Begin your weighted vest walking preparation by wearing your vest empty on day one—yes, with no weights added. This critical step helps you gauge fit and identify any pressure points before introducing load. Move through your normal household routine while wearing the empty vest to ensure comfort.
Daily Tasks Test:
– Walk up and down stairs
– Bend to tie shoes
– Reach overhead to cabinets
– Sit and stand from chairs
On day two, add just 5% of your body weight. Walk around your house for 10-15 minutes while doing light chores. Focus on maintaining upright posture—imagine balancing a book on your head to keep your spine aligned.
Day 4-7: Posture Practice
Spend 15 minutes daily practicing perfect walking form with your weighted vest:
– Shoulders back (natural position, not military-straight)
– Core engaged (gently pull belly button toward spine)
– Short strides (avoid overstriding which strains knees)
– Heel-to-toe rolling foot strike pattern
Pro Tip: Practice in front of a mirror or film yourself walking. Most beginners unconsciously lean forward—correct this immediately to prevent lower back strain while walking with added weight.
Week 2: First Outdoor Walks
:max_bytes(150000):strip_icc()/vwt-tone-fitness-weighted-vest-christine-luff-03-da7f7d1bcf24414c8bd3be98b297ed10.jpeg)
Location Strategy
Start your outdoor weighted vest walking on familiar, flat terrain. Your neighborhood block or local park’s walking path works perfectly. Avoid hills, trails, or uneven surfaces until you’re comfortable with the vest for at least two weeks.
Smart Starting Route:
– Distance: 10 minutes out, 10 minutes back
– Surface: Smooth paved sidewalk or track
– Timing: When you’re naturally energized (typically morning)
Heart Rate Guidelines
Expect your heart rate to increase 10-20 beats per minute compared to regular walking. If you’re hitting 70-75% of your maximum heart rate (220 minus your age), you’re pushing too hard during these early outdoor sessions.
Quick Check: You should be able to maintain conversation, though it’ll be more challenging than normal walking without the vest.
Common Week 2 Mistakes
Avoid These Critical Errors:
– Adding weight too quickly (“just 5 more pounds”)
– Walking longer than 30 minutes total
– Ignoring foot pain or hot spots
– Skipping rest days between sessions
Do This Instead:
– Track distance, not speed during initial outdoor walks
– Listen to your body’s subtle signals
– Take rest days between weighted walking sessions
– Adjust vest fit immediately if it shifts while walking
Progression Timeline: Weeks 3-8
Month 1 Goals
Week 3-4: Build to 30-minute continuous walks
– Add 5 minutes every 2-3 sessions
– Keep weight at 5-7% body weight
– Focus on consistent frequency (3-4x weekly)
Week 5-8: Introduce gentle challenges
– Option A: Same route, 10% faster pace
– Option B: Add 2-3 lbs to vest
– Option C: Include one small hill
When to Increase Weight
Add 2-5 lbs only when you can complete your current routine without:
– Excessive fatigue that lasts beyond 24 hours
– Joint pain in knees, hips, or ankles
– Compromised walking form
– Recovery time exceeding 24 hours
Progressive Loading Schedule:
– Month 1: 5-7% body weight
– Month 2: 7-10% body weight
– Month 3+: 10-15% body weight (maximum safe limit)
Prevent Common Injuries
Red Flag Symptoms
Stop immediately and remove your vest if you experience:
– Sharp knee pain (especially under kneecap)
– Lower back strain (distinct from normal muscle fatigue)
– Ankle rolling or instability
– Numbness in feet or hands
– Difficulty breathing beyond normal exertion
Pre-Walk Safety Check
5-Minute Warmup Routine:
– March in place (1 minute)
– Hip circles (10 each direction)
– Ankle rolls (10 each foot)
– Shoulder rolls (10 forward/backward)
– Gentle torso twists (10 each side)
Post-Walk Cooldown:
– Slow walking for 2-3 minutes
– Calf stretches against wall
– Quad stretch (hold 30 seconds each leg)
– Gentle lower back twist
Footwear Requirements
Essential Features for Weighted Walking:
– Cushioned heel to absorb extra impact
– Stable midsole preventing ankle rolling
– Wide toe box accommodating foot swelling
– Good arch support maintaining proper alignment
Replace shoes every 300-500 miles when walking with added weight—sooner than regular walking shoes due to increased stress.
Troubleshooting Fit Issues
Vest Slipping Solutions
Causes and Fixes:
– Loose shoulder straps → Tighten until vest sits high on chest
– Wrong size → Size down if vest shifts more than 1 inch
– Uneven weight → Redistribute weights evenly front/back
– Wrong clothing → Avoid slippery fabrics underneath
Chafing Prevention
Immediate Solutions:
– Wear moisture-wicking base layer
– Apply Body Glide or similar anti-chafe product
– Check vest positioning (shouldn’t ride up)
– Ensure weights aren’t creating pressure points
Breathing Difficulties
If the vest feels restrictive during your walking:
– Loosen chest strap one notch
– Reposition weights lower on torso
– Check vest size (may be too small)
– Reduce weight temporarily
Integration Strategies
Daily Routine Hacks
Morning Integration:
– Walk to coffee shop instead of driving
– Park farther from work entrance
– Take stairs instead of elevator (with vest)
Lunch Break Options:
– 15-minute power walk
– Walk during phone calls
– Walking meetings with colleagues
Evening Activities:
– Post-dinner digestive walks
– Errand walking (bank, pharmacy)
– Family walks with kids/dogs
Stay Motivated Long-Term
Variety Strategies:
– Theme walks: Podcast days, music days, silent days
– Route rotation: 3-4 different safe routes
– Challenge weeks: Focus on hills, speed, or distance
– Social accountability: Walk with friends or join groups
Progress Celebrations:
– New vest purchase at 3-month mark
– Fitness tracker upgrade
– Registration for charity walk
– Weekend hiking trip preparation
Starting how to use a weighted vest for walking requires patience and gradual progression, but the payoff is substantial. Within six weeks, most users report visible muscle definition, improved endurance, and increased daily energy levels. The key is consistency over intensity—better to walk 20 minutes daily with 10 lbs than attempt 60 minutes once weekly with 30 lbs.
Listen to your body, follow the progression timeline, and adjust based on your individual response. Your future self will thank you for starting this simple yet powerful fitness habit today. Remember that proper form and gradual progression transform weighted vest walking from a potential injury risk into one of the most effective ways to enhance your daily walking routine.


