

If you’ve mastered bodyweight bench dips but notice your triceps strength has plateaued after hitting 15-20 perfect reps, it’s time to implement progressive overload—the fundamental principle that drives continued muscle development. Bench dips remain one of the most effective bodyweight exercises for building triceps power and shoulder stability, but without increased resistance, they stop challenging your muscles effectively. Adding weight to bench dips properly transforms this foundational movement into a serious strength builder that delivers measurable results. Whether you’re a beginner ready to progress beyond bodyweight or an experienced lifter chasing new personal records, this guide reveals the safest, most effective methods to load your bench dips while protecting your joints and maximizing muscle growth. You’ll discover exactly how to scale resistance appropriately, avoid common pitfalls that lead to shoulder injuries, and create a structured progression plan that keeps your strength gains moving forward consistently.
Essential Safety Considerations Before Adding Weight
Before attaching any external resistance to your bench dips, establishing proper safety protocols prevents joint damage and ensures your progressive overload efforts translate to real strength development rather than setbacks.
Assess Your Bodyweight Dip Foundation
You must demonstrate control through 12-15 perfect bodyweight reps before adding external weight—this baseline confirms your triceps, shoulders, and core possess sufficient strength to handle additional loading safely. Rushing weighted dips before establishing this foundation dramatically increases shoulder injury risk while reinforcing poor movement patterns that become increasingly difficult to correct. During each rep, maintain a 45-degree elbow angle relative to your torso, keep your core braced to prevent lower back arching, and achieve full elbow extension at the top position without locking your joints.
Warm-Up Protocol for Weighted Dips
Implement a targeted warm-up routine before weighted dip sessions to prepare vulnerable shoulder structures for increased demands. Begin with 5-10 minutes of light cardio to boost blood flow, followed by dynamic shoulder mobility work including arm circles in all planes, scapular wall slides, and triceps band stretches. Many lifters find performing 1-2 sets of high-rep (20-30) bodyweight dips with perfect form further activates the necessary muscles and lubricates the shoulder joint before adding resistance.
Dumbbell Methods for Bench Dips
Dumbbells provide the most accessible progression path for weighted bench dips, requiring minimal equipment while offering multiple loading variations to accommodate different strength levels.
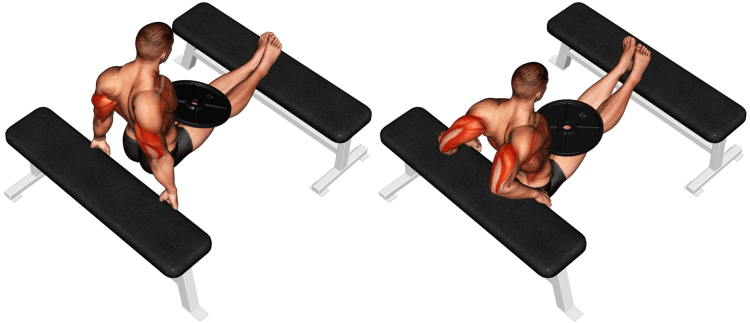
Holding Dumbbells on Your Lap
Place a dumbbell securely across your lap, held between your thighs while positioned on the bench—this beginner-friendly method keeps weight stable without demanding additional grip strength. Start with just 5-10 pounds to maintain proper form through your target rep range of 6-10 reps. As strength improves, increase weight in 5-pound increments every 2-3 weeks, ensuring you maintain full range of motion throughout each set. The lap placement method works particularly well when you need small resistance increases but have limited dumbbell options available.
Single-Arm Dumbbell Holding
Advanced lifters can hold a single dumbbell between their knees or against their hip for asymmetric loading that dramatically increases core engagement. This technique proves valuable when you need incremental weight increases but only have access to larger dumbbells—holding a 15-pound dumbbell between your knees provides meaningful resistance without requiring precise weight selection. The single-arm method challenges your obliques and spinal stabilizers to prevent rotation during each rep, creating greater overall muscle activation while still targeting the triceps effectively.
Weighted Vest and Belt Systems
Dedicated weighted equipment provides the most stable, scalable progression path for serious bench dip development once you’ve mastered basic loading methods.
Weighted Vest Advantages
A quality weighted vest distributes resistance evenly across your upper body without altering your natural movement mechanics, making it ideal for consistent progressive overload. Vest weights sit close to your center of gravity, maintaining standard dip biomechanics while increasing difficulty proportionally. Look for vests with secure closure systems and flat weight plates that won’t create pressure points during the bottom position. Most vests allow incremental additions of 1-5 pounds per plate, enabling precise progression that aligns perfectly with gradual strength gains.
Weight Belt with Chain or Strap Attachments
Specialized weight belts with chain or strap attachments provide the highest loading capacity for bench dips, allowing you to add substantial resistance that would be impractical with other methods. The belt sits securely around your waist while chains or straps extend downward to hold bumper plates or dumbbells. This configuration shifts your center of gravity lower, increasing the lever arm effect and creating greater muscle activation through the full range of motion. Always start with lighter loads than expected—typically 20-30% less than your vest weight—due to the changed mechanics, and double-check all connections before beginning your set to prevent dangerous mid-rep failures.
Resistance Band Modifications

Resistance bands offer unique loading benefits for bench dips through accommodating resistance that increases throughout the movement range.
Band Placement Above the Bench
Secure a resistance band over your shoulders with the ends positioned beneath your hands on the bench to create upward resistance that increases as you descend. This band placement provides maximum tension at the bottom position where most lifters struggle most, perfectly matching the natural strength curve of the dip movement. The band’s stretch creates greater challenge through the entire rep while reducing stress on the shoulder joint compared to free weights. Ensure the band remains securely positioned throughout each set to maintain consistent resistance.
Body Positioning Adjustments for Increased Difficulty
Strategic body position changes can significantly increase bench dip difficulty without requiring additional equipment.
Elevated Feet Position
Place your feet on an elevated surface (6-12 inches high) to shift your body angle toward vertical, dramatically increasing shoulder and triceps engagement while reducing leg assistance. The higher your feet elevation, the greater the demand on your upper body muscles as you approach a more vertical body position. Start with modest elevation to allow your stabilizer muscles to adapt before progressing to higher platforms, as dramatic position changes can quickly compromise form if attempted too aggressively.
Narrower Hand Placement
Moving your hands closer together on the bench (while maintaining proper 45-degree elbow tracking) places greater tension on your triceps throughout the movement by reducing chest involvement. A narrow grip increases the mechanical challenge without additional weight, making it an excellent technique when equipment access is limited. Avoid placing hands too close together, as excessive narrowing creates dangerous shoulder internal rotation—aim for a grip width that maintains comfortable shoulder positioning through the full range of motion.
Common Mistakes to Avoid
Understanding critical errors prevents injuries and ensures your weighted dip efforts produce meaningful strength gains.
Sacrificing Range of Motion
The most common mistake when adding weight involves shortening your range of motion to complete additional reps. Partial reps with heavier weight actually undermine strength development compared to full-range reps with lighter loads. Maintain strict form through every set—if you cannot complete a rep with full range of motion, reduce the weight immediately. Dropping resistance to regain proper form produces better long-term results than pushing through compromised movement patterns.
Elbow Flaring
External loading often encourages dangerous elbow flaring (90-degree angle from torso), which creates excessive shear stress on the shoulder joint. Keep elbows tracking at approximately 45 degrees throughout every rep, treating any flaring as a form breakdown requiring immediate correction. If you cannot maintain proper elbow positioning with a given weight, reduce the load until you can execute the movement correctly.
Sample Progression Timeline
Follow this structured approach to ensure consistent, injury-free progress with weighted bench dips.
Weeks 1-4: Foundation Building
Focus on perfecting bodyweight form and establishing your baseline rep max. Perform 3-4 sets of 8-12 reps with meticulous attention to form cues. If already strong with bodyweight dips, use this phase to refine technique and build shoulder stability before adding resistance.
Weeks 5-8: Initial Loading
Introduce your first external load using dumbbell lap placement or a light weighted vest (5-10 pounds). Perform 3 sets of 8-10 reps, adding small increments (2-5 pounds) weekly if form remains perfect. Reduce weight immediately if form deteriorates, spending additional time at that load before progressing.
Weeks 9-12: Intermediate Progressions
Transition to more stable loading methods like weighted vests or belts while incorporating tempo manipulations (3-5 second lowers) or position changes. Target 3 sets of 6-8 reps with challenging but manageable loads, ensuring full range of motion on every rep.
Integrating Bench Dips Into Your Training Program
Strategic programming ensures weighted bench dips contribute to overall development without creating recovery issues.
Optimal Training Frequency
Train bench dips 2-3 times weekly for optimal strength and hypertrophy with adequate recovery. If pairing with chest training, position weighted dips early in your session when you’re freshest, or save them for the end as an isolation movement after compound pressing exercises. Avoid pairing heavy weighted dips with close-grip bench press in the same session to prevent excessive joint stress.
Volume and Intensity Management
Maintain total weekly volume between 9-20 sets for most lifters pursuing triceps development. Each session should include 3-6 working sets at 70-85% intensity (based on your estimated 1-rep max). Track your progress meticulously and adjust volume based on recovery—persistent joint aching indicates excessive volume requiring reduction.
Adding weight to bench dips properly extends the effectiveness of this foundational exercise long after bodyweight becomes too easy. By starting with accessible loading methods like dumbbells or weighted vests, progressing gradually, and maintaining strict technique, you’ll build impressive triceps strength while protecting your shoulder joints. Remember that sustainable progress comes from consistent, patient effort—not aggressive weight jumps that compromise form and lead to injury. Implement these techniques systematically, track your progress diligently, and you’ll continue breaking through plateaus with weighted bench dips for years to come.


