

That unsettling wobble during your bench press isn’t just annoying—it’s potentially dangerous when you’re under heavy weights. A stable weight bench forms the foundation of effective strength training, yet many home gym owners struggle with equipment that shifts, rocks, or creates that unnerving instability during critical lifts. The good news is that most wobble issues can be diagnosed and fixed with basic tools and minimal mechanical experience. This comprehensive guide walks you through identifying the root cause of your bench’s instability, performing lasting repairs, and implementing preventive maintenance to keep your equipment rock-solid for years to come.
Before grabbing your wrench, understand that weight bench instability typically stems from four common sources: loose fasteners connecting frame components, worn or damaged hardware, uneven flooring beneath the bench, or debris in adjustment mechanisms. By systematically diagnosing each potential cause, you can pinpoint the exact issue rather than guessing and replacing parts unnecessarily. Most repairs take 30-90 minutes with standard household tools, saving you the cost of replacement equipment while restoring confidence in your lifting platform.
Diagnose Your Bench’s Stability Issue Accurately
Effective repair begins with precise diagnosis—rushing to tighten bolts without understanding the root cause often creates new problems. Dedicate fifteen minutes to thorough inspection before touching any tools, as misdiagnosis leads to wasted effort and recurring instability.
Begin by sitting on the bench and gently rocking side-to-side while paying attention to where the movement originates. Listen for specific creaking, clicking, or grinding sounds that indicate particular component failures. Place your hands on different frame sections to feel for play or movement at each joint. A bench that wobbles front-to-back typically indicates different issues than one shifting side-to-side—this distinction guides your repair approach. Front-to-back wobble often points to problems with the main frame-to-base connections, while side-to-side movement usually stems from seat post instability or uneven floor contact.
Check all visible bolts and fasteners by hand first to identify any that have visibly loosened. Examine the floor where your bench sits for uneven surfaces, debris, or damage to the bench’s feet. Test each adjustment mechanism—seat angle, incline settings, and leg adjustment points—to ensure they engage fully and lock securely. Document everything you discover during this inspection, as this information determines which repair section applies to your situation. Pay special attention to whether the wobble occurs only when loaded (with your body weight) or persists when the bench is empty, as this distinction separates structural issues from load-bearing component failures.
How to Identify Specific Wobble Patterns
Different wobble patterns indicate specific problem areas. A rhythmic creaking sound during movement often points to dry pivot points needing lubrication. A sudden “clunk” when adjusting positions suggests worn adjustment pins or damaged locking mechanisms. If the bench feels stable when empty but wobbles under your weight, check the main load-bearing connections between the seat post and base frame. When the entire bench shifts position during use, examine the contact points between bench feet and floor surface.
Tighten Loose Bolts and Fasteners Systematically
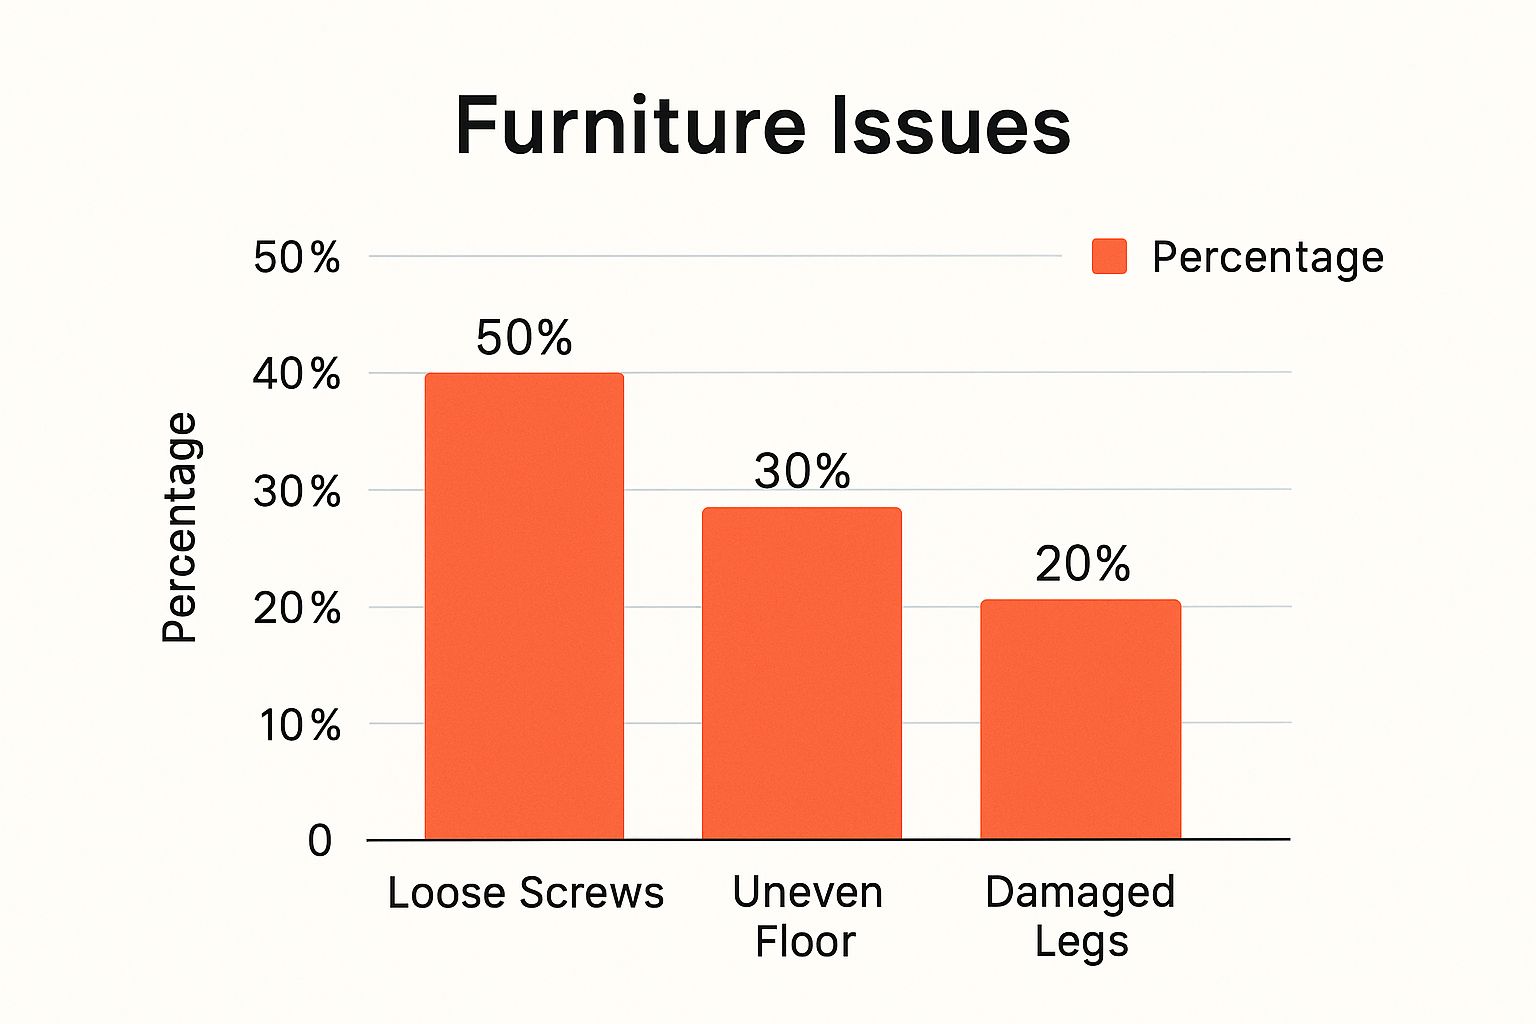
Loose hardware causes approximately 70% of bench instability issues, making it the most common culprit. Vibration from regular use gradually loosens fasteners, and many benches ship from the factory with bolts that weren’t adequately torqued during assembly. Don’t make the common mistake of tightening bolts randomly—this can create uneven stress and worsen the problem.
Gather the necessary tools: typically an adjustable wrench, hex key set, and possibly a socket set with ratchet. Consult your owner’s manual for specific torque specifications if available, but in the absence of guidance, tighten bolts to firm resistance without applying excessive force that could strip threads. Work systematically through the entire bench, starting from the main frame connections and moving outward to secondary components.
Pay special attention to the connections where the bench frame meets the upright posts, the brackets securing the seat and backrest, and any pivot points in adjustment mechanisms. When tightening, alternate between opposing bolts on each joint to ensure even pressure distribution—this critical step prevents frame warping. For example, if tightening a four-bolt connection, tighten diagonally opposite bolts in sequence rather than working around the perimeter. Over-tightening a single bolt can warp frames or strip threads, creating new problems while solving the original wobble. After tightening all fasteners, test the bench again by applying pressure at various points to confirm stability has been restored.
Replace Worn or Damaged Hardware Effectively
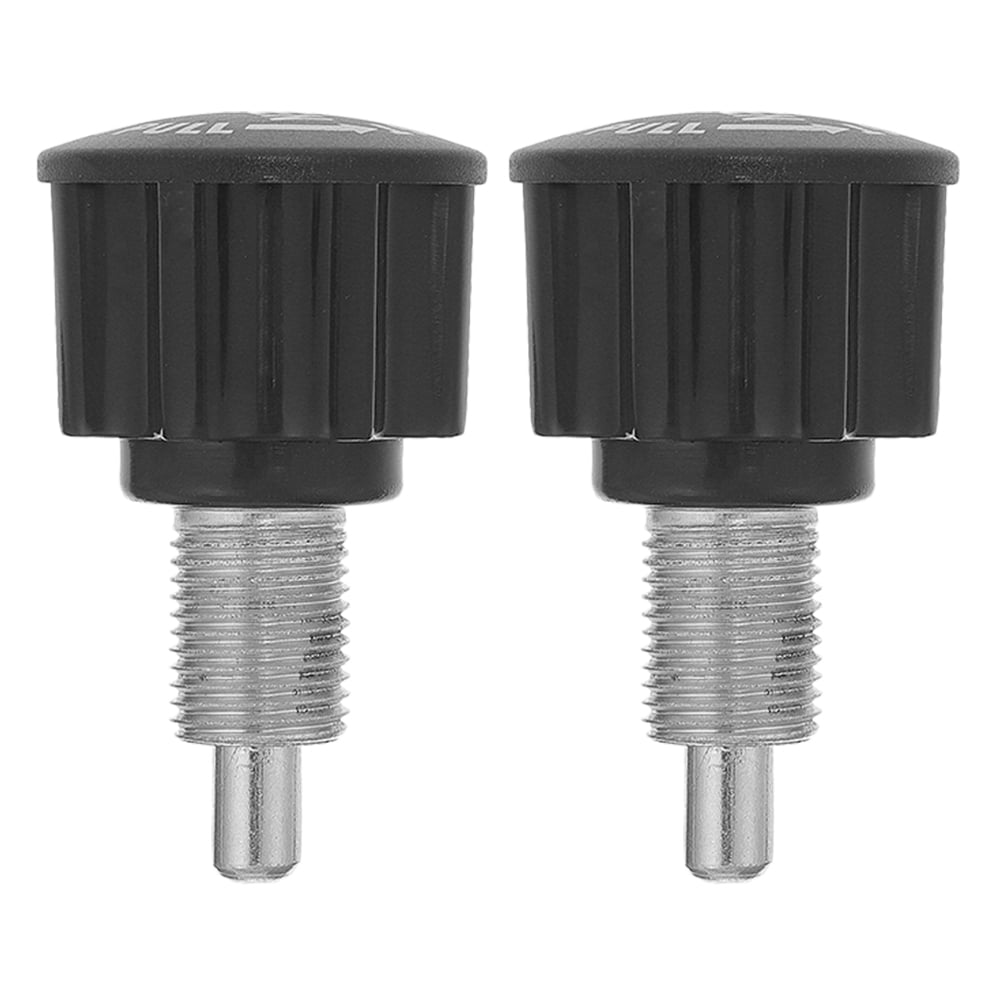
Sometimes tightening isn’t enough because the hardware itself has failed. Stripped threads, corroded bolts, bent brackets, and worn bushings all require replacement rather than simple re-tightening. Inspect all fasteners closely for signs of damage before assuming simple tightening will solve the problem.
Corroded or rusted bolts often appear discolored, pitted, or may show rust buildup around the threads. These fasteners should be replaced rather than cleaned and reused, as corrosion compromises structural integrity. Bent bolts or brackets typically result from impact damage or excessive overload—inspect frame members for visible deformation that indicates the metal has been stressed beyond its design limits. Worn bushings or washers appear flattened, cracked, or have developed excessive play within their mounting holes, allowing movement that creates wobble.
When sourcing replacement hardware, always match the specifications of the original components exactly. Measure bolt diameters, lengths, and thread pitches precisely before purchasing replacements. Visit a hardware store with the old bolt in hand for accurate matching. Using incorrect hardware—whether oversized bolts that require force to install or undersized fasteners that can’t handle the load—creates new stability problems and potential safety hazards. Many manufacturers sell replacement hardware kits specifically designed for their benches, which eliminates guesswork and ensures compatibility.
Address Uneven Flooring and Surface Issues Properly
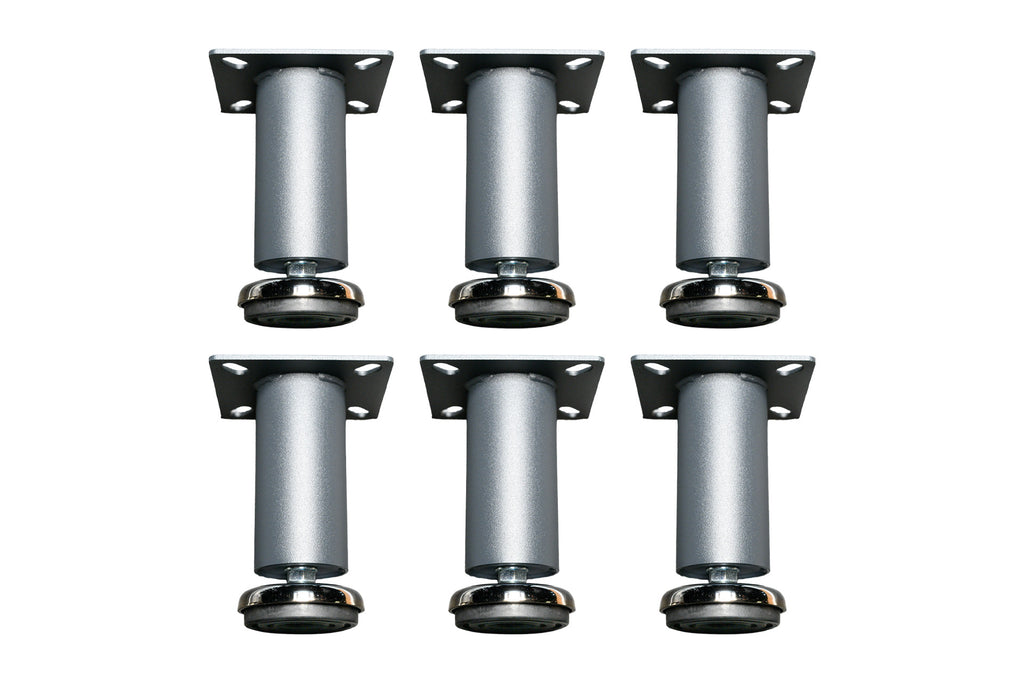
Flooring problems cause nearly 20% of bench stability complaints, yet this issue often goes undiagnosed because attention focuses on the equipment rather than its foundation. Even minor floor irregularities of just 1/16 inch translate to significant wobble when a bench’s feet contact uneven surfaces.
First, test whether your flooring is the culprit by moving the bench to a different location—preferably a concrete basement floor or garage surface where the ground is typically more level. If the wobble disappears entirely, you’ve identified a flooring-related issue. Common problem surfaces include carpet with padding underneath, which compresses unevenly under weight, and older floors with settlement-related dips or rises.
For carpeted areas, consider a dedicated equipment mat that provides a firm, level surface. These mats also protect your flooring from equipment damage and reduce noise transmission. For minor floor irregularities, adjustable leveling feet on your bench can compensate for surface variations—simply rotate the feet to extend or retract them until all contact points touch the floor evenly. If your bench lacks adjustable feet, furniture risers or shims placed strategically under the affected feet create a level foundation. Ensure any leveling solution distributes weight adequately and won’t shift during use—never rely on folded paper or cardboard as a long-term solution.
Clean and Lubricate Adjustment Mechanisms Thoroughly
Debris accumulation and inadequate lubrication cause adjustment mechanisms to bind, slip, or fail to lock properly—all of which create the sensation of instability even when the frame itself is sound. Regular cleaning and lubrication prevents these issues and maintains smooth operation.
Begin by fully extending all adjustment mechanisms and clearing visible debris with a brush or cloth. For accumulated grime, a mild detergent solution applied with a soft brush removes buildup without damaging surfaces. Pay particular attention to the adjustment holes where pins insert, the pivot points on seat and backrest connections, and any sliding mechanisms. After cleaning, dry all components thoroughly to prevent moisture-related corrosion.
Apply lubricant specifically designed for fitness equipment—avoid penetrating oils like WD-40 that attract dirt or automotive greases that can stain clothing. A light coating of silicone-based or Teflon lubricant on pivot points, sliding surfaces, and adjustment pins ensures smooth operation without attracting debris. Wipe away excess lubricant after application. Perform this maintenance monthly for benches in home gyms with regular use, or quarterly for less frequently used equipment. This simple routine prevents the binding and slipping that often gets misdiagnosed as structural instability.
Implement Preventive Maintenance That Works
The most effective strategy for avoiding bench instability is consistent preventive maintenance that addresses small problems before they escalate. A fifteen-minute monthly maintenance routine keeps your bench stable and extends its useful life significantly.
Establish a fixed schedule—perhaps the first Saturday of each month—and stick to it regardless of whether problems are apparent. During each session, tighten all fasteners according to your bench’s torque specifications, inspect all components for wear or damage, and clean adjustment mechanisms before applying fresh lubricant. Pay particular attention to high-stress points: the connections between seat and frame, the adjustment pin mechanisms, and any pivot points that see regular use.
Monitor the condition of all rubber and plastic components, which degrade over time with exposure to sweat and cleaning products. Worn feet, cracked padding, and degraded adjustment covers should be replaced promptly to prevent associated stability issues. Keep a log of maintenance activities and any observations about equipment condition—this documentation helps identify recurring problems and supports warranty claims if manufacturer defects develop. Consider taking before-and-after stability measurements by placing a level on the bench surface to objectively track your bench’s condition over time.
Determine When Repair Makes Sense Versus Replacement
Making the repair-versus-replacement decision requires balancing cost, safety, and practicality. While many bench issues respond well to DIY repair, certain scenarios clearly warrant equipment replacement.
Consider replacement when frame damage is present, when repair costs approach fifty percent of replacement cost, or when the bench’s design has known structural weaknesses that repairs won’t adequately address. Age matters too—benches older than ten years often have accumulated wear that makes comprehensive restoration impractical, and newer models typically offer improved designs and safety features. If you find yourself repeatedly fixing the same bench, the cumulative time and money may exceed the cost of newer, more reliable equipment.
For most wobble issues caused by loose hardware or minor wear, repair represents the sensible choice. These fixes cost a fraction of replacement, require minimal tools and expertise, and restore bench stability effectively when performed correctly. The key is accurate diagnosis followed by appropriate repair—addressing the specific cause rather than guessing at solutions or replacing components unnecessarily. Always prioritize safety: if you have any doubt about the structural integrity of your bench after repairs, replace it rather than risk injury during use.
A stable weight bench forms the foundation of effective strength training at home. By understanding the common causes of instability and applying the diagnostic and repair approaches outlined in this guide, you can restore your bench to reliable operation and maintain that stability through regular preventive maintenance. Your equipment should support your fitness goals, not create anxiety about safety during critical lifts—take the time to properly diagnose and fix wobble issues, and you’ll build confidence in both your equipment and your performance. Remember that consistent maintenance prevents most stability problems before they develop, saving you time, money, and potential injury in the long run.


