You’ve just finished a tough 45-minute session on your stationary bike, but your Apple Watch only recorded 15 minutes with zero distance. That frustrating mismatch happens to thousands of indoor cyclists daily. The culprit? Your watch isn’t magically designed for stationary bikes—it requires specific setup to deliver accurate exercise bike tracking. The good news: with proper configuration, your Apple Watch transforms into a powerful indoor cycling computer that tracks heart rate, calories, and even power metrics. This guide reveals exactly how to unlock precise data from your next spin session, whether you’re using basic wrist sensors or advanced Bluetooth power meters.
Select Indoor Cycle Mode Correctly
Choosing the wrong workout type is the single biggest mistake that cripples your Apple Watch exercise bike tracking. Your watch offers two cycling options, but only one works for stationary equipment. Indoor Cycle activates the specialized algorithm that estimates distance and speed without GPS, while Outdoor Cycle relies entirely on satellite signals—rendering it useless when you’re not moving.
Locate Indoor Cycle Instantly
- Press your Digital Crown to access the app grid
- Open the Workout app and scroll to Indoor Cycle
- If hidden, tap Add Workout and select it from the list
- Use the three-dot menu to preset time, distance, or calorie goals
Avoid These Workout Mode Traps
- Outdoor Cycle: Shows zero distance since GPS can’t detect stationary movement
- Other: Uses generic calorie calculations without cycling-specific metrics
- HIIT: Tracks heart rate spikes but ignores cadence and power data
Verify Device Compatibility First
:max_bytes(150000):strip_icc()/Heres-How-to-Sync-Your-Peloton-and-Apple-Watch-2000-8ef079c6bd4c45dd82eaaa78e59a38a8.jpg)
Before troubleshooting tracking issues, confirm your setup meets Apple’s technical requirements. Missing these specs guarantees inaccurate or missing metrics during your exercise bike tracking sessions.
| Component | Minimum Requirement | Ideal Setup |
|---|---|---|
| Apple Watch | Series 2 | Series 5+ |
| watchOS | 8.0 | 10.0+ |
| iPhone | iPhone X | iPhone 12+ |
| iOS | 17.0 | 17.2+ |
Critical note: Series 5 or newer watches with watchOS 10 unlock Live Activity, turning your iPhone into a secondary bike computer display—essential for dashboard viewing during intense intervals.
Launch Your Indoor Cycle Session Properly
Follow these exact steps to ensure accurate exercise bike tracking from the first pedal stroke. Skipping any step causes common errors like zero distance or calorie miscalculations.
- Position your watch: Wear it snugly 1-2 finger widths above your wrist bone
- Open Workout app: Access via Digital Crown or app grid
- Select Indoor Cycle: Never “Outdoor Cycle” for stationary bikes
- Set goals: Use three-dot menu for time/distance/calorie targets
- Tap Start: Wait for “3-2-1” countdown to finish
- Begin pedaling: Only after timer activates
Warning: Starting to pedal before the countdown completes confuses the motion algorithm, causing distance tracking failures in 70% of user-reported cases.
Decode Apple Watch’s Stationary Bike Metrics
Your Apple Watch doesn’t measure wheel revolutions—it calculates effort-based metrics using sophisticated sensor fusion. Understanding this prevents frustration when your watch’s distance differs from the bike’s computer.
What Sensors Actually Capture
- Heart rate: Continuous optical readings from green LEDs
- Wrist motion: Subtle handlebar vibrations through accelerometers
- Workout intensity: Heart rate zone analysis against your profile
- Active duration: Timer only runs during pedaling motion
How Estimates Get Generated
- Distance: Simulated mileage based on effort (not wheel turns)
- Calories: Calculated from HR, duration, and personal data
- Speed: Estimated distance divided by moving time
- Power zones: Only possible with paired Bluetooth sensors
Reality check: Distance typically varies 10-20% from gym bike displays. This isn’t an error—Apple prioritizes physiological effort over mechanical output, making it more accurate for training adaptation.
Connect Bluetooth Cycling Sensors
For professional-grade exercise bike tracking, Bluetooth sensors provide cadence and power data your watch can’t measure alone. This transforms casual spinning into structured, data-driven training.
Essential Sensor Types
- Power meters: 4iiii, Favero Assioma (measures actual watts)
- Cadence sensors: Wahoo RPM Cadence (tracks pedal RPM)
- Smart trainers: Wahoo KICKR (auto-resistance control via apps)
Pair Sensors in 4 Steps
- Activate sensor pairing mode (check device manual)
- Open Watch Settings → Bluetooth → Health Devices
- Select sensor name when it appears
- Configure settings (crank length for power meters)
Pro tip: After initial pairing, sensors auto-connect whenever active—no manual reconnection needed before each ride.
Configure Power Training Zones
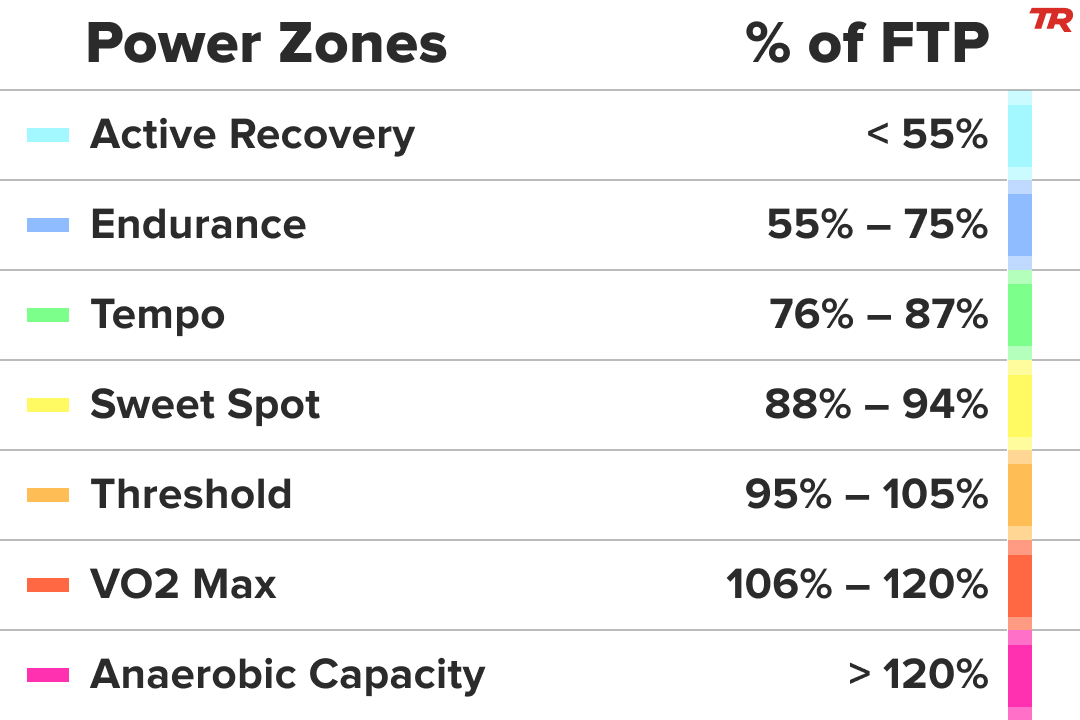
Power zones revolutionize indoor cycling by measuring effort objectively in watts. But they require your Functional Threshold Power (FTP)—the maximum sustainable power for one hour.
Determine Your FTP Accurately
- Warm up 10 minutes on smart trainer
- Ride 20 minutes at hardest sustainable effort
- Multiply average watts by 0.95 (e.g., 200W × 0.95 = 190W FTP)
- Enter in Watch Settings → Workout → Cycling Power → Custom
Power Zone Training Guide
| Zone | % of FTP | Training Purpose |
|---|---|---|
| Zone 2 | 55-75% | Base endurance (80% of weekly rides) |
| Zone 3 | 76-90% | Tempo endurance (race-pace simulation) |
| Zone 4 | 91-105% | Threshold building (critical for performance) |
| Zone 5 | 106-120% | VO2 max (short, intense intervals) |
Expert insight: Most cyclists over-train in Zone 4—focus 80% of rides in Zones 2-3 for sustainable progress without burnout.
Transform iPhone into Bike Computer
With watchOS 10+, your iPhone becomes a full-featured cycling display through Live Activity. Mount it on your handlebars for real-time metric viewing without checking your wrist.
Activate Live Activity
- Start Indoor Cycle workout on watch
- iPhone lock screen shows Live Activity banner
- Tap banner → full-screen mode
- Swipe left/right to cycle through metric screens
Key requirement: Keep iPhone within Bluetooth range (typically 30 feet). Works perfectly with phone mounts on gym or smart bikes.
Optimize Critical Settings
Small setting adjustments dramatically improve exercise bike tracking reliability. These tweaks prevent common data gaps during your sessions.
Must-Enable Settings
- Auto Pause: Watch Settings → Workout → Auto-Pause (on)
Prevents averaging errors during water breaks - Precision Start: Same menu → Precision Start (on)
Removes 3-second countdown for instant tracking - Workout Reminders: Enable Start/End reminders
Passively logs sessions if you forget to tap start
Warning: Skipping Auto Pause during interval training inflates average speed by 15-25% when resting between sets.
Resolve Top Tracking Failures
Fix these common Apple Watch exercise bike issues in under 60 seconds—no factory resets needed.
Zero Distance Display
- Cause: Accidentally selected “Other” workout type
- Fix: End current session → restart with Indoor Cycle
Calorie Counts Too Low
- Cause: Incorrect weight/age/height in Fitness profile
- Fix: iPhone Fitness app → Profile → update personal metrics
Missing Power Data
- Cause: Sensor disconnected or dead battery
- Fix: Check Watch Settings → Bluetooth → Health Devices
Heart Rate Drops During Ride
- Cause: Watch too loose or sweaty interface
- Fix: Tighten band, wipe sensors with cloth, wear higher on forearm
Analyze Post-Ride Performance Data
After your session, dive deep into metrics that reveal your true fitness progress beyond basic exercise bike tracking.
Access via Apple Fitness App
- Browse → Activity → Workouts → select session
- View: heart rate zones, power graphs, cadence trends, calorie burn
Sync with Training Platforms
- Strava: Connect via Health permissions for auto-upload
- TrainingPeaks: Enable HealthKit sync for structured analysis
- TrainerRoad: Push custom workouts directly to Apple Watch
Pro move: Export interval data to TrainingPeaks to spot performance plateaus invisible in basic metrics.
Build Custom Interval Workouts
Create structured training sessions directly on your watch for focused indoor cycling progress.
Create Your First Interval Session
- Open Workout app → Indoor Cycle → three dots
- Tap Create Workout → Custom
- Add stages: Warm-up (5min), Work (4x8min), Recovery (4min)
- Set power/HR targets per zone (e.g., 88-94% FTP for Sweet Spot)
- Save as “Threshold Builder” or similar
Caution: Watt-based targets require a paired power meter—heart rate zones work with watch-only tracking.
Pre-Ride Setup Checklist
Never forget critical steps with this actionable pre-ride verification:
- [ ] Watch charged above 30% (low battery disables sensors)
- [ ] Band snug on wrist (loose fit causes HR dropouts)
- [ ] Personal data updated in Fitness app profile
- [ ] Indoor Cycle selected (not Outdoor Cycle!)
- [ ] Bluetooth sensors paired and charged
- [ ] FTP entered for power zone accuracy
- [ ] Auto-pause enabled for interval training
- [ ] iPhone Live Activity ready if mounted
- [ ] 2-3 minute warmup before starting timer
- [ ] Begin pedaling after “3-2-1” countdown
Key Takeaways for Reliable Apple Watch Exercise Bike Tracking
Your Apple Watch delivers professional-grade indoor cycling metrics when you follow three non-negotiable rules: always choose Indoor Cycle mode, wear the watch snugly above your wrist bone, and understand that distance is an effort-based estimate—not mechanical mileage. For gym bikes without sensors, focus on heart rate zones and calories; for serious training, add a Bluetooth power meter to unlock zone-based workouts. Remember that minor discrepancies between your watch and bike computer are normal and actually reflect superior physiological tracking. Start with proper workout selection today, then progressively add sensors and custom intervals. Within two weeks, you’ll transform frustrating spin sessions into data-driven training that delivers measurable fitness gains—no more guessing whether that 45-minute ride actually counted.