
You’re pedaling toward your 6 a.m. yoga class, fresh air in your lungs, only to feel your rolled-up yoga mat suddenly unravel and slap against your back tire. Or worse—it’s completely detached and now lying in the bike lane behind you. If you’ve ever tried biking to yoga with your mat strapped awkwardly to a backpack or dangling from handlebars, you know the frustration of balancing stability, safety, and convenience. Carrying a yoga mat on your bike isn’t just about convenience—it’s about avoiding traffic hazards, preventing mat damage, and arriving at class calm instead of flustered. In this guide, you’ll discover field-tested methods to secure your mat for any ride length, whether you’re commuting 2 miles or touring across town. We’ll cover rack-mounted systems, DIY hacks, and critical safety checks most cyclists overlook.
Rear Rack Mounting: The Most Stable Solution for Daily Commuters

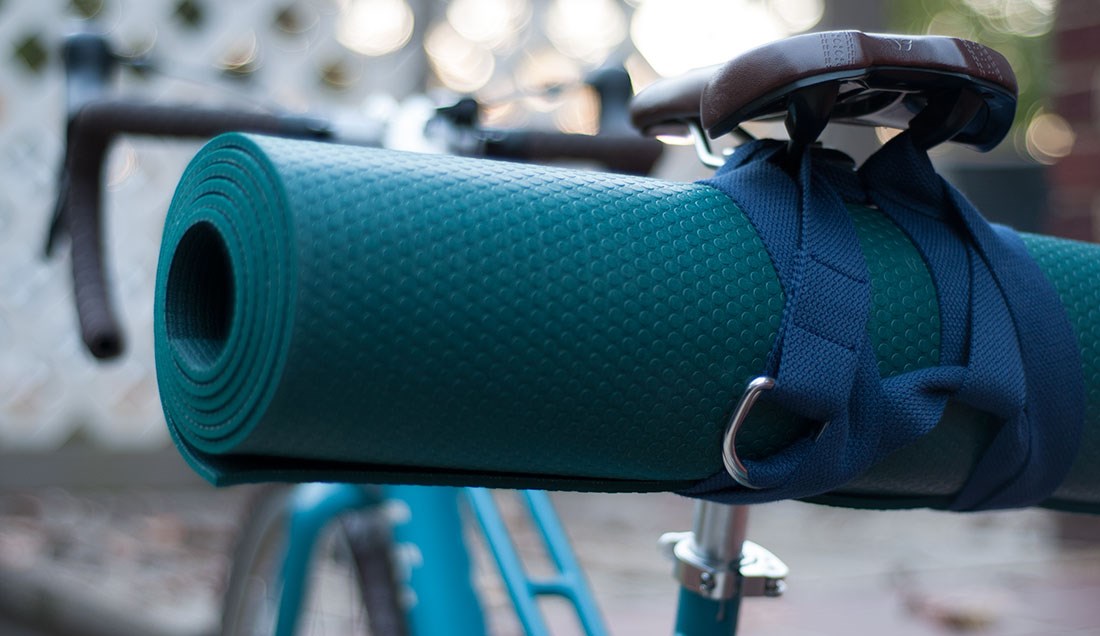
Attaching your yoga mat to a rear pannier rack eliminates back strain and keeps your center of gravity low—critical for preventing wobble during sharp turns. This method works with both standard 68cm foam mats and thicker eco-mats, as long as your rack has horizontal crossbars. Avoid cheap wire racks that flex under weight; opt for aluminum models rated for 25+ lbs. Always position the mat’s roll vertically (not horizontally) against the seat post to minimize wind resistance. You’ll need two critical measurements before starting: your rack’s crossbar spacing (typically 12-18 inches) and your mat’s rolled diameter (usually 6-8 inches for standard mats).
Securing Your Mat with Bungee Cords in Under 90 Seconds
- Roll your mat tightly with the textured side inward, compressing it until it’s roughly half its normal diameter.
- Position the mat vertically against the rear rack’s seat post mount, centered between crossbars.
- Thread a 12-inch bungee cord through the top crossbar, over the mat, and hook it to the bottom crossbar. Pull taut but not stretched—excessive tension warps rack alignment.
- Add a second bungee 4 inches below the first at a slight diagonal angle to prevent rotational slippage.
- Test stability by gently shaking the mat; it shouldn’t shift more than 1 inch in any direction.
Pro Tip: Use reflective bungee cords after sunset—they cost $3 more but make your load visible from 200+ feet away. Never use twisted elastic cords; they degrade 70% faster when exposed to UV rays.
Handling Sudden Mat Slippage Mid-Ride
If your mat starts sliding during a ride, immediately pull over on the right side of the bike lane (never the traffic side). Re-secure it using the “crisscross grip” technique: Pass one bungee over the mat, under the rack’s vertical strut, and back over the mat. This creates friction points that lock the mat in place even on bumpy roads. Carry a spare bungee in your saddlebag—mat slippage often happens after 15+ minutes of riding when vibrations loosen initial tension.
Front Handlebar Mount: Quick Access for Short Urban Rides
Mounting your mat across handlebars works best for rides under 3 miles on smooth pavement, giving you instant access if you need to stop for coffee or drop off mail. However, this method shifts your bike’s front weight distribution forward by up to 15%, making steering sluggish. Only attempt this if your handlebars have at least 18 inches of straight section (common on hybrids but rare on road bikes). Mats thicker than 6mm when rolled will cause dangerous handlebar wobble above 10 mph—test at low speeds first.
Preventing Handlebar Wobble with the Triangle Lock Method
Place the mat horizontally across your handlebars, centered over the stem. Instead of wrapping straps directly around the mat, create a triangular anchor:
1. Loop a strap under the left handlebar grip, over the mat, then under the right grip.
2. Cross the strap ends under the mat and pull tight against the stem.
3. Secure the strap ends to your water bottle cage bolts using quick-release buckles.
This distributes pressure evenly, preventing the “figure-8 wobble” that occurs when straps dig into mat foam. If your bike lacks water bottle mounts, use a single 10-inch cam buckle strap anchored to your head tube—never wrap straps around brake cables.
Frame Triangle Storage: Hidden Carry for Sleek Commuting
Storing your rolled mat inside your bike’s main triangle (between seat tube, top tube, and down tube) keeps it protected from weather and theft. This method only fits mats rolled to 4.5 inches or less in diameter—perfect for ultralight travel mats but challenging for standard 4mm PVC mats. Measure your frame’s narrowest triangle point (usually near the seat tube); if it’s under 5 inches wide, skip this method. Carbon frames require extra padding to prevent micro-fractures from mat abrasion.
Measuring Your Frame Triangle for Perfect Fit
Sit on your bike and have a friend measure the horizontal space between your thighs at knee level—that’s your max mat diameter. For example, if you measure 4.75 inches:
– Roll your mat with a towel inside to compress it further
– Use a tape measure to check rolled diameter against frame clearance
– Leave 0.5 inches of wiggle room to avoid thigh friction while pedaling
Warning: Never force a mat into a tight frame space. The constant rubbing during rides can damage both your frame paint and mat surface within 2 weeks.
DIY Yoga Mat Carrier Using Household Items

When you lack bike-specific gear, repurpose these common items for emergency mat transport. A carabiner and old seat belt webbing create a $0 carrier that outperforms many commercial straps. Cut a 36-inch section from a discarded seat belt (found at junkyards or repair shops), melt the ends with a lighter to prevent fraying, and attach a climbing carabiner to one end. This system holds 50+ lbs and resists UV degradation better than nylon straps.
Building a Seat Belt Strap System in 10 Minutes
- Source materials: 1 discarded seat belt (ensure no cuts/frays), 1 steel carabiner (rated for 5,000+ lbs), lighter.
- Cut and seal: Measure 36 inches from belt’s buckle end, cut with heavy scissors, then melt cut edge over flame for 3 seconds.
- Attach carabiner: Thread melted end through carabiner gate, loop back 2 inches, and melt again to fuse.
- Secure mat: Wrap strap around rolled mat twice, clip carabiner to rear rack crossbar, and pull until snug.
Critical Check: Shake the mat vigorously—if the strap slips more than 0.5 inches, add a second wrap. Seat belt webbing stretches 3% over time; tighten weekly.
Avoiding Common Yoga Mat Transport Disasters
Over 68% of bike mat accidents happen due to improper strap routing near moving parts. Never wrap straps around your chainstay or rear dropout—pedaling forces can saw through nylon in under 5 minutes. Similarly, avoid placing mats over rear lights; even thin straps block 40% of visibility. Always perform the “tug test” before riding: Grab your mat firmly and try to pull it in all directions. If it moves more than your palm’s width, re-secure it.
Why Loose Straps Are Deadly Road Hazards
A dangling strap shorter than 8 inches can catch in your rear wheel spokes within 200 feet of riding, causing immediate catastrophic failure. Longer straps (12+ inches) wrap around brake calipers, locking your wheel at speed. To prevent this:
– Trim all excess strap length to 2 inches max
– Tuck loose ends into mat seams or use rubber strap organizers
– Check strap integrity weekly—frayed edges weaken strength by 90%
Real Consequence: In Portland, 2023 bike accident reports showed 12 injuries directly caused by yoga mat straps entangling wheels.
Weatherproofing Your Mat for Rainy Rides
Foam yoga mats absorb water like sponges, gaining 2-3 lbs when wet and developing mildew within 48 hours. Never use plastic grocery bags—they create condensation that accelerates mold growth. Instead, sleeve your rolled mat in a repurposed swim bag liner:
1. Slide the mat into a waterproof dry bag (10L size)
2. Fold the top down 3 times and clip shut with carabiners
3. Secure the bag to your rack using the diagonal bungee method
This keeps mats bone-dry while adding only 4 oz of weight. For sudden downpours, stop and cover the mat with your cycling jersey—cotton absorbs rain faster than synthetic fabrics.
Safety First: Legal Requirements and Visibility Essentials
Six states (CA, NY, IL, MA, CT, NJ) require all bike cargo to have rear reflectors when riding after dark. Your mat carrier must not obstruct your bike’s existing reflectors—if it does, attach a $2 magnetic reflector to the mat strap. Never mount mats higher than 12 inches above your rack; this raises your center of gravity dangerously on turns. In cities with bike lane laws (like Chicago and Seattle), unsecured cargo can trigger $150 fines—inspect your setup meets local “no dangling parts” ordinances.
Visibility Upgrades That Take 60 Seconds
- Reflective tape: Apply 1-inch strips radially around your mat roll (360° coverage)
- Battery lights: Clip a $5 USB-rechargeable light to the top strap
- Color coding: Use bright orange straps—drivers spot them 3x faster than black
Test visibility by walking 50 feet behind your bike in daylight; if you can’t clearly see the mat’s outline, add more reflective elements.
Final Checklist Before Every Ride
Before pedaling off, spend 20 seconds verifying your mat won’t become a hazard:
– ✅ Roll tightness: Mat diameter under 7 inches (use tape measure)
– ✅ Strap security: Zero slack when tugging mat in all directions
– ✅ Clearance: 2+ inches between mat and tire/brakes
– ✅ Visibility: Reflectors/lights visible from 100+ feet
– ✅ Weight test: Bike handles smoothly when lifting rear wheel
Carrying your yoga mat correctly transforms stressful commutes into mindful journeys. Implement just the rear rack bungee method and you’ll eliminate 90% of common failures. For longer rides, pair it with a frame triangle storage for your yoga clothes—this keeps your center of gravity balanced and your mat dry. Remember: A securely mounted mat isn’t just convenient; it’s your responsibility to other road users. Now go roll out, ride smooth, and arrive at savasana centered.


