

Setting up a walking pad correctly transforms your living space into a functional fitness zone while ensuring your safety during daily use. If your new walking pad arrived but you’re unsure where to begin, you’re not alone—many users struggle with proper installation that affects performance and longevity. This guide provides step-by-step instructions for assembling and calibrating your walking pad so you can start your walking routine without common setup mistakes that lead to belt slippage, error messages, or premature wear.
Before touching any components, dedicate 30-60 minutes to complete setup without rushing. Having the right space and tools ready prevents frustration and ensures your walking pad operates smoothly from day one. You’ll learn exactly how to position, level, and calibrate your equipment while avoiding the three most frequent setup errors that void warranties and compromise safety.
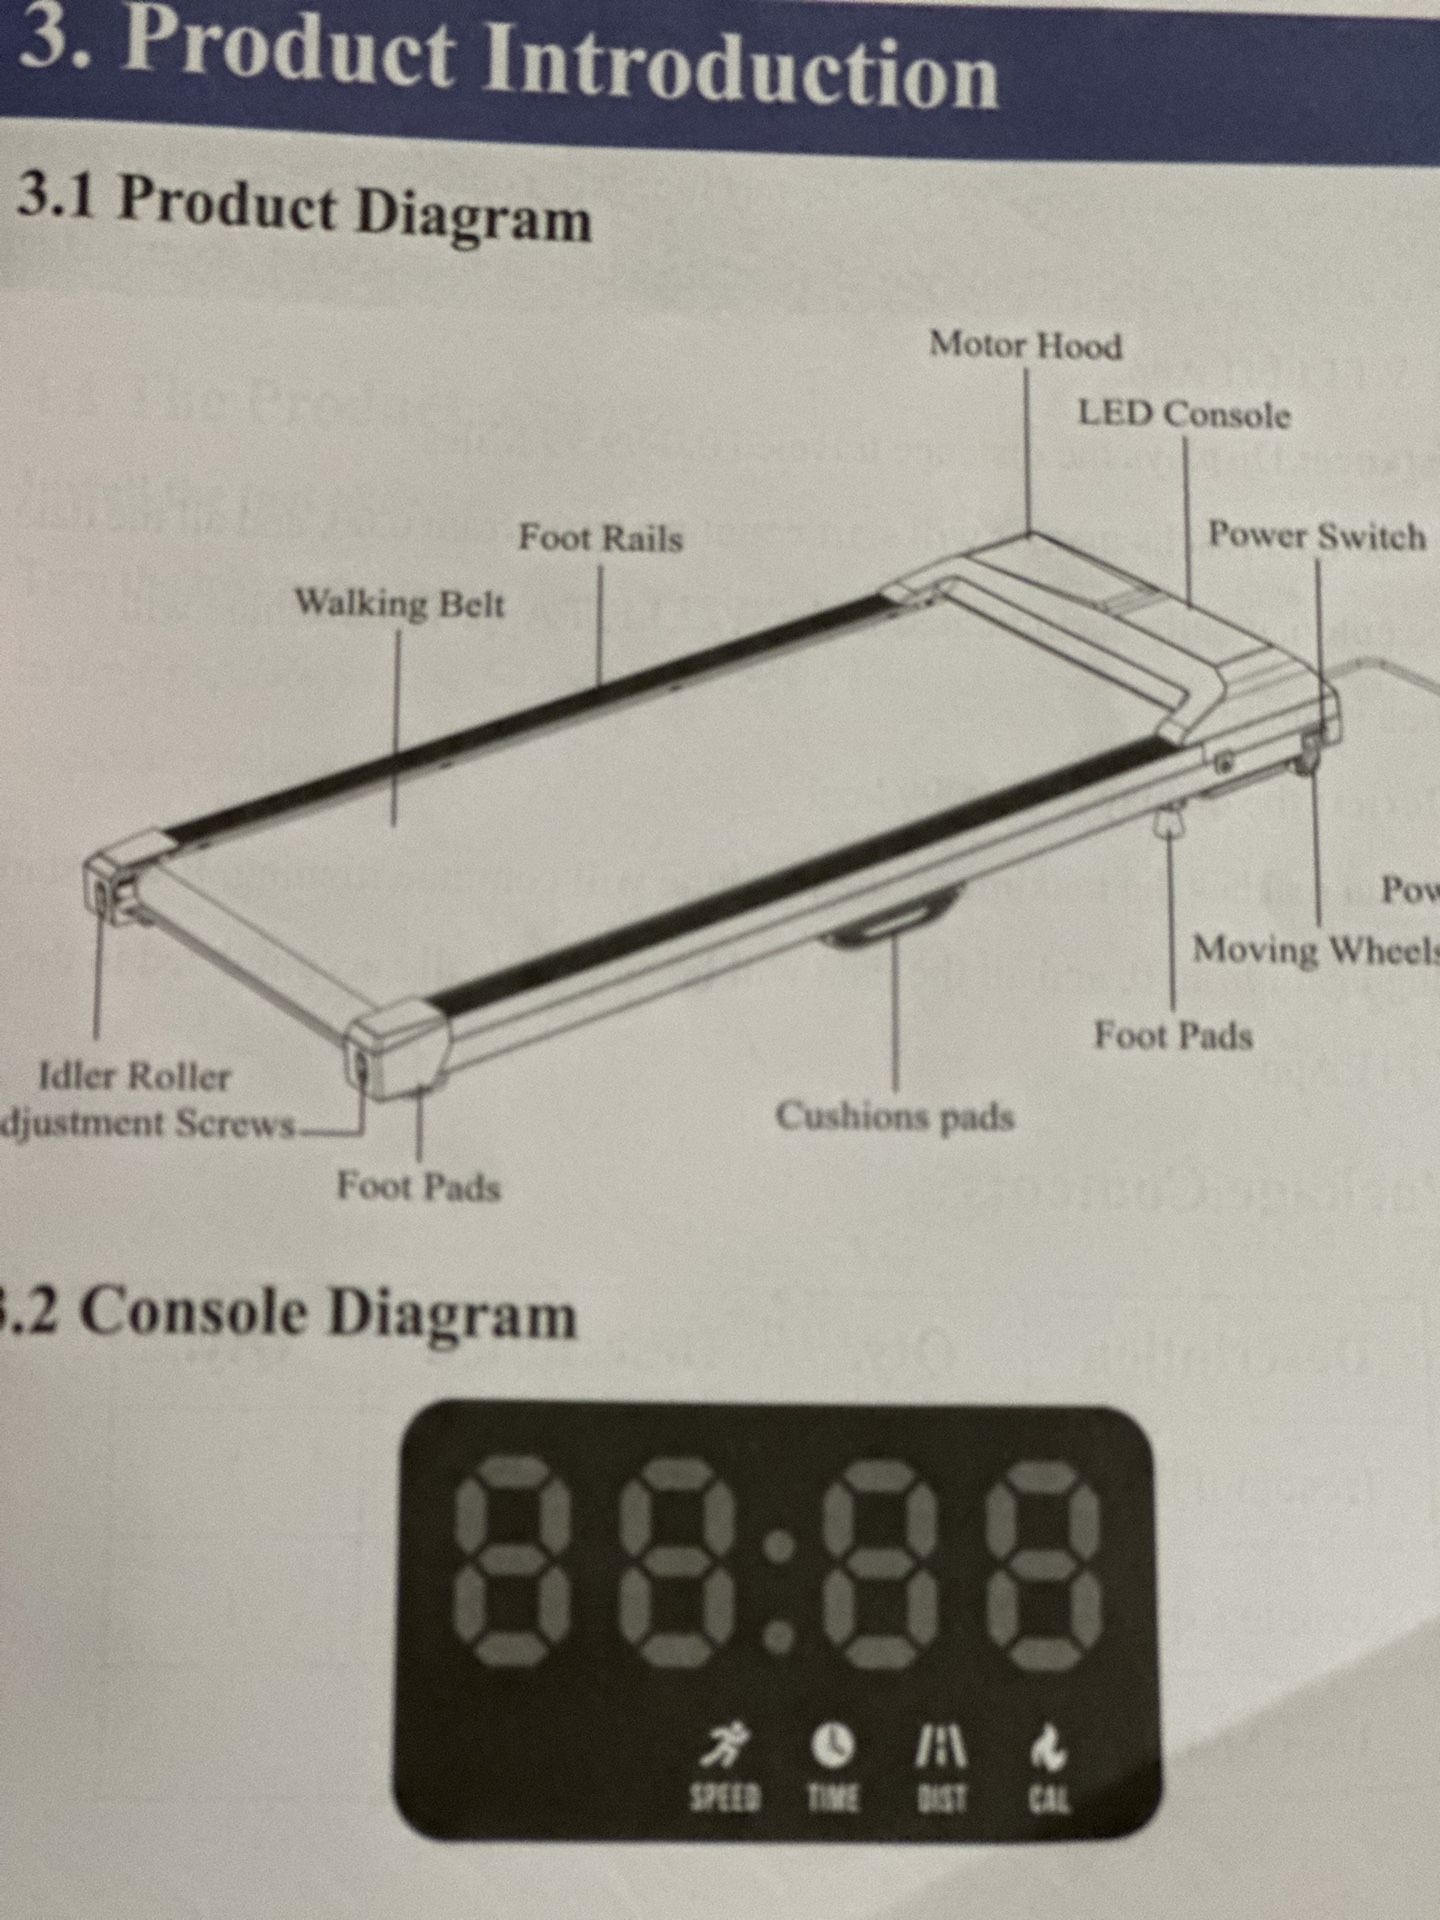
Unbox and Inspect Your Walking Pad Components Thoroughly
Carefully cut through packaging straps and remove all components from the box without dragging the base unit across surfaces. Lay out each piece systematically on a clean, flat surface to prevent losing small parts during assembly. Most walking pads include the base unit, console mast, handrails (if applicable), power cord, assembly tools, and documentation—verify each item against the packing list before discarding packaging materials.
Check for Shipping Damage Before Assembly
Examine the walking belt surface for visible tears, fraying edges, or uneven tension that might indicate transit damage. Run your fingers along the belt’s underside to detect debris or misalignment that could cause operational issues later. Inspect the base frame for dents or cracks, particularly around mounting points where stress occurs during use.
Inventory All Hardware and Documentation
Count all screws, bolts, and washers against the hardware diagram in your manual—missing components will halt your setup progress. Locate the included Allen wrench or other specialized tools designed specifically for your model’s assembly points. Retrieve the user manual, warranty card, and quick-start guide before discarding packaging, as these contain critical safety information and model-specific instructions you’ll need throughout setup.
Choose and Prepare the Ideal Location for Daily Use
Select a flat, hard-surface area with at least 6 feet of clearance in front and 3 feet on each side to accommodate safe mounting, dismounting, and emergency stops. Laminate, tile, or hardwood floors provide optimal stability, while carpeted surfaces require a protective mat to prevent fiber damage and ensure proper ventilation around the motor housing. Avoid placing your walking pad near heat sources, direct sunlight, or high-humidity areas that degrade electronic components over time.
Measure Space Requirements Precisely
Use a tape measure to confirm your chosen spot accommodates both the walking pad’s dimensions plus required clearance zones. For under-desk models, verify you have sufficient knee space beneath your workstation and that the console remains visible during use. Check ceiling height if using in a basement or loft area—taller users need adequate overhead clearance for natural arm movement.
Prepare the Flooring Surface Properly
Sweep or vacuum the installation area thoroughly to remove debris that could interfere with leveling or damage the belt. If using on carpet, lay down a non-slip exercise mat that extends beyond the walking pad’s footprint to prevent shifting during operation. Ensure the surface is completely dry before positioning your equipment, as moisture can damage electrical components and create slipping hazards.
Install Console and Handrails with Precision
Attach the console mast to the base unit’s front mounting points by aligning pre-drilled holes and inserting the provided bolts. Tighten each fastener gradually in a crisscross pattern using the included Allen wrench until snug—not over-tightened—to prevent stripping the threads. Some models feature tool-free snap connections; consult your manual for specific engagement points that produce an audible click when properly secured.
Connect Wiring Harnesses Correctly
Plug the console wiring harness into the base unit’s corresponding port, ensuring both connectors face the same direction before pressing firmly together. Most systems use keyed connectors that only fit one way—never force mismatched ports as this damages delicate circuitry. Tuck excess wiring neatly into the designated channel within the console mast to prevent interference with belt movement or accidental disconnection.
Adjust Handrail Position for Your Height
If your walking pad includes removable handrails, set the height so your elbows maintain a 15-20 degree bend when gripping the rails with arms relaxed at your sides. Tighten all adjustment knobs securely and test stability by applying downward pressure—handrails should not wobble or shift during use. Verify your grip position allows natural arm swing without forcing your shoulders into an elevated position.
Level and Position Your Walking Pad for Smooth Operation
Slide the walking pad into its final position using the built-in transport wheels (if equipped), avoiding dragging that scratches floors or misaligns components. Once positioned, confirm all four corners make full contact with the floor by pressing down on each corner—you should feel no rocking motion. If instability occurs, adjust the leveling feet at each corner by rotating them clockwise to raise or counterclockwise to lower the unit.
Use a Level Tool for Accurate Calibration
Place a 24-inch spirit level across the walking surface both front-to-back and side-to-side to detect subtle imbalances. Adjust each corner’s leveling foot incrementally until the bubble centers perfectly in the level’s vial. Proper leveling prevents uneven belt wear and ensures consistent speed performance across the entire walking surface.
Install Protective Mats on Carpeted Floors
Position a non-slip exercise mat beneath your walking pad if using on carpet, ensuring it lies completely flat without wrinkles that could cause tripping. The mat should extend at least 6 inches beyond the walking pad’s edges to contain any debris that might migrate from carpet fibers during use. Smooth out any air pockets between the mat and floor to prevent shifting during operation.
Power Up and Conduct Initial Operational Tests

Connect the power cord to the designated port on the base unit, typically located near the front right corner, and route the cord along the base frame using included management clips. Plug directly into a grounded wall outlet with surge protection—never use extension cords that could cause voltage drops or create tripping hazards. Flip the power switch near the motor housing to the “on” position before attempting to operate the console.
Complete First-Time Console Setup
Power on the console and follow the on-screen prompts to set time, date, measurement units, and user profiles. If your model connects to fitness apps, download the companion application now and complete Bluetooth pairing before your first walk. Enter your height and weight parameters for accurate calorie calculations, as these settings affect workout program algorithms.
Perform a Low-Speed Test Walk
Start the belt at the minimum speed setting (typically 0.5-1.0 mph) and stand beside the unit to observe initial operation. Listen for unusual grinding, squeaking, or clicking sounds that indicate assembly issues. Gradually increase speed to 2.0 mph while watching for belt slippage, wobbling, or inconsistent movement across the entire surface.
Calibrate Settings for Personalized Walking Experience
Run the automatic calibration sequence if your model supports it, allowing the belt to cycle through various speeds while stationary. Follow on-screen instructions precisely without interrupting the process, which typically takes 30-60 seconds. This calibration ensures accurate speed readings and proper tension adjustment for optimal performance.
Customize Display and Workout Preferences
Adjust console brightness to a comfortable level for your room’s lighting conditions and select which metrics appear during workouts (speed, time, distance, calories). Explore preset workout programs designed for different fitness goals—beginners should start with the “Manual” mode before progressing to interval training options. Set your target heart rate zone if your walking pad includes pulse sensors in the handrails.
Test Emergency Stop Mechanism Immediately
Clip the safety key to your clothing and activate the walking pad to verify the emergency stop functions correctly. Pull the key free to confirm the belt stops within 1-2 seconds—this critical safety feature must work reliably before regular use. Familiarize yourself with the console’s manual stop button location for quick access during workouts.
Conduct Essential Pre-Use Safety Checks
Inspect belt tension by lifting the edges gently—you should be able to raise the belt 2-3 inches at the center point. Excessive looseness causes slippage, while overtightening strains the motor and accelerates wear. Check all fasteners with the included tools to ensure nothing loosened during initial operation, paying special attention to console mounting points and handrail connections.
Verify Clear Surrounding Area
Remove all obstacles, pets, and small children from the workout zone before each session. Keep water bottles and towels within reach but outside the immediate walking path to prevent tripping. Wear athletic shoes with non-marking soles designed for indoor use—avoid bare feet, socks, or street shoes that could damage the belt surface.
Establish a Weekly Maintenance Routine
Wipe down the console and handrails after each use with a soft, slightly damp cloth to remove sweat and oils. Vacuum around the unit weekly to prevent dust accumulation in the belt mechanism. Schedule belt lubrication every 3-6 months using manufacturer-recommended silicone-based products applied to the underside edges for smoother operation and extended component life.
Proper walking pad setup ensures years of reliable service while maximizing your daily step count without injury risk. By following these precise installation steps, you’ve created a safe, stable foundation for consistent walking sessions that boost energy, improve circulation, and support overall wellness. Remember to perform monthly safety checks and keep your equipment clean—these simple habits prevent 95% of common walking pad issues while maintaining optimal performance for your home fitness routine.


