
Stuck doing the same bodyweight exercises with zero progress? You’re not alone—most beginners hit a plateau within weeks of starting calisthenics. The secret weapon hiding in plain sight? A weighted vest. By adding just 5% of your body weight (about 3.5kg for a 70kg person), you instantly transform basic squats and push-ups into muscle-building power moves. This isn’t gym theory; studies confirm weighted vests boost calorie burn by 12% and accelerate strength gains while improving bone density. In this guide, you’ll discover exactly how to choose your vest, avoid beginner injuries, and follow plug-and-play workouts that deliver visible results in 8 weeks—no fancy equipment required.
Forget complicated lifting routines. Weighted vest training leverages movements you already know, amplifying their impact through strategic resistance. But jump in too heavy too soon and you’ll strain your lower back or wreck your form. I’ve seen countless new users make this mistake—loading up with 10kg on day one only to quit from joint pain. The solution? A methodical approach starting at just 5% body weight. You’ll learn why this specific load is non-negotiable for beginners, how to spot a dangerously loose vest fit, and the 6 foundational exercises that build real-world strength without equipment. By the end, you’ll have a complete roadmap from your first vest purchase to advanced jump squats—all while keeping workouts under 20 minutes.
Why 5% Body Weight is Your Perfect Starting Vest Load
Skip this step and you risk injury or burnout. Beginners consistently succeed with exactly 5% of their body mass—not 8%, not 10%. For a 70kg person, that’s 3.5kg; scale accordingly for your size. Why so light? Your muscles and connective tissues need time to adapt to the new spinal compression. Research shows loads exceeding 10% body weight (7kg for 70kg) drastically increase lower back strain during squats and lunges. Stick to 5% for your first two weeks to groove perfect form while still doubling metabolic demand.
Adjustable vs Fixed Vest: Which Wins for New Users?
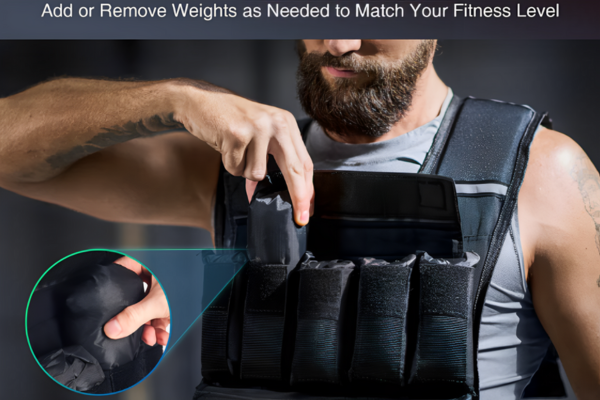
Choose adjustable vests with removable 0.5–1kg steel packets if you’re unsure of your ideal load. They let you micro-adjust as you progress—adding just 500g when 12 reps feel easy. Fixed-weight vests (like Davina McCall’s 3kg model) cost less but lock you into one resistance level. Beginners often outgrow them too quickly, forcing premature upgrades. Pro tip: Test vests by performing 10 bodyweight squats while wearing them. If straps dig in or the vest rides up your ribcage, keep shopping.
The 30-Second Fit Test That Prevents Injury
Don’t trust online size charts—do this live check:
1. Clavicle-to-ribs coverage: Vest must sit evenly from collarbones to lower ribs, never riding up over your chest.
2. Bounce test: Do 10 jumping jacks. Snug straps prevent vertical shifting—any bounce means dangerous instability.
3. Arm raise check: Lift arms overhead. Vest shouldn’t slide down or pinch underarms (a major lower-back strain trigger).
4. Squat validation: Perform 10 bodyweight squats. Straps must stay tight, weight centered over your hips.
Critical Vest Safety Checks Before Your First Workout

Skipping these steps turns a strength builder into a spine wrecker. Always complete this pre-workout safety sequence:
Core Bracing: Your Non-Negotiable Injury Shield
Before every rep, draw your navel toward your spine like zipping a tight pair of jeans. This simple cue activates your transverse abdominis—the body’s natural weightlifting belt—to protect lumbar discs under load. Fail to brace and the vest’s extra weight amplifies spinal compression by 300%, according to biomechanics research. Practice while standing: inhale deeply, then exhale while pulling belly button inward. Hold this tension through every movement.
Pain vs Discomfort Decoder for New Users
- Muscular burn during squats? Normal—keep going.
- Sharp knee or shoulder pain? STOP immediately. Vest weight exposed pre-existing weakness.
- DOMS (next-day soreness)? Expected. Walk it off with a 20-minute vest-assisted stroll at 50% effort.
- Persistent lower back ache? Vest too heavy or straps loose. Reduce weight by 1kg and recheck fit.
6 Weighted Vest Exercises Every Beginner Must Master
Forget complex routines. These six moves build full-body strength using only your vest:
Lower Body Power Builders
Flawless Weighted Squat Technique
Feet shoulder-width, toes slightly out. Brace core, hinge hips back, and descend until thighs break parallel. Keep chest proud—no rounding forward. Drive through heels to stand tall. Beginner tip: Place a yoga block between your knees to fire glutes and prevent knee cave-in. Do 3 sets of 10–12 reps with 60 seconds rest.
Reverse Lunge: The Joint-Friendly Alternative
Step backward (not forward!), plant forefoot, and drop back knee toward floor until both knees hit 90°. Push through front heel to return. Alternate legs. Why reverse? Less knee shear than forward lunges—critical for vest beginners. Aim for 3 sets of 8–10 reps per leg.
Upper Body Strength Builders
Vest Push-Up: Chest & Triceps Igniter
High plank position, hands slightly wider than shoulders. Lower chest to 5cm above floor, elbows at 45° from torso (not flared out). Press back to lockout. Knee modification: Keep hips stacked over knees for strict form. Target 3 sets of 8–10 reps.
Hand-Release Push-Up: Eliminate Cheating
Lower completely to floor, lift hands briefly, replace hands, then press up. This removes momentum and builds true pressing strength. Beginner hack: Elevate hands on a bench if full reps fail. Do 3 sets of 6–8 reps.
Core Stability Essentials
Weighted Plank: Spinal Armor Builder
Forearms on floor, elbows under shoulders. Squeeze glutes and quads while bracing abs. Body straight line head-to-heels—no sagging hips. Pro tip: Add shoulder taps (alternate lifting hands) once you hit 45 seconds. Hold 3 sets of 30–45 seconds.
Russian Twist: Rotational Power
Seated, knees bent 90°, torso reclined 45°. Hold vest edges and rotate shoulders left-to-right. Keep feet flat if balance wobbles—never use momentum. Complete 3 sets of 20 twists (10 per side).
3 Plug-and-Play Weighted Vest Workouts for New Users
No guesswork. These routines deliver results in under 20 minutes:
20-Minute Strength Circuit (3 Rounds)
- Weighted Squats: 12 reps
- Vest Push-Ups: 10 reps
- Reverse Lunges: 10 reps/leg
- Weighted Plank: 30 seconds
- Vest Curls: 12 reps (hold vest by straps, curl toward shoulders)
Rest 60 seconds between moves. Perfect for post-work dinner sessions.
15-Minute EMOM (Every Minute on the Minute)
Start each minute with:
– Min 1: 12 squats
– Min 2: 8 push-ups
– Min 3: 16 alternating reverse lunges
– Min 4: 30-second plank
Rest remaining time. Repeat 4 rounds. EMOM builds cardiovascular resilience while reinforcing perfect rep pacing.
At-Home AMRAP (20-Minute Timer)
As Many Rounds As Possible of:
– 200m brisk walk/march
– 10 squats
– 10 hand-release push-ups
– 20 Russian twists
Track total rounds weekly—your progress metric. Beginners average 3–4 rounds initially.
Your 8-Week Weighted Vest Progression Plan

Ramp up safely with this science-backed timeline:
Weeks 1–2: Form Foundation
- Weight: 5% body mass (e.g., 3.5kg)
- Volume: 3 sets of 8–10 reps
- Frequency: 2 sessions (non-consecutive days)
- Critical: Record yourself squatting. Check for upright torso and heel drive.
Weeks 3–4: Rep Mastery
- Keep same vest weight
- Push to 3 sets of 11–12 reps
- Add 3-second slow lowering on squats
- Red flag: If speed drops >20%, reduce reps to 8–10.
Weeks 5–6: Micro-Loading
- Increase vest by 0.5–1kg OR add 4th set
- Monitor RPE (Rate of Perceived Exertion)—aim for 7–8/10 on final set
- Beginner trap: Skipping rest days. DOMS doubles if you train consecutive days.
Weeks 7–8: Dynamic Power
- Jump to 7–8% body weight
- Swap squats for jump squats only if knee pain-free
- Test readiness: Can you do 15 unweighted jump squats with perfect landing?
Post-Workout Recovery Protocol for Weighted Vest Training
Skip this and soreness becomes injury:
– Hydrate: 500ml water within 30 minutes post-workout
– Protein: 20g within 60 minutes (e.g., whey shake or Greek yogurt)
– Active recovery: 3–5 minutes light walking + hip flexor stretch (kneeling lunge hold)
– Sleep check: If morning resting heart rate jumps >10bpm above baseline, take an extra rest day.
Top 4 Weighted Vest Mistakes That Cause Beginner Injuries
1. Starting Above 5% Body Weight
Consequence: Spinal compression spikes 40%. Solution: Stick to 5% for 2 full weeks—no exceptions.
2. Loose Straps During Dynamic Moves
Consequence: Vest bounce shifts center of gravity, straining lumbar discs. Fix: Re-tighten straps before every set.
3. Skipping the Dynamic Warm-Up
Consequence: Cold muscles + extra load = 3x higher strain risk. Must-do: 3 minutes of leg swings, arm circles, and cat-camel spinal rolls.
4. Ignoring Core Bracing
Consequence: Vest weight amplifies poor posture into disc damage. Non-negotiable: Draw navel toward spine before every rep.
| Factor | Beginner Guideline |
|---|---|
| Vest Weight | 5–10% body mass (start at 5%) |
| Sessions | 2–3/week, non-consecutive days |
| Sets × Reps | 3 × 8–12 |
| Key Moves | Squat, Push-Up, Reverse Lunge, Plank |
| Rest Between Sets | 45–90 seconds |
| Progression | +0.5–1kg or +1–2 reps every 2 weeks |
| Safety Check | Pain-free range, tight straps, braced core |
Your weighted vest journey starts today—not with heavy loads, but with perfect form at 5% body weight. Master these six exercises for two weeks, then progress using the 8-week plan. Track your AMRAP rounds weekly; when you hit 5 full circuits, you’ve unlocked real strength. Remember: the vest doesn’t build muscle—the consistent, safe repetitions do. Strap in, brace your core, and turn ordinary movements into extraordinary results. Your first vest-assisted push-up awaits.


