
Getting on a rowing machine without proper setup is like driving a car with the seat in the wrong position—you’ll struggle, get frustrated, and potentially hurt yourself. Whether you’re facing your first rowing session or switching between different gym machines, knowing exactly how to configure your rower transforms your workout from awkward fumbling into smooth, powerful strokes.
This guide walks you through the complete setup process for both air resistance (Concept2 style) and water resistance (WaterRower style) machines. By the end, you’ll be able to dial in your perfect setup in under 60 seconds and start rowing with confidence. Proper rowing machine setup is the foundation for effective workouts and injury prevention—skip these steps, and you’ll never maximize your potential on this incredible full-body exercise machine.
Perfect Seating Position for Your Rowing Machine
Why Glute Placement Determines Your Rowing Power
Slide onto the seat and position your glutes toward the back edge, letting the seat’s natural depression cradle your tailbone. This isn’t just about comfort—it directly affects your ability to generate power. When your glutes are properly positioned, your hamstrings engage correctly, allowing you to drive through your legs rather than relying on your back.
Visual cue to check: Your feet should rest flat on the pedals with toes pointing forward. If your heels lift off the footplate, you’re too far forward. This foundation prevents lower back strain and gives you maximum power transfer throughout your stroke.
How to Find Your Ideal Seat Position in 10 Seconds
Sit on the rower with your feet unstrapped and slide back until your legs are fully extended. Now, gently pull your knees toward your chest while keeping your back straight. Your ideal starting position places your knees slightly in front of your toes at full extension—not past them, but not behind either.
Pro tip: If you feel pressure on your tailbone, you’re sitting too far back. If your knees feel cramped when bent, you’re too far forward. The perfect position lets you sit tall with a neutral spine throughout the entire stroke cycle.
Troubleshooting Common Seat Position Mistakes
Many beginners sit too far forward, thinking it gives them more leverage. This forces them to pull with their arms instead of driving with their legs, dramatically reducing efficiency. If you find yourself leaning back excessively during the drive phase, your seat position is likely too far forward.
Warning: Sitting too far back causes your hamstrings to overstretch at the catch position, increasing risk of strain. You should feel comfortable reaching forward without rounding your lower back.
How to Position Your Feet on a Concept2 and WaterRower
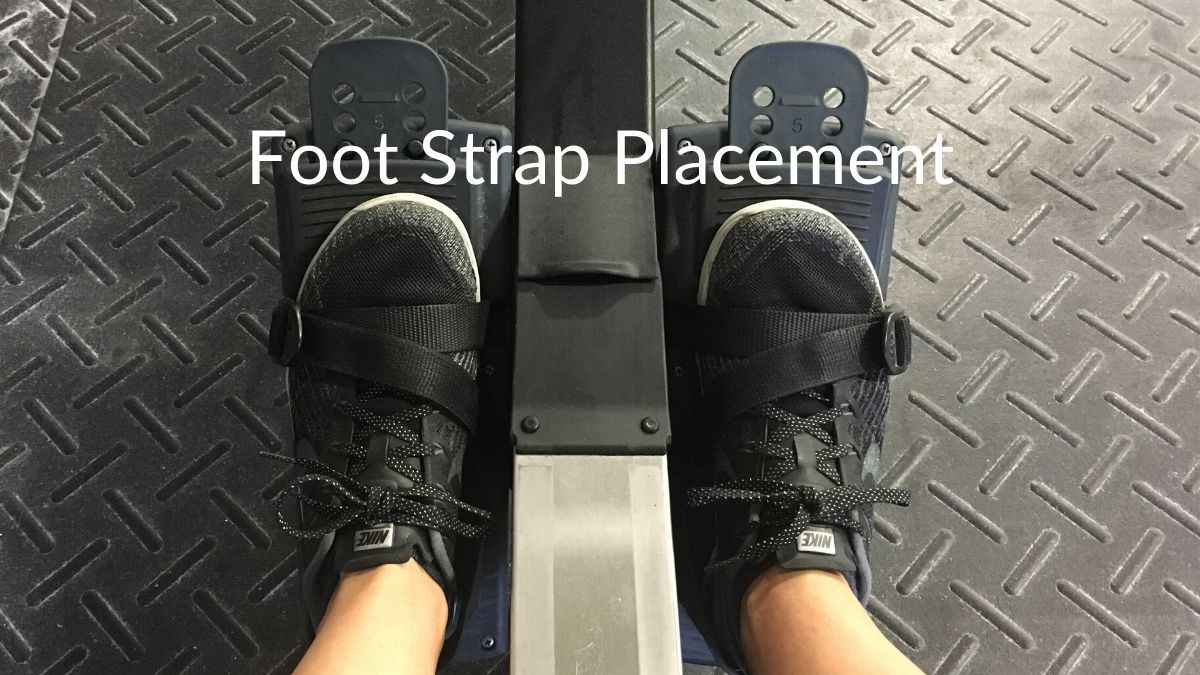
Exact Placement of Foot Straps for Maximum Power Transfer
Fasten the straps securely over the balls of your feet—not your toes, not your arches. This placement is non-negotiable for proper form and power transfer. The straps should feel snug but not restrictive, allowing you to push through your heels during the drive phase.
Key indicator: When you pull the handle toward your body, your feet shouldn’t lift off the footplate. If they do, your straps are too loose, wasting 30-40% of your leg drive power. Tighten them until your feet feel anchored but not constricted.
Adjusting Foot Stretchers for Different Leg Lengths
The foot stretcher (the adjustable footplate) moves up or down to match your shin length:
– Longer shins: Position the stretcher lower
– Shorter shins: Position the stretcher higher
– Quick test: If you can’t reach full forward position without your knees splaying outward, lower the stretcher
Time-saver: On Concept2 machines, the foot stretcher adjusts with a simple lever. WaterRower models typically require pressing a button while sliding the footplate. Get this right once, and you won’t need to adjust it again for your body type.
Why Knee Clearance Matters in Your Rowing Stroke
In the catch position, your forearms should clear over your knees without contact. If your arms hit your knees, the foot stretcher needs adjustment. This clearance ensures the handle travels in a straight line throughout your stroke—critical for efficiency and injury prevention.
Troubleshooting: If you have to bend your elbows to clear your knees, your foot stretcher is too high. If your knees feel cramped, it’s too low. The ideal position lets your arms stay straight until your shoulders pass your knees.
Proper Catch Position Setup for Injury Prevention
How Flexible Should You Be for Proper Rowing Form?
The catch is your starting point—where the real power begins. Sit forward with legs bent, bringing your knees close to your chest without bouncing them. Your arms should reach straight ahead, holding the handle naturally.
Flexibility affects your range:
– Flexible athletes: Can reach all the way back to the flywheel
– Limited flexibility: Stop when you feel a gentle stretch, not strain
– Key indicator: If your shoulders cave inward, you’ve gone too far forward
The 11 O’Clock Torso Angle Rule Most Rowers Miss
Keep your chest wide and shoulders pulled back throughout the entire movement. Your torso should lean slightly forward in the catch position—think 11 o’clock on a clock face. Too far forward overworks your upper body, while too far back reduces power. The sweet spot requires minimal effort to accelerate the flywheel smoothly.
Pro tip: Place a hand on your lower back during setup. If you feel your back rounding, you’re leaning too far forward. If you feel pressure on your lower back, you’re sitting too upright.
Diagnosing Shoulder Alignment Problems During Setup
Shoulder position directly impacts your ability to maintain proper form throughout your workout. At the catch position, your shoulders should be slightly in front of your hips, with your chest open and collarbones wide.
Warning sign: If your shoulders roll forward and your upper back rounds, you’re reaching too far. This puts excessive strain on your lumbar spine and dramatically reduces power transfer from your legs.
Air vs. Water Rowing Machine Resistance Configuration

Concept2 Damper Settings: What 1-10 Really Means
For Concept2 style machines, locate the damper lever on the flywheel housing marked 1-10. This isn’t actually resistance—it’s airflow control:
– 1: Feels like rowing a sleek racing shell
– 5: Simulates a standard rowing boat (recommended starting point)
– 10: Feels like rowing a barge—great for strength work, terrible for cardio
Pro tip: Start at 3-4 for your first sessions. Higher settings create strength workouts that exhaust you quickly and provide minimal aerobic benefit. Most competitive rowers train between 3-5 for optimal power-to-endurance ratio.
WaterRower Resistance Reality: Why You Can’t Adjust It
WaterRower machines work differently—there’s no resistance adjustment. The water tank provides variable resistance based purely on how hard you pull. Row gently for light resistance, pull hard for heavy resistance. It’s that simple. Ignore any resistance adjustment instructions when using WaterRower models.
Key insight: The water level in the tank affects overall resistance. If your WaterRower feels too easy or too hard consistently, check the water level—most models require 14-17 liters depending on your strength level.
Cleaning Your Air Rower to Maintain Consistent Resistance
Dust and dirt can clog the flywheel mesh on air resistance machines, making damper settings feel different between machines. If a setting 4 feels unusually heavy or light, the machine might need cleaning rather than your technique being off.
Maintenance schedule: Wipe down the flywheel housing weekly with a damp cloth. Every three months, use a soft brush to clear debris from the mesh. This ensures your damper settings remain consistent workout-to-workout.
60-Second Rowing Machine Setup Checklist
The 5-Point Pre-Row Verification Process
Before your first stroke, run through this checklist:
– [ ] Seat positioned with glutes back
– [ ] Foot straps over balls of feet, tight but comfortable
– [ ] Can you reach full forward without arm-knee contact?
– [ ] Damper at 3-5 (air) or ready to row (water)
– [ ] Display showing your preferred metrics
Time estimate: With practice, this verification takes just 15 seconds. Skipping it could waste your entire workout on poor form.
How to Adjust Between Users Without Starting Over
When switching machines or users:
1. Foot stretcher: One adjustment based on shin length
2. Foot straps: One pull to tighten
3. Damper: One lever movement to desired setting
4. Display: One button press for preferred view
Total time: 45-60 seconds once you’re familiar with the process. Create a mental checklist so you never miss a step when hopping on a different machine.
Common Setup Oversights That Wreck Your Workout
Most people focus only on seat position and ignore foot placement, which accounts for 60% of power transfer. Another common mistake is setting the damper too high while thinking it makes the workout “better.”
Pro tip: Set up the same way every time. Consistency in setup leads to consistent performance improvements. Take a photo of your ideal setup for quick reference when using different machines.
Fixing the 3 Most Common Rowing Machine Setup Mistakes
Why Damper Setting 10 Is Killing Your Cardio Workout
Setting damper to 10 because “higher is better” creates a strength workout that leaves you exhausted in 2 minutes. This isn’t impressive—it’s counterproductive for building rowing fitness.
Fix: Set your damper to 4-5 for most workouts. Only use settings 7+ for specific strength training sessions, and even then, limit these to 10-15 minutes total.
How to Avoid Back Strain from Overreaching at the Catch
Forcing yourself into an extreme catch position because you saw an Olympian do it leads to back strain. Work within your current range and improve flexibility gradually.
Quick correction: If you feel your back rounding at the catch position, shorten your stroke immediately. It’s better to take shorter, powerful strokes than longer, inefficient ones.
Proper Foot Strap Tightness: Too Loose or Too Tight?
Loose foot straps cause your feet to lift during the drive phase, reducing power and potentially causing blisters. The straps should anchor your feet solidly to transfer leg power.
Perfect tightness test: You should be able to wiggle your toes slightly but not lift your foot off the plate. If you can’t adjust your foot position without unbuckling, they’re too tight.
Mastering your rowing machine setup transforms every workout. The difference between a properly configured machine and a random hop-on is night and day—better form, more power, and significantly lower injury risk. Once these steps become second nature, you’ll dial in your perfect setup faster than most people find the TV remote.
Start with these fundamentals, and every stroke will feel natural, powerful, and efficient. Commit to perfecting your setup for your next five workouts, and you’ll notice dramatic improvements in endurance, power, and overall workout enjoyment. Remember: proper rowing machine setup isn’t just about getting started—it’s the foundation for every successful rowing session you’ll ever have.


