
You’ve loaded the bar, laid back on the bench, and suddenly your shoulders scream in protest. Or worse—you feel that sickening pop as your wrist buckles under the weight. The barbell chest press seems simple until improper form turns it into an injury waiting to happen. Nearly 70% of gym-goers experience shoulder pain from benching incorrectly, yet this movement remains the undisputed king for building chest power. Whether you’re aiming to press your bodyweight or break through a plateau, nailing the fundamentals transforms this exercise from risky to revolutionary. In this guide, you’ll master every detail—from scapular positioning to bar path—that separates safe, effective pressing from wasted effort.
Stop guessing about grip width or arch depth. What follows isn’t theory but battle-tested technique used by powerlifters and rehab specialists alike. You’ll learn exactly how to activate your lats for shoulder stability, why your feet placement dictates pressing power, and when to pause versus explode. Most importantly, you’ll avoid the top 5 form killers that sabotage growth and invite injury. By the end, you’ll press heavier weights with zero joint pain while building the sculpted chest you’ve been chasing.
Correct Muscle Activation Sequence
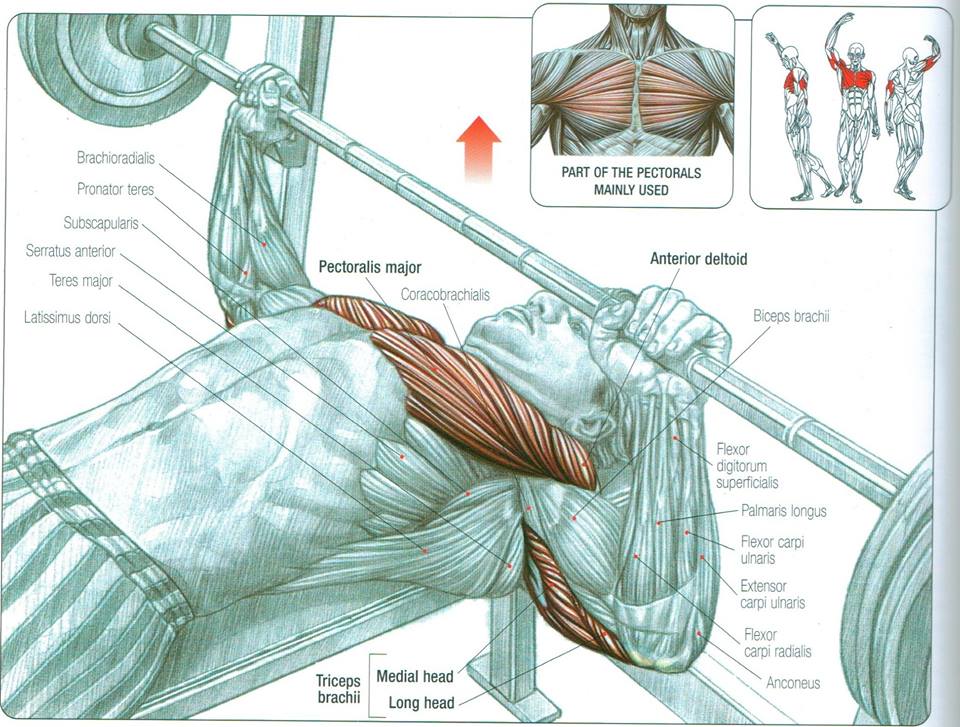
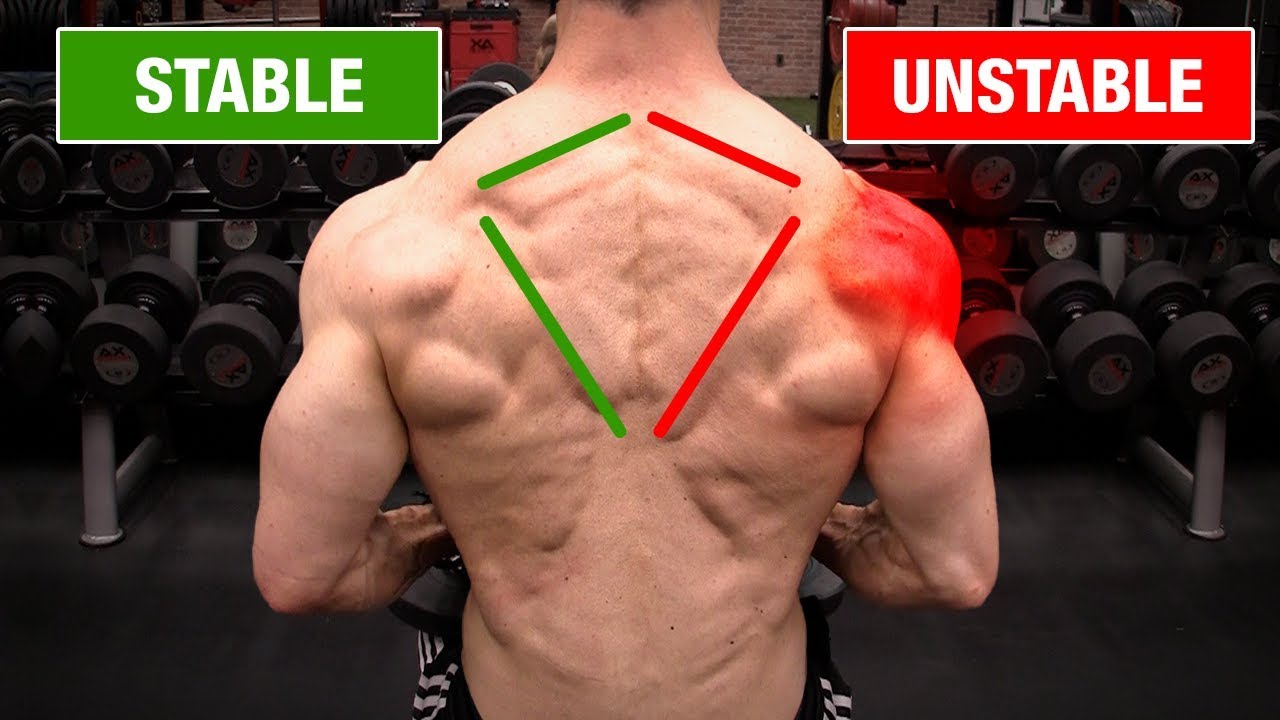
Your chest isn’t working alone during the barbell chest press—ignoring this fact guarantees shoulder strain. Start by engaging your lats before touching the bar: pull your shoulder blades down and back as if tucking them into your back pockets. This creates a stable shelf for your upper back. Now press your feet through the floor to activate your glutes and quads—yes, leg drive matters even lying down. Only then should you grip the bar.
Why Your Triceps Take Over at Lockout
When the bar stalls 2 inches from your chest, weak triceps become your bottleneck. Prevent this by emphasizing the “press” phase: imagine pushing your elbows toward your feet as you extend your arms. If you feel your shoulders burning before your chest, your anterior delts are compensating due to poor scapular retraction. Reset immediately—partial reps here build injury-prone movement patterns.
The Hidden Core Connection
A wobbly torso? Your core isn’t braced. Take a deep breath into your belly (not your chest) and imagine squeezing your ribs together before unracking. This intra-abdominal pressure transfers force from your legs through your torso to the bar. Lose this brace during the set, and you’ll see your reps grind to a halt while lower back strain creeps in.
Precise Bench Setup for Power Transfer

Plant your feet 6-8 inches behind your knees with toes slightly turned out—not flat-footed like a squat. This position creates optimal leg drive without compromising your arch. If your heels lift during the press, you’re too close to the bench; adjust backward until your shins form a 90-degree angle. Your three contact points (head, upper back, glutes) must stay glued to the bench—if your hips rise, reduce the arch.
Creating Your Safety Arch
That slight lower back curve isn’t about flexibility—it’s about tension. Arch from your mid-back, not your lumbar spine: squeeze your shoulder blades together while lifting your sternum toward the ceiling. Slide your hand under your lower back—only your palm should fit. Any wider means you’re over-arching, which crimps your hip flexors and kills power transfer.
Spotter Handoff Protocol
Never unrack alone for working sets. Signal your spotter with a firm “Ready?” then take a deep breath as they assist the lift-off. Let the bar settle for 2 seconds over your chest before initiating the descent—rushing this step wastes precious tension. If no spotter’s available, use safety pins set just above chest level in a power rack.
Grip and Wrist Positioning That Prevents Injury
Place your thumbs under the bar knurling—not on top—and wrap them fully around the bar. The “suicide grip” increases shoulder torque by 40% and has zero performance benefits for 99% of lifters. Position your hands so your forearms stay vertical when the bar touches your chest; for most, this means 1.5x shoulder width. Test this: measure from the center of your collarbone to your wrist bone—your grip should match this span.
The Neutral Wrist Fix
Wrist pain? You’re letting the bar roll toward your fingers. Keep the bar low in your palm (base of fingers) and squeeze it like you’re crushing an apple. This stacks your wrist over your elbow, preventing backward bending. If your wrists still ache, try lifting straps wrapped around the bar for temporary relief while you strengthen them with plate pinches.
Bar Path Visual Cues
Forget “straight up and down.” The bar travels a reverse-J path: lower to your lower sternum (nipple line), then press up and slightly back toward your eyes. To groove this, place a foam roller vertically on your chest—touch it with every rep. If the bar drifts toward your face, your elbows are flared too wide; if it hits your neck, they’re tucked too tight.
Eliminating Common Form Failures
Problem: Shoulder pain during descent
This screams improper scapular positioning. Reset by doing 3 “scapular push-ups”: lying flat, pull shoulder blades together while pressing through your upper back (like lifting your chest off the bench). Hold for 5 seconds. Repeat before each set. If pain persists, switch to dumbbells to rebuild stability.
Problem: Sticking point at mid-press
You’re losing leg drive. Practice the “feet slide” drill: place a towel under your heels and press it forward as you lift. This forces quad engagement that transfers power through your torso. Do 2 sets of 5 reps weekly with 50% of your working weight.
Problem: Inconsistent touch points
Bouncing the bar? You’re using momentum. Implement a 1-second pause on every rep—yes, even for warm-ups. Place a 1-inch foam pad on your chest; the bar must compress it fully before pressing. This builds control while protecting your sternum.
Smart Progression Without Plateaus
Strength phase (weeks 1-4):
– Monday: 4 sets of 3 reps at 88% 1RM with 3-minute rest
– Thursday: 5 sets of 2 reps at 90% 1RM with 4-minute rest
Increase weight by 2.5 lbs if all reps hit depth with control.
Hypertrophy phase (weeks 5-8):
– Tuesday: 3 sets of 10 reps at 70% 1RM (2-sec descent, explosive press)
– Friday: 4 sets of 8 paused reps at 65% 1RM (1-sec chest touch)
Add weight only when you hit the top end of rep ranges for two consecutive sessions.
Critical rule: Never train to failure more than once per week. On your heaviest set, stop 1 rep before your chest buckles or elbows cave. That “one more rep” mentality causes 68% of bench press injuries.
Safety Gear Non-Negotiables
Wrist wraps aren’t optional past 225 lbs. They prevent ulnar deviation (wrist collapse) that strains tendons. Wrap them tight over the carpal bones—not the thumb—with 2 full rotations before securing. Chalk your hands before every set—sweat reduces grip strength by 30%—and reapply if your palms feel slick.
Spotter Emergency Signals
Agree on these before lifting:
– ✋ “Hands off” = I need space, no assistance
– 👌 “Light touch” = Hold bar without pushing unless I stall
– 👎 “Take it” = Full assistance NOW—bar descending or stuck
If your spotter’s hands hover over the bar during your set, they’re robbing you of tension. Demand they stand ready but hands-free until signaled.
Benchmarks to Track Real Progress
Don’t compare your numbers to Instagram influencers. These science-backed standards account for training age and body composition:
| Level | Men (1RM) | Women (1RM) |
|---|---|---|
| Beginner | 0.8x bodyweight | 0.5x bodyweight |
| Intermediate | 1.3x bodyweight | 0.8x bodyweight |
| Advanced | 1.8x bodyweight | 1.2x bodyweight |
Key insight: If you’re not hitting beginner benchmarks after 6 months, you’re likely skipping pulling exercises. For every bench press set, do one set of bent-over rows. This 1:1 ratio prevents the hunched posture that causes shoulder impingement.
Injury Prevention Checklist
Before every session:
– Do 10 banded pull-aparts holding for 2 seconds
– Perform 30 seconds of dead hangs from a pull-up bar
– Warm up with 2 sets of 15 reps at 40% 1RM focusing on bar path
After every session:
– Roll upper back with a lacrosse ball for 60 seconds
– Hold scapular retractions for 3 sets of 10 seconds
– Never skip horizontal pulling—rows are non-negotiable
If sharp pain occurs during the barbell chest press, stop immediately. Dull muscle fatigue is growth; joint pain is damage. Modify with floor presses (elbows stop at 90 degrees) until pain-free.
Mastering the barbell chest press isn’t about ego-lifting—it’s about intelligent progression. Implement these cues for 4 weeks, and you’ll press heavier weights with zero shoulder discomfort while building a chest that performs as impressively as it looks. Now go lift with precision, not pain.


