
You’ve been hoisting heavy barbells for months, yet your traps remain stubbornly flat like a deflated basketball. That frustrating gap between your neck and shoulders won’t fill out no matter how many sets you grind through. The problem isn’t your effort—it’s likely your barbell shrug exercise technique. This deceptively simple movement packs massive trap-building potential when executed correctly, but 90% of lifters sabotage their results with critical form errors that shift tension away from the trapezius muscles.
Unlike complex lifts requiring full-body coordination, the barbell shrug exercise isolates your traps with minimal movement complexity. Yet that simplicity creates dangerous complacency—lifters load excessive weight while rolling shoulders or using momentum, transforming an effective isolation move into a wasted effort. Mastering this exercise unlocks not just wider shoulders and a powerful neck, but also critical strength for deadlifts, overhead presses, and even carrying heavy objects in daily life. By the end of this guide, you’ll know exactly how to position the bar, control the movement, and select the right weight to trigger explosive trap growth.
Stop Wasting Time on Ineffective Barbell Shrugs
Why Standard Shrug Form Fails Your Traps
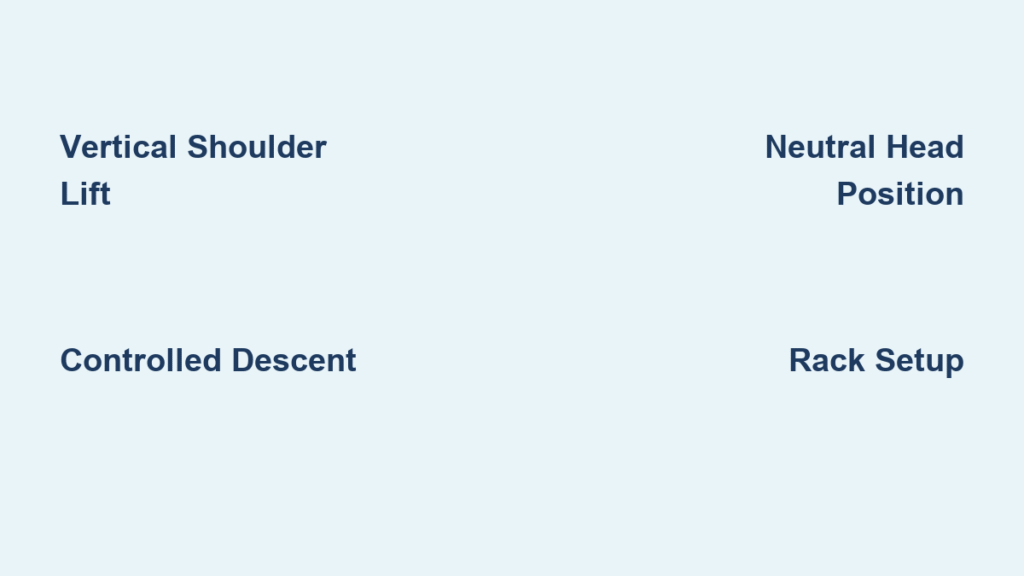
Most lifters perform barbell shrugs with shoulders rolling forward in a circular motion, mistakenly believing this increases range of motion. This common error shifts tension from your upper trapezius to your rhomboids and rear delts while straining your cervical spine. The trap muscles respond best to pure vertical elevation—your shoulders should travel straight toward your ears like an elevator, not in a circular path. When you roll your shoulders, you lose the critical peak contraction needed for hypertrophy.
Critical visual cue: Stand sideways to a mirror. If your shoulder caps move forward past your ears at the top of the movement, you’re rolling incorrectly. Your shoulders should align vertically over your hips throughout.
The Weight Loading Trap Everyone Falls Into
Lifters often treat the barbell shrug exercise as a max-strength movement, loading 300+ pounds while compromising form. Your traps respond better to controlled tension than brute force. Start with 50-60% of your deadlift max—this typically means 135-185 pounds for intermediate lifters. You’ll feel immediate burn in your traps within 8-10 reps when using proper form. If you can complete 15+ reps with ease, increase weight by 10% next session. If your grip fails before trap fatigue, reduce weight immediately.
Pro tip: Perform your first set without lifting from the floor. Position the bar on safety pins just below waist height. This eliminates the deadlift component and ensures your traps—not your spinal erectors—bear the load from the first rep.
Fix Your Barbell Shrug Form in 5 Critical Steps
Power Rack Setup for Maximum Trap Activation
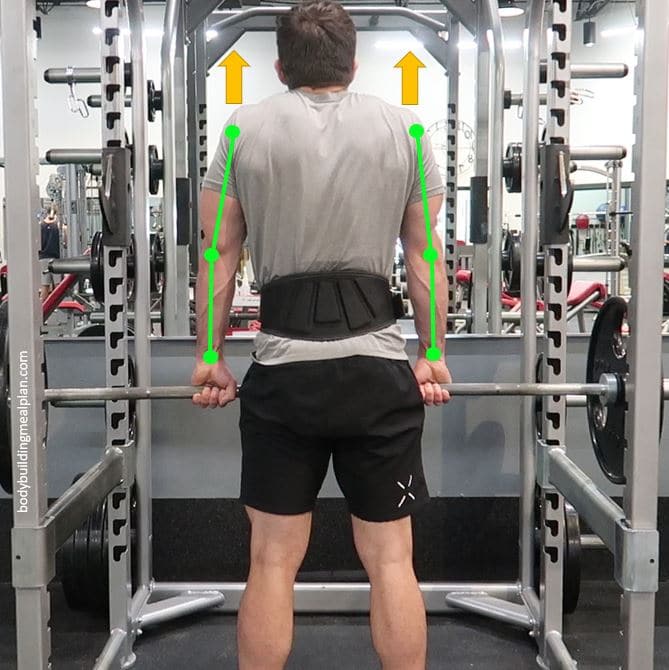
Skip the floor entirely for true isolation. Position safety bars just below hip crease height in a power rack. Stand centered with feet shoulder-width apart, toes slightly outward. Grip the bar with a double overhand hold, hands 2-3 inches wider than shoulder width. Hinge at the hips (not the waist) to grasp the bar, then stand tall while maintaining neutral spine alignment. This setup prevents lower back strain and ensures pure trap engagement.
Key checkpoint: Your arms should hang perfectly vertical when viewed from the front. If elbows angle forward, widen your grip.
The 4-Phase Execution Protocol
- Lift Phase (1 second): Drive shoulders straight upward toward ears—imagine trying to touch your traps to your jawline. Keep elbows locked and chest proud.
- Peak Squeeze (2 seconds): Hold the top position while violently contracting traps. Visualize crushing a tennis ball between your shoulders and ears.
- Lower Phase (3 seconds): Descend with controlled resistance. Never drop the weight—this eliminates eccentric tension critical for growth.
- Reset (1 second): Briefly pause at bottom without releasing tension before next rep.
Warning: Bouncing the bar off your hips transfers momentum to your lower body. Maintain constant tension by stopping 1 inch above pins between reps.
Why Your Head Position Sabotages Results
Jutting your chin forward during barbell shrugs shifts cervical vertebrae out of alignment and reduces trap activation by 40%. Keep your gaze fixed straight ahead at a neutral horizon point throughout. Your ears should stay stacked over shoulders—not ahead of them. If you experience neck strain, reduce weight and practice the movement without load while focusing on head position.
Troubleshooting flow: Neck pain? → Check head position → Still painful? → Try behind-the-back variation → Persistent pain? → Consult physical therapist
Heavy Shrug Variations for Complete Trap Development
Behind-the-Back Barbell Shrug for Middle Trap Thickness
Hold the barbell vertically behind your legs with both hands gripping the ends. Stand with feet wider than shoulder-width to create clearance. Perform the same 4-phase shrug motion while keeping your chest high. This variation shifts emphasis to the middle trapezius, creating that coveted “diamond” upper back appearance.
Critical adjustment: Use 20% less weight than standard shrugs initially. If you feel shoulder strain, reduce grip width or discontinue immediately. Stop if discomfort occurs—this variation isn’t for everyone.
Dumbbell Shrug + Upright Row Hybrid
Hold dumbbells at your sides with palms facing your body. Complete 8 standard shrugs with strict form. Without resting, immediately perform upright rows by raising dumbbells to collarbone height with elbows flared outward. At the top of the row, add 3 explosive shrugs before lowering. This combines lateral deltoid activation with trap stimulation for 360-degree shoulder development.
Time-saving hack: Perform this superset after your main back workout. It takes just 7 minutes but delivers compound benefits.
Program Your Shrugs for Explosive Growth
Strategic Placement in Your Routine
Insert barbell shrug exercises AFTER heavy compound lifts like deadlifts or bent-over rows. Your traps will already be pre-fatigued from supporting those movements, allowing you to stimulate them with moderate weight while maintaining perfect form. Never program shrugs before overhead pressing—fatigued traps compromise shoulder stability during presses.
Optimal timing: Wait 90 seconds after your last compound set before starting shrugs. This partial recovery lets you handle 15-20% more weight than if done immediately after.
Progressive Overload Without Injury
Start with 2 sets of 12 reps using dumbbells (30-40 lbs per hand). After 3 weeks, transition to barbell shrugs at 95 lbs. Increase weight by 5-10 lbs only when you achieve all reps with perfect form. Track your “trap max”—the heaviest weight you can shrug for 8 controlled reps. Aim to increase this by 15% quarterly.
Plateau buster: When progress stalls, implement tempo variations. Try 5-second lowers for 2 weeks before returning to standard tempo. This creates new micro-tears in trap fibers.
Critical Safety Fixes for Long-Term Training
Eliminate Neck Injury Risks Now
Never perform barbell shrugs with jerking motions or excessive weight that causes head whipping. Maintain a neutral cervical spine by imagining a tennis ball balanced on your head throughout. If using straps for heavy sets, reduce weight by 15%—straps allow dangerous overloading that strains neck muscles.
Emergency stop signal: Tingling in fingers or radiating neck pain requires immediate cessation. Apply ice and consult a specialist before resuming.
Shoulder-Safe Shrug Modifications
If standard shrugs cause anterior shoulder pain, switch to behind-the-back shrugs immediately. Keep your grip narrow (hands 6 inches apart) to reduce shoulder rotation. For severe shoulder issues, replace barbell shrugs with prone Y-raises using light dumbbells—this builds trap endurance without joint stress.
Pro prevention: Perform 2 sets of band pull-aparts before shrugs to activate rotator cuff muscles. This creates a stable shoulder platform for heavy loading.
Advanced Growth Triggers
Mind-Muscle Connection Hacks
Place your fingertips on your upper traps during the first set. Focus on squeezing those muscles upward against your fingers. Visualize your shoulder blades sliding straight up your rib cage like elevator cars. Perform the last set of the week with eyes closed—this dramatically increases neural drive to the traps.
Time under tension boost: Add a 1-second pause at the halfway point during lowering. This creates metabolic stress that triggers growth hormone release.
Grip Strength Integration
Perform your first two shrug sets without straps or wraps, even if grip fails before trap fatigue. This builds functional forearm strength that transfers to deadlifts. For your heaviest set, use straps but reduce weight by 10% to maintain pure trap focus. Always finish with 1 high-rep strapless set (20+ reps) using 50% of your working weight.
Grip endurance protocol: On non-shrug days, perform 3 sets of farmer’s carries (30-second holds) to build supporting musculature.
Stop spinning your wheels with ineffective barbell shrug exercises that waste precious gym time. Your traps respond explosively to precise vertical elevation under controlled tension—not momentum-loaded circus acts. Implement the rack setup protocol immediately to isolate your traps, prioritize the 4-phase execution for maximum fiber recruitment, and program shrugs after compound lifts for synergistic growth. Within three weeks of strict form adherence, you’ll notice your shirts fitting tighter across the shoulders and your deadlift lockout strength surging. Remember: perfect form with moderate weight builds traps faster than sloppy max-effort attempts. Grab that barbell today and feel your traps ignite like never before—your powerhouse upper back starts now.


