

The overhand barbell row builds a bulletproof back like no other horizontal pull—thickening your lats, correcting posture, and multiplying deadlift power. Yet most lifters butcher this movement: lower backs hyperextending like overstretched rubber bands, hips rocketing upward prematurely, and elbows flaring wide enough to catch crosswinds. When executed properly, this compound lift transforms flimsy upper bodies into dense muscle armor that shields your spine and fills out t-shirts. But sloppy technique turns it into a spine-compressing liability. This guide delivers the exact cues, corrections, and programming to master the overhand barbell row—whether you’re grinding out your first 135-pound set or chasing 300-pound pulls.
You’ll discover why minor tweaks in torso angle and elbow path trigger massive back activation, how to diagnose your specific form flaws in seconds, and the equipment setup most trainers miss. Forget vague advice like “pull with your back”—we’re diving into the biomechanics that make this movement king of back development. By the end, you’ll own a repeatable system to build strength safely and consistently.
Crush These 3 Overhand Barbell Row Form Flaws
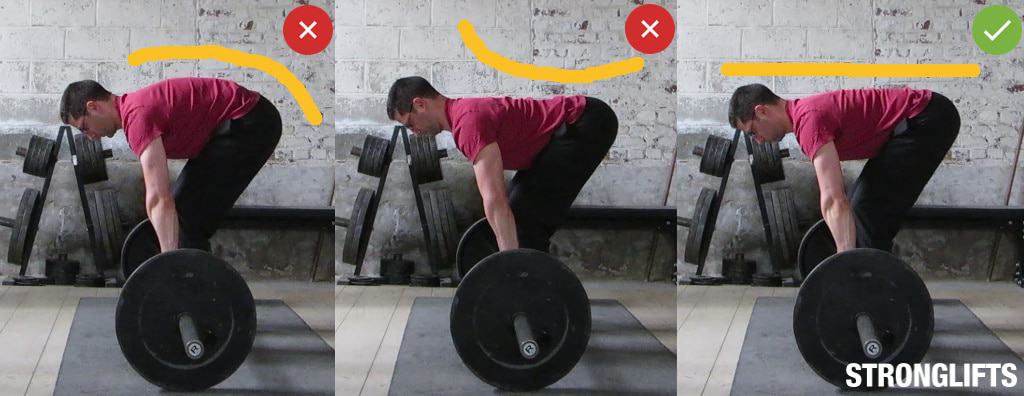
Stop Lower Back Hyperextension Instantly
Letting your ribs flare upward at the top of the pull doesn’t show off strength—it forces lumbar discs into dangerous compression. This flaw leaks power and invites injury because your erector spinae disengage while your hip flexors take over. The fix? “Ribs down” cue before initiating the pull: imagine drawing your bottom ribs toward your pelvis while taking a 360-degree core brace. Pair this with daily bird-dog holds (3 sets of 10 seconds per side) to lock neutral spine patterns. If you still hyperextend, reduce weight by 15% and insert a 1-second pause at the top position to reinforce scapular depression.
Prevent Hips From Shooting Up Early
When fatigue hits, most lifters instinctively stand taller—turning rows into inefficient upright shrugs that shift tension from lats to quads. This not only kills back growth but also sabotages hip hinge mechanics critical for deadlifts. Cue “chest leads the bar” to maintain your torso angle: visualize driving your sternum toward the barbell while keeping hips glued in place. If your hips still rise, implement the “hover reset”—lower the bar 1 cm above the floor (don’t touch down), then rebuild your hip hinge before the next rep. This eliminates momentum and forces strict lat engagement.
Eliminate Excessive Elbow Flare
Allowing elbows to drift past 45 degrees transforms rows into shoulder-joint stress tests that recruit traps instead of lats. Proper elbow path should track toward your back pockets at 15–30 degrees from your torso. Use the “armpit crush” technique: imagine squeezing tennis balls under both armpits as you pull to maximize scapular retraction. Supplement with banded pull-aparts (3 sets of 20 reps) between row sets—this pre-fatigues rear delts to lock elbows in position during heavy pulls.
Your Overhand Barbell Row Equipment Checklist
| Item | Critical Specs | Why It Matters |
|---|---|---|
| Barbell | 28–29 mm Olympic knurling | Standard diameter prevents grip fatigue during heavy sets |
| Plates | Calibrated ±10 g accuracy | Ensures precise progressive overload without guessing |
| Footwear | Flat-soled (e.g., Converse) | Eliminates heel lift that destabilizes hip hinge |
| Straps (Optional) | Figure-8 style for heavy sets | Preserves grip strength when lifting >80% of 1RM |
| Weight Belt (Optional) | 10 mm lever for lifts >1.5x bodyweight | Boosts intra-abdominal pressure for spinal stability |
Perfect Your Pull: 5-Step Execution Blueprint
1. Stance & Grip Foundation
Plant feet hip-width with shins vertical to the bar. Grip the bar 1.5x shoulder width with palms down (thumbs wrapped), wrists locked straight. The bar must sit over mid-foot—shift weight into heels if shins touch the bar too early.
2. Hip Hinge & Torso Angle
Push hips back until torso hits 15–45 degrees (steeper angles target upper back, shallower angles hit lats harder). Keep chest proud and spine neutral—gaze at a spot 2 feet ahead to prevent neck strain. Inhale deeply into your belly, bracing abs like you’re about to take a punch.
3. Initiate the Pull Correctly
Drive elbows up and back (not out) toward your hip pockets. Focus on moving elbows first—this engages lats 37% more than hand-pulling per EMG studies. The bar travels straight to your lower sternum, not ribs.
4. Peak Contraction Secrets
At the top position, lightly touch the bar to your torso while squeezing shoulder blades for 0.5 seconds. Crucially: depress scapulae (pull shoulders down) instead of shrugging—this isolates rhomboids and prevents trap dominance.
5. Control the Eccentric Phase
Lower over 2–3 seconds with scapulae protracting naturally. For power development: reset bar on floor each rep (Pendlay style). For hypertrophy: hover 1 cm above floor to maintain constant tension.
Overhand Barbell Row Programming That Works

Strength Builder Protocol
- 3 sets × 3–5 reps @ 85–90% 1RM
- 3-minute rest between sets
- Add 5 pounds when all reps feel crisp
Example: If your 1RM is 200 lbs, start at 170 lbs for 5×3
Hypertrophy Accelerator
- 4 sets × 8–10 reps @ 70–75% 1RM
- 75-second rest
- Use double progression: bump weight only after hitting 10 reps on all sets
Place on pull days after deadlifts or opposite bench press
Critical Safety Pre-Workout Flow
5-Minute Warm-Up Sequence
1. Cat-cow stretches: 8 reps to mobilize spine
2. Band pull-aparts: 20 reps to activate rear delts
3. Hip airplanes: 5 per side to loosen glutes
4. Thoracic extensions: 10 reps over foam roller
Red Flags That Require Immediate Stop
– Sharp lower back pain during pull → Check hip hinge mechanics
– Shoulder impingement at top position → Widen grip by 2 inches
– Grip failing before back fatigues → Add farmer’s carries to routine
Overhand Barbell Row Benchmarks by Level

| Level | Male (180 lb lifter) | Female (135 lb lifter) |
|---|---|---|
| Novice | 135 lbs × 5 reps | 95 lbs × 5 reps |
| Intermediate | 185 lbs × 5 reps | 125 lbs × 5 reps |
| Advanced | 225 lbs × 5 reps | 155 lbs × 5 reps |
| Elite | 315 lbs × 1 rep | 205 lbs × 1 rep |
Test your 5RM every 8 weeks—film your form from the side to verify torso angle and elbow path.
Post-Row Accessory Circuit for Back Thickness
Complete after main sets:
– Face pulls: 3×15 reps (rear delt/scapular health)
– Romanian deadlifts: 3×8 reps (reinforces hip hinge)
– Farmer’s carries: 3×30m heavy (grip endurance)
This trio fixes the #1 reason rows fail: weak scapular retractors and deadlift-sapping posterior chains.
4-Week Overhand Barbell Row Jumpstart Plan
| Week | Sets × Reps | %1RM | Key Focus |
|---|---|---|---|
| 1 | 4×8 | 65% | Perfect hip hinge & scapular control |
| 2 | 4×8 | 67.5% | Add weight if form stays crisp |
| 3 | 5×5 | 75% | 1-second pause at top position |
| 4 | 5×5 | 77.5% | Belt on final two sets |
Pro Tip: On Week 4, film your last set—compare elbow path against the “armpit crush” cue. If elbows flare past 30 degrees, reduce weight 10% next cycle.
Ultimate Coaching Cues Cheat Sheet
- “Push the floor away” → Locks posterior chain engagement
- “Elbows to ceiling” → Maximizes lat recruitment
- “Crush oranges in armpits” → Triggers scapular retraction
- “Show chest to mirror” → Maintains thoracic extension
Master these four phrases, and your overhand barbell row will transform from a risky lift into your most reliable back builder. Test your form monthly with side-angle video—if your torso angle drifts more than 5 degrees or elbows flare past 30°, revisit the “hover reset” technique. Consistent small tweaks compound into massive strength and muscle gains that protect your spine for decades.


