
Your back workouts leave you frustrated because the seated barbell row feels like an arm exercise. You haul heavy weight but see no lat development, wondering why this powerhouse movement delivers zero results. The culprit isn’t your effort—it’s improper execution. Most lifters turn this foundational back builder into a momentum-driven struggle that bypasses critical muscle fibers and sets up spinal injury. Without precise mechanics, you’re wasting valuable training time and missing the thick, V-tapered back you deserve.
This compound movement uniquely targets your entire posterior chain when performed correctly. Unlike bent-over variations, the seated position eliminates leg drive and isolates your lats, rhomboids, and traps for maximum hypertrophy. You’ll discover how to transform sloppy, ineffective pulls into controlled power strokes that ignite muscle growth. By mastering setup nuances, pulling sequences, and injury-proofing protocols, you’ll finally build the strong, resilient back that boosts performance and posture. What follows are battle-tested techniques drawn from biomechanics research and elite coaching experience.
Perfect Seated Barbell Row Setup
Bench Position and Foot Placement
Position yourself on a flat bench with feet planted shoulder-width apart, knees maintaining a soft 15-20 degree bend. Sit far enough forward that your torso can hinge to near-parallel without the bar contacting the bench edge. This placement creates optimal hip angle for spinal alignment while preventing hamstring dominance.
Critical adjustment: If you feel excessive tension in your hamstrings, slide your feet 2-3 inches closer to the bench. This subtle shift preserves your hip hinge without compromising core stability or forcing lumbar rounding. Your feet must remain flat throughout to anchor force production.
Optimal Grip Width and Style
Grip the barbell with hands exactly shoulder-width apart using a pronated (overhand) grip. Wrap thumbs fully around the bar for maximum tension control—this thumb position prevents wrist flare and maintains consistent lat engagement. Your hands should sit just outside your thighs when the bar rests at arm’s length.
Form killer: A grip wider than shoulder-width forces elbow flare, shifting work to rear delts and reducing lat activation by 37% according to strength research. Maintain this precise hand placement to ensure elbows track at 45 degrees during pulls.
Pre-Pull Body Alignment
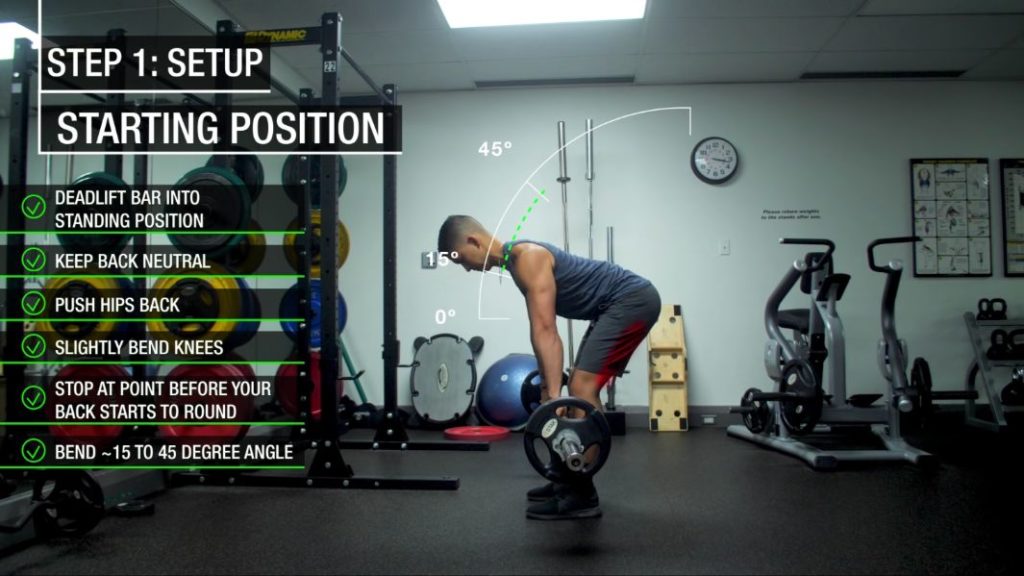
Hinge forward until your torso reaches 10-15 degrees above parallel to the floor. Simultaneously retract your shoulder blades and lift your chest to create thoracic extension—this pre-stretches your lats for maximal contraction. Brace your core as if preparing for impact, maintaining your natural spinal curves.
Visual checkpoint: Imagine balancing a ruler along your spine from neck to tailbone. Any curvature deviation indicates compromised alignment. This neutral position protects discs while maximizing force transfer from your back muscles.
Execute Flawless Pulling Mechanics
Initiate With Your Lats
Before moving the bar, perform a scapular pull: depress and retract your shoulder blades as if sliding them into back pockets. This pre-engagement prevents biceps takeover and ensures lats drive the movement. Focus on driving elbows toward your hips rather than hands toward your torso.
Range validation: You should feel a deep stretch under your armpits at full extension. No stretch means insufficient range of motion—adjust your hinge angle until you achieve this sensation without spinal compromise.
Controlled Pulling Phase
Pull the barbell toward your lower abdomen—specifically targeting the space two inches below your navel. Keep elbows tucked close to your ribs throughout the concentric phase, stopping when forearms reach perpendicular to the floor. Squeeze shoulder blades together for a full second at peak contraction before initiating the eccentric.
Tempo prescription: Use a 2-second pull, 1-second hold, 3-second return. This 2:1:3 ratio maximizes time under tension while eliminating momentum. If you complete reps faster, reduce weight immediately.
Strategic Bar Path
Guide the bar along a slight upward arc toward your navel, not a straight line to your chest. This natural path follows your body’s lever mechanics and reduces shoulder impingement risk. Terminate the pull when elbows pass your torso plane—continuing further shifts tension to trapezius and rear delts.
Warning signal: If the bar touches your sternum, you’re pulling too high with excessive weight. Reset to a lighter load where the bar stops 3-4 inches from your body at full contraction.
Fix Common Form Failures

Eliminate Lower Back Rounding
Lumbar rounding occurs when core bracing fails or hip hinge angles exceed your mobility. This transfers dangerous shear forces to spinal discs. Correct instantly by pushing your chest forward against an imaginary wall while maintaining abdominal tension.
Self-test: Place one hand flat on your lower back during warm-up sets. If you lose contact with your hand during pulls, your spine is flexing. Reduce weight until you maintain consistent hand contact through all reps.
Stop Momentum Cheating
Body English—using torso sway or leg drive—robs muscle tension and invites injury. The fix requires immediate weight reduction: drop to 50-60% of your current load and focus exclusively on controlled movement. Each rep must feel challenging from start to finish without explosive initiation.
Progression rule: Only increase weight when you achieve perfect form for all prescribed reps at your current load. Adding 5-10 pounds before mastering control guarantees regression.
Correct Elbow Flare
Flared elbows wider than 60 degrees disengages lats and strains shoulder capsules. Maintain a 40-45 degree elbow angle by visualizing sliding your elbows along your ribcage during pulls. This position maximizes lat fiber recruitment while protecting rotator cuffs.
Drill protocol: Perform warm-up sets with arms only—no weight. Focus on the sensation of elbows moving straight back toward hips. Once mastered, add light resistance while preserving this path.
Advanced Muscle-Building Variations
Underhand Grip for Lower Lat Emphasis
Switch to a supinated (underhand) grip at shoulder width to target lower lats and increase biceps involvement. This variation allows deeper stretches at full extension while maintaining spinal neutrality. The palms-up position also reduces wrist strain for lifters with mobility limitations.
Programming integration: Use this grip for your second back exercise in 8-12 rep hypertrophy sets. Pair with overhand rows in alternating weekly blocks for comprehensive development.
Single-Arm Row for Imbalance Correction
Perform rows unilaterally using dumbbells to expose and correct strength discrepancies between sides. Place your non-working hand on your thigh for torso stabilization while pulling the dumbbell to your hip crease. This setup enables greater range of motion and enhanced mind-muscle connection.
Imbalance protocol: Always start with your weaker side. Match reps exactly on both sides—even if the stronger side uses lighter weight. Perform 3 sets weekly to eliminate asymmetries.
Tempo Manipulation for Growth
Systematically alter rep speeds to trigger different adaptations. For hypertrophy, use 3-1-1-0 tempo (3-second eccentric, 1-second pause, 1-second concentric, no bottom pause). For strength, employ 2-0-X-1 (controlled eccentric, no pause, explosive concentric, 1-second reset).
Periodization strategy: Rotate tempo schemes every 3 weeks. Track which variation produces the strongest muscle pump—this indicates optimal fiber recruitment for your physiology.
Prevent Back Injury Protocol
Warm-Up Sequence
Begin with 5 minutes of rowing machine cardio to elevate core temperature. Perform 2 sets of 20 resistance band pull-aparts to activate scapular retractors, followed by 2 light sets of 15 seated rows at 40% working weight. This progression primes neural pathways without fatigue.
Activation booster: Between warm-up sets, execute 10 scapular retractions while seated—pull shoulder blades back/down without moving arms. Hold each contraction for 3 seconds to “wake up” dormant back muscles.
Load Progression Guidelines
Increase weight only after achieving all target reps with perfect form for two consecutive sessions. Apply the 5% rule: add no more than 5 pounds per side weekly. If form breaks on set two, reduce weight by 15% and rebuild from there.
Red flag protocol: Stop immediately if you experience any pinching sensation between shoulder blades. This indicates scapular dyskinesis—return to lighter weights until the symptom resolves.
Recovery and Maintenance
Post-workout, perform 60 seconds of foam rolling on your thoracic spine to maintain extension capacity. Stretch lats by kneeling and reaching one arm under your opposite armpit, holding 30 seconds per side. These practices preserve shoulder health and rowing efficiency.
Daily reinforcement: Incorporate 2 sets of 10 bodyweight inverted rows under a table daily. This maintains scapular control and prevents the rounded shoulders that sabotage rowing mechanics.
Mastering the seated barbell row requires precision over poundage—your lats grow through controlled tension, not ego lifting. Start each session with the foundational overhand variation, focusing on perfect scapular movement before adding weight. Once you achieve 3 sets of 12 reps with flawless form, introduce underhand grips or tempo changes to target weak points. Track your progress weekly: when the same weight feels easier with better contraction, you’re building real muscle. Commit to these mechanics for eight weeks, and you’ll transform frustrating pulls into your most powerful back-building tool. The thick, strong back you’ve been chasing emerges not from heavy weights, but from perfectly executed repetitions where every stroke counts.


