
Your deadlift stalls at 315 pounds because your grip gives out before your back fails. You crush bicep curls but your outer forearms stay stubbornly flat, creating a lopsided arm profile. This isn’t genetics—it’s neglecting the barbell reverse wrist curl, the single most effective exercise for building forearm extensors that transform weak wrists into steel cables. When performed correctly, this movement adds 1/4 inch to your forearm circumference in 8 weeks while boosting pulling strength across every lift. Let’s fix what regular curls can’t: the neglected muscles that power your grip and balance your arm development.
Most lifters waste energy on flashy forearm machines while ignoring this barbell staple. You’ll discover why standard wrist curls miss 60% of your forearm potential, how to set up safely without a specialized bench, and the exact tempo that triggers explosive growth in these stubborn muscles. By the end, you’ll know how to integrate this movement into your programming without risking tendonitis—the most common forearm training mistake.
Why Your Forearm Extensors Need Reverse Wrist Curls (Not Regular Ones)
Standard wrist curls target only the inner forearm flexors, leaving the outer extensors chronically underdeveloped. This imbalance causes more than aesthetic issues—it directly sabotages your deadlift, pull-up, and row performance. The barbell reverse wrist curl uniquely isolates the extensor digitorum, extensor carpi radialis longus, and brevis muscles that control wrist extension and finger straightening.
How This Exercise Fixes Your Weak Grip
- Eliminates assistance from larger muscles like biceps that dominate compound lifts
- Creates maximal tension specifically on extensor muscles through full range of motion
- Builds structural balance between flexors and extensors to prevent elbow pain
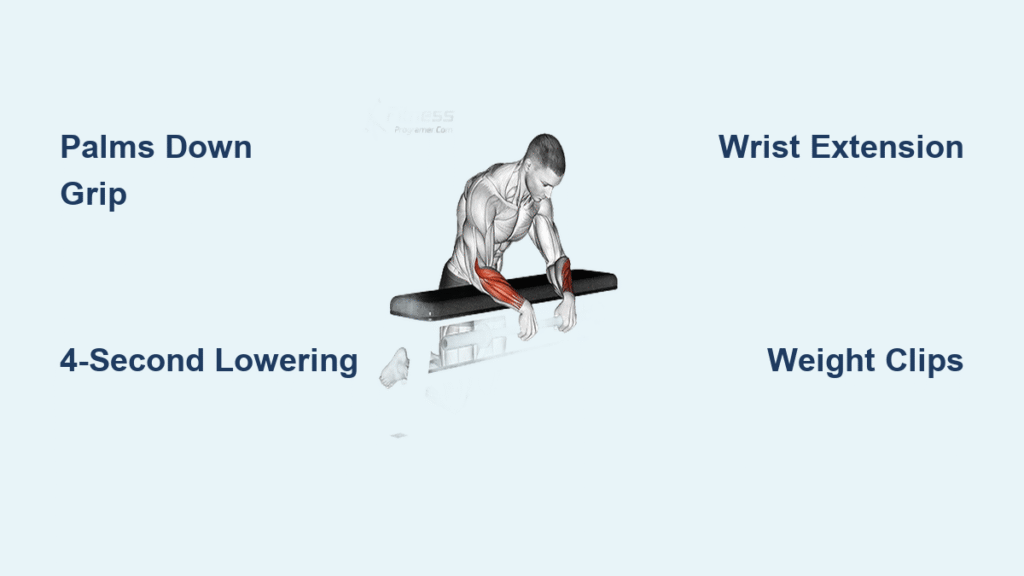
When you curl with palms down (overhand grip), you force these neglected muscles to work alone. Unlike deadlifts where grip fails before extensors fatigue, this isolation exercise delivers direct, measurable stress that triggers rapid strength gains. Within two weeks of proper execution, you’ll notice your grip holding firm during the final reps of heavy rows.
3 Must-Have Items for Safe Barbell Reverse Wrist Curl Setup
Skipping proper equipment setup turns this simple exercise into a wrist injury risk. You don’t need a specialized machine—just these three items with one critical safety step most lifters ignore.
The Non-Negotiable Safety Step
Always use weight clips—this is non-negotiable. Unsecured plates shift during the eccentric phase, causing sudden wrist torque that strains tendons. Test your setup by gently shaking the bar before lifting; if plates move, re-secure them immediately.
Equipment Checklist With Setup Hacks
- Standard barbell: Use 5-10lb plates for beginners (women) or 10-15lb (men)
- Flat surface: Bench or sturdy chair (thighs work if bench unavailable)
- Towel: Fold under wrists if bench edge digs into skin
When using your thighs as support, spread your legs wider than hip-width. This creates a stable platform that prevents forearm slippage during the concentric phase. Place the towel lengthwise along your thighs to cushion wrist pressure points—this small adjustment prevents bruising during high-rep sets.
The Exact Starting Position That Prevents Wrist Strain

90% of wrist pain during reverse wrist curls stems from incorrect starting alignment. Your forearms must form a solid foundation before movement begins—here’s how to lock in position.
Bench Setup Sequence
- Sit upright with feet flat, back straight against bench
- Place barbell across thighs, grip with palms down, hands 6-8 inches apart
- Spread legs, lift bar slightly to slide forearms onto bench
- Position wrists 2 inches beyond bench edge (critical for full extension)
Thigh Variation Fix for Home Gyms
- Rest forearms on thighs with elbows at 90 degrees
- Let wrists hang 1 inch off knee edges
- Squeeze knees together to stabilize thighs
Your knuckles should face the floor at the start position. If you see any wrist bend (ulnar deviation), widen your grip slightly. This neutral alignment distributes stress evenly across tendons instead of concentrating it on one spot.
Step-by-Step Execution: How to Curl Without Momentum
The magic happens in the negative phase—most lifters blow this by rushing the lowering motion. Follow this exact sequence to maximize muscle damage while protecting joints.
The 4-Phase Rep Protocol
- Start: Wrists fully extended (bar hanging at fingertips)
- Lift: Exhale while curling bar toward forearms (2 seconds)
- Peak: Squeeze extensors hard at top position (1 second hold)
- Lower: Inhale while controlling descent to full extension (4 seconds)
Critical visual cue: Watch your knuckles throughout. If they rotate inward during the lift, your grip is too wide—narrow by 1 inch. The bar should travel in a straight line vertically, not in an arc. If it swings, reduce weight by 25%.
Breathing Pattern That Boosts Strength
- Inhale deeply before starting the eccentric phase
- Exhale forcefully during concentric (lifting) movement
- Hold breath lightly during peak contraction
This pattern stabilizes your core and creates intra-abdominal pressure that supports wrist alignment. When you exhale on the lift, you engage the transverse abdominis—a hidden stability system that reduces wrist strain.
4 Form Errors That Cause Injury (And Immediate Fixes)

These mistakes waste your time and invite injury. Recognize these warning signs before they sideline your training.
The Momentum Trap
Sign: Bar swings upward or body rocks during lift
Fix: Reduce weight by 30% and focus on wrist-only movement
Test: Place a business card between forearm and bench—drop it if you move your arm
Partial Range Disaster
Sign: Stopping short of full extension or flexion
Fix: Start each rep with wrists bent 45 degrees downward
Visual: Imagine trying to pour water from your palm at the bottom position
Wrist Rolling Hazard
Sign: Knuckles rotating inward during contraction
Fix: Narrow grip and consciously keep knuckles facing floor
Pro Tip: Place index fingers against bar collars to maintain alignment
Bouncing Reps
Sign: Letting bar drop suddenly at bottom position
Fix: Pause 1 second at full extension before lifting
Warning: Bouncing causes micro-tears in extensor tendons
Overhand vs. Underhand: Which Grip Builds Stronger Extensors?
Your grip orientation changes everything. The reverse wrist curl’s magic lies in the overhand position—but strategic grip variations create complete forearms.
The Extensor-Focused Overhand Grip
- Hand position: Palms down, knuckles toward floor
- Muscle emphasis: 95% on extensor digitorum and radial hand extensors
- Optimal spacing: Hands 4-6 inches apart (closer = more brachioradialis)
This is your primary grip for extensor growth. Use it for 80% of your forearm volume. The narrow grip increases mechanical tension on the target muscles while reducing bicep involvement.
Strategic Underhand Integration
- When to use: As finisher after reverse wrist curls
- Purpose: Balances flexor development to prevent imbalances
- Ratio: 2 sets reverse grip : 1 set underhand grip
Never substitute underhand for reverse grip—this shifts focus to flexors. Instead, pair them: 3 sets reverse wrist curls followed by 1 set standard wrist curls for complete forearm development.
How to Progress Without Overtraining Your Forearms
Forearm tendons recover 40% slower than muscle tissue. This progression system builds strength without inviting tendonitis.
The 3-Week Strength Cycle
- Week 1: 3 sets × 12 reps (moderate weight)
- Week 2: 4 sets × 10 reps (same weight)
- Week 3: 3 sets × 8 reps (increase weight 10%)
Weight increase rule: Only add load when you hit the top rep count with perfect form. If using 15lb plates, progress to 20lbs—never jump more than 25% per increase.
Tempo Progression For Stubborn Growth
When strength stalls, manipulate time under tension:
– Week 4: 3×12 with 3-second eccentric
– Week 5: 4×10 with 4-second eccentric
– Week 6: 3×8 with 2-second peak hold
This builds tendon resilience while continuing muscle growth. If you feel sharp pain during slow eccentrics, revert to normal tempo for two weeks.
Troubleshooting: Fixing Wrist Pain and Weak Contractions
Your body sends clear signals when something’s wrong. Address these issues before continuing.
“My Wrists Hurt During the Lift”
- Cause: Wrist hyperextension at top position
- Fix: Stop 5 degrees short of full flexion
- Alternative: Switch to EZ bar with semi-pronated grip
“I Don’t Feel It in My Forearms”
- Cause: Using too much weight or cheating
- Fix: Reduce weight 50%, focus on muscle-mind connection
- Test: Do 5 reps with 5lb plates—burn should start by rep 3
“Elbows Keep Slipping Off Bench”
- Cause: Insufficient leg stability
- Fix: Place feet wider than hips, press knees together
- Hack: Wrap resistance band around bench legs under thighs
When to Program Reverse Wrist Curls for Explosive Grip
Timing matters more than volume. Integrate this exercise when your grip is pre-fatigued for maximum carryover to big lifts.
Optimal Placement In Your Split
- After back day: 3 sets post-deadlifts when grip is compromised
- Arm day finisher: 2 sets after biceps work
- Never on shoulder or chest days (steals recovery energy)
Sample weekly schedule:
– Monday: Back workout → 3×12 reverse wrist curls
– Thursday: Arm day → 2×15 post-barbell curls
– Saturday: Optional grip specialization session
Rest at least 72 hours between forearm sessions. If you train back on Monday, don’t do reverse wrist curls again until Friday at earliest. These small muscles need extended recovery for supercompensation.
Master the barbell reverse wrist curl with these precision techniques, and watch your grip strength surge while your forearms finally match your biceps. Remember: perfect form with light weight beats ego lifting every time—your tendons will thank you when you’re still lifting heavy at 50. Start with just 3 sets twice weekly, focusing on that 4-second lowering phase, and you’ll add noticeable forearm thickness within 30 days. For immediate gains, implement the towel-under-wrists hack during your next session and feel the difference in stability. Your deadlift plateau ends here.


