

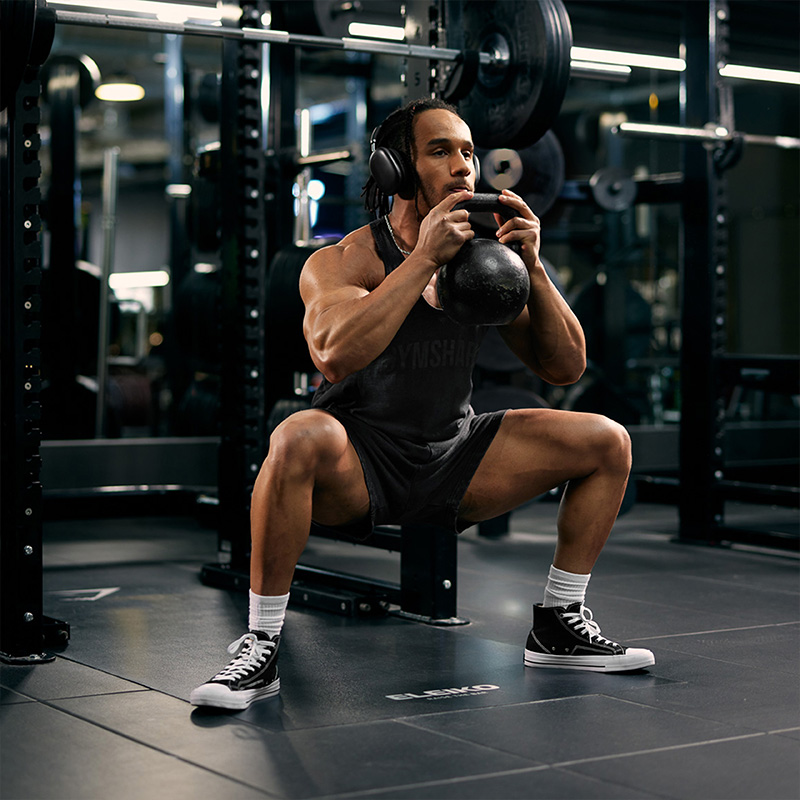
Your quads are strong, but your glutes refuse to grow. You’ve hit a wall with conventional squats, and that inner thigh burn feels impossible to achieve. The solution? The barbell sumo squat—this wide-stance powerhouse uniquely targets your adductors and glutes while building serious lower-body strength with less spinal compression than traditional squats. Unlike narrow-stance variations, the sumo position leverages biomechanics to maximize hip extension torque, making it a game-changer for lifters stuck in a plateau.
Most lifters miss critical setup details that turn this exercise from transformative to risky. When executed perfectly, the barbell sumo squat delivers explosive strength gains and sculpted inner thighs. But one wrong knee angle or bar position can derail your progress. This guide cuts through the confusion with exact stance measurements, muscle activation secrets, and programming tactics proven to build mass and power—no fluff, just actionable steps you can implement today.
Set Up Your Barbell Sumo Squat Correctly in 3 Steps
Skipping precise setup guarantees wasted effort or injury. Nail these non-negotiables before lifting a single pound.
Rack Height: The Chin-Level Rule
Position the bar 4-6 inches below your head height when standing upright. Too high strains wrists into extreme extension; too low forces dangerous back rounding during unracking. Pro Tip: Stand sideways to the rack—your chin should align with the bar when you take your stance. This ensures smooth unracking without shoulder impingement.
Hand Placement: Shoulder Width × 1.5
Grip the bar just outside shoulder width—approximately 1.5 times your bi-acromial span (shoulder-to-shoulder measurement). This creates optimal shoulder stability: too narrow restricts upper-back engagement; too wide shifts weight forward. Visual Cue: Your elbows should point straight down, not backward, forming a solid “shelf” with your upper traps.
Bar Position: Upper Trap Anchor Point
Rest the bar across your upper trapezius, precisely above your rear delts. This high-bar placement keeps your torso upright (45-90° relative to hips), unlike low-bar squats that pitch you forward. Critical Check: Pinch your shoulder blades together before unracking—this prevents the bar from sliding during descent.
Find Your Ideal Stance Width and Toe Angle
Generic “wide stance” advice sets you up for knee collapse or groin strain. Your anatomy demands precision.
Foot Width: 1.3x to 1.6x Shoulder Measurement
Start with feet 1.3 times shoulder width apart (measure from hip bones). Most lifters settle between 1.3x and 1.6x based on femur length and hip socket depth. Test It: Perform bodyweight sumo squats—adjust width until you feel deep hip stretch without pinching at the front of your groin.
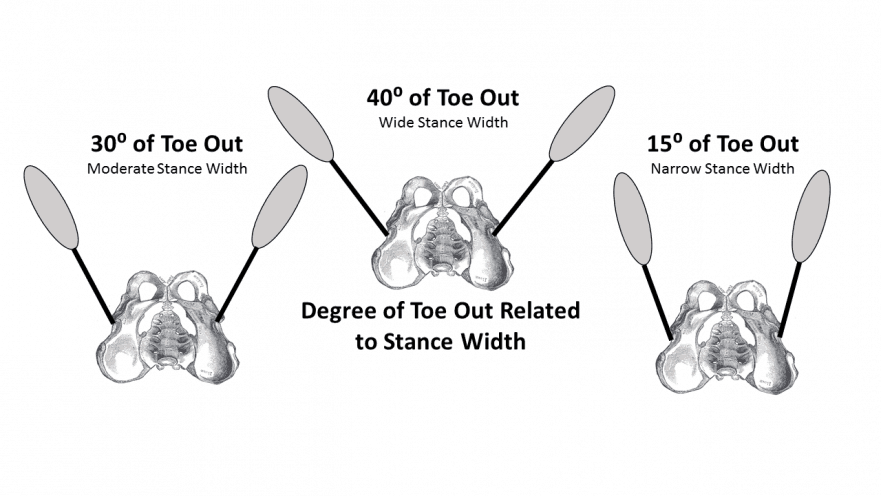
Toe Angle: 30° to 45° for Knee Safety
Point toes outward 30-45 degrees to align knee tracking with your second and third toes. This external rotation prevents valgus collapse. Troubleshooting: If knees cave inward, your toes aren’t wide enough—add 5° until knees track perfectly over toes.
Weight Distribution: Mid-Foot Pressure Secret
Balance pressure across your entire foot, emphasizing the outer edges and heels. Warning: Shifting weight to toes = knee strain; lifting heels = reduced glute activation. Fix: Place 5lb plates under heels if ankle mobility limits depth.
Master the Descent and Ascent Phases Perfectly
Most lifters rush the eccentric phase, missing 50% of muscle-building potential. Execute these phases like a powerlifter.
Descent: Sit Straight Down Between Your Legs
Inhale deeply into your belly, brace your core hard, then push knees outward as you sit straight down. Depth Rule: Stop when your hip crease dips below your knee cap—never force depth if your lower back rounds. Visual Cue: Your shins should stay vertical relative to your foot angle.
Ascent: Drive Through Heels With Knees Out
Exhale forcefully as you push through your mid-foot and heels, actively spreading the floor apart with your feet. Critical Fix: If your knees collapse during ascent, loop a mini-band above them and push against it with maximum force on every rep.
Fix These 3 Common Sumo Squat Mistakes Now
Ignoring these errors wastes months of training—correct them today.
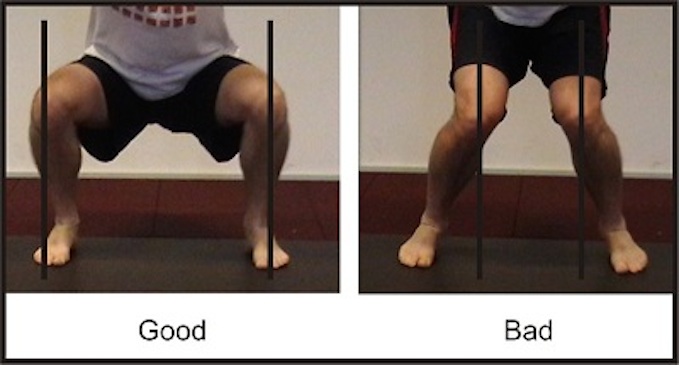
Knee Collapse: The Silent Strength Killer
Symptoms: Knees cave inward during ascent, reducing glute activation by 30%.
Solution: Perform 10 banded lateral walks pre-squat to fire adductors. During lifts, cue “knees out over pinky toes” with every rep.
Forward Lean: Torso Pitch Disaster
Symptoms: Chest drops below 45° relative to hips, shifting load to quads and straining your spine.
Solution: Reduce weight 15% and practice front-rack sumo squats for 2 weeks to reinforce upright posture.
Heel Lift: Ankle Mobility Emergency
Symptoms: Heels rise off floor during descent, killing posterior chain engagement.
Solution: Do 60 seconds per ankle of deep lunge ankle mobilizations pre-workout. Wear lifting shoes with 0.75″ heels if needed.
Avoid Injury: Sumo Squat Safety Checklist
Skip this pre-lift ritual and risk hip impingement or lumbar strain.
Stop Immediately If:
- Sharp groin pain occurs (indicates adductor strain)
- Lower back rounds at any depth
- Knee pain worsens with each rep
Pre-Lift Verification (Do Every Set):
- [ ] Bar rests on upper traps above rear delts
- [ ] Grip width = 1.5x shoulder width, wrists neutral
- [ ] Feet 1.3-1.6x shoulder width, toes at 35°
- [ ] Core braced like preparing for a punch
- [ ] Knees track over 2nd/3rd toes throughout ROM
Prime Your Hips With These 3 Mobility Drills
Tight hips destroy sumo squat depth. Do these daily:
- Deep Bodyweight Sumo Hold: Sink into bottom position for 20 seconds, driving knees outward. Repeat 5x.
- Adductor Rock Backs: From sumo stance, shift weight side-to-side 10x per side, stretching inner thighs.
- Seated Frog Stretch: Hold 30 seconds post-workout to maintain hip external rotation.
Program Strength or Size Gains in 3 Ways
Stop guessing—use these science-backed protocols.
Strength Builder (3-6 Reps)
- Sets/Reps: 4 × 4
- Load: 85% of 1RM
- Tempo: 3-1-X (3s down, 1s pause, explosive up)
- Rest: 3 minutes
Why it works: Pauses build starting strength from the hole.
Hypertrophy Blaster (8-12 Reps)
- Sets/Reps: 3 × 10
- Load: 70% of 1RM
- Tempo: 2-0-1 (controlled throughout)
- Rest: 90 seconds
Pro Tip: Squeeze glutes at lockout for 1 second on every rep.
Beginner Accelerator
Start with goblet sumo squats (20lb dumbbell) for 3 weeks. Progress to barbell only when you hit 3 × 15 with perfect form. Add 5lbs weekly.
Level Up With Advanced Sumo Squat Variations
Break plateaus with these pro techniques.
Paused Sumo Squats
Hold the bottom position for 3 seconds before ascending. Builds explosive power out of the hole and improves hip mobility. Use: 3 × 5 reps at 75% 1RM.
Tempo Sumo Squats
Descend for 4 seconds, pause 2 seconds at parallel. Maximizes time-under-tension for glute growth. Use: 3 × 8 reps at 65% 1RM.
Chain-Loaded Sumo Squats
Attach chains (20% of bar weight) to accommodate resistance. Matches your natural strength curve for heavier top-end lifts. Use: 4 × 3 reps at 80% 1RM.
Integrate Sumo Squats Into Your Weekly Routine
Stop random programming—strategically place sumo squats for maximum impact.
Upper/Lower Split Example
- Monday: Barbell sumo squat (strength focus) + Romanian deadlifts
- Wednesday: Hip thrusts + lateral band walks
- Friday: Conventional squats (hypertrophy focus)
Full-Body Power Plan
- Day 1: Sumo squats (4 × 5 @ 85% 1RM) + pull-ups
- Day 3: Sumo squats (3 × 10 @ 70% 1RM) + overhead press
- Day 5: Rest or mobility work
Critical Note: Never pair sumo squats with heavy deadlifts on the same day—they overload similar muscle groups.
Final Takeaway: Film your next set from the side—your bar path must stay over mid-foot throughout. If you feel knee strain, narrow your stance by 2 inches; if hip flexors pinch, widen 3 inches. Most lifters gain 15-20lbs on their sumo squat 1RM within 6 weeks of perfecting these cues. Start light, master the footwork, and watch your glutes finally explode with growth. Your strongest, most sculpted lower body starts today.


