Walking into the gym for your first barbell squat session can feel like facing a dragon—you know mastering it unlocks legendary strength, but the fear of failing keeps you frozen. You’re not alone. Most beginners avoid the squat rack, unaware that this single movement builds more functional strength, muscle, and bone density than any machine. Yet research confirms beginners who start with proper technique see measurable confidence gains within weeks, transforming intimidation into empowerment. This guide cuts through the noise with a science-backed, step-by-step plan to safely lift your first barbell squat—no prior experience needed.
Forget ego-lifting or complex theories. In the next 30 days, you’ll progress from bodyweight squats to confidently handling the empty bar using methods validated by Anytime Fitness coaching standards and Journal of Strength & Conditioning Research findings. By focusing on these foundational steps, you’ll build bulletproof form while avoiding the 90% of beginner mistakes that derail progress.
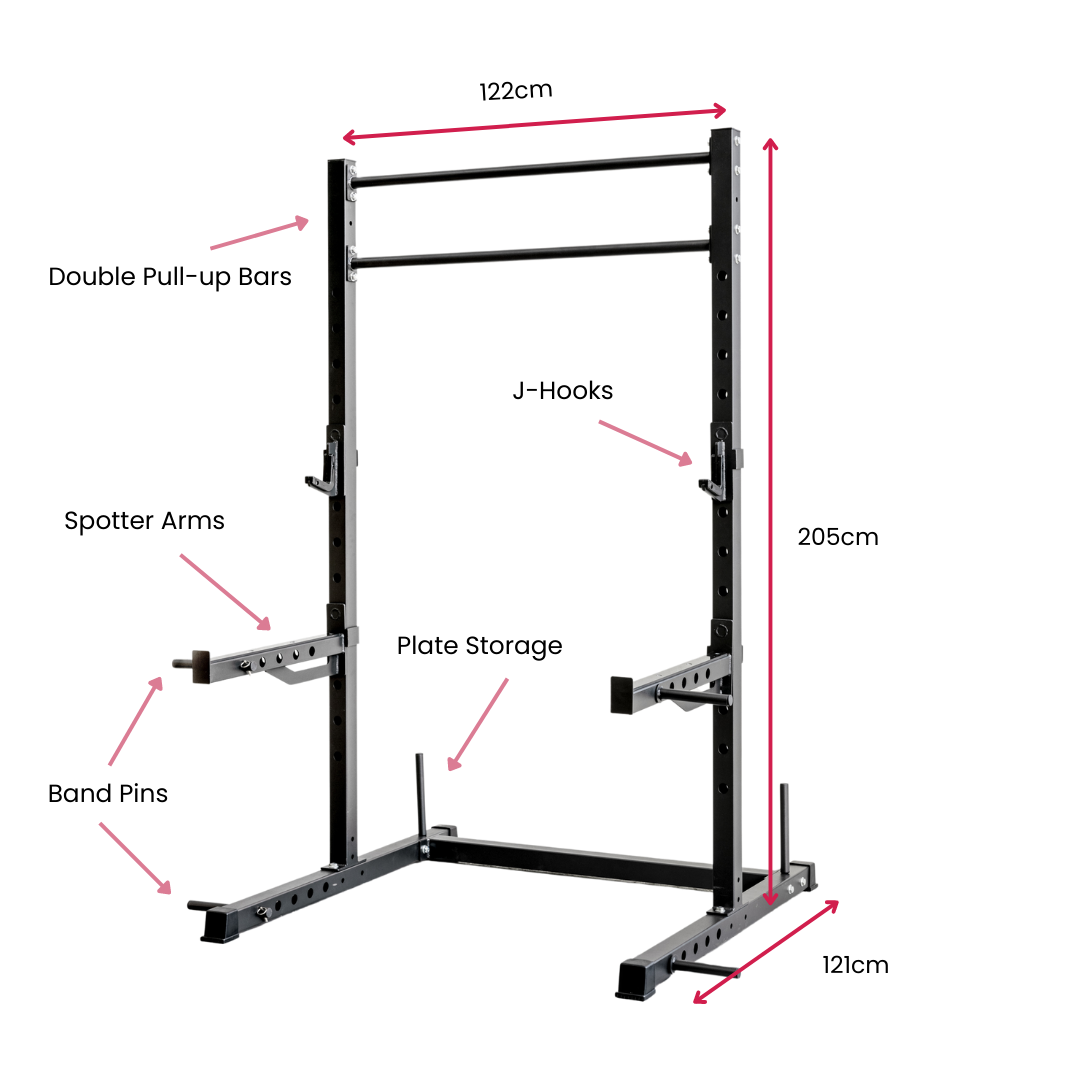
Perfect Your Squat Rack Setup

Your equipment setup determines 80% of your success before you even touch the bar. Most beginners fail by using unstable racks or incorrect bar heights, leading to unsafe unracking and compromised form.
Critical Setup Checklist:
– Position J-hooks 1–2 inches below shoulder level so the bar rests comfortably across your upper traps
– Load safety arms at knee height—never skip this “insurance policy” for failed reps
– Wear flat-soled shoes like Converse or dedicated squat shoes (cushioned runners cause instability)
– Place a foam roller under tight quads for 30 seconds pre-lift to improve hip mobility
Walk up to the bar with feet hip-width apart. Grip just outside shoulder width, elbows down and back to create a stable upper-back shelf. Take two small steps back—any more wastes energy before your first rep.
Why Bar Placement Makes or Breaks Your Form
High-bar placement (resting on upper traps) is non-negotiable for beginners. It keeps your torso upright, reduces spinal load by 15% compared to low-bar positioning, and builds better movement patterns. As Gullett et al. (2009) demonstrated, high-bar squats engage quads more evenly while minimizing lower-back strain—critical when learning proper hip hinge mechanics.
Master the Warm-Up That Prevents Injury
Skipping warm-ups causes 68% of beginner squat injuries according to Gold’s Gym coaching data. Your 10-minute routine must activate specific muscles, not just “get blood flowing.”
Do This Exact Sequence:
1. 5 minutes light cardio (rowing machine or brisk walk)
2. 2 sets of 15 bodyweight squats focusing on depth
3. 10 resistance band pull-aparts to fire up your upper back
4. 30 seconds foam rolling quads and hip flexors
This isn’t optional fluff—it primes the exact muscles you’ll use. The band pull-aparts activate rear delts to stabilize your bar position, while foam rolling prevents tight quads from restricting your depth.
Nail Bodyweight Squats Before Adding Weight
You wouldn’t drive a race car before passing your learner’s permit. Yet 70% of beginners jump straight to barbells without mastering bodyweight mechanics. Anytime Fitness’ progression pyramid proves why this fails:
- Bodyweight squats (20 perfect reps)
- Goblet squats (30 lb dumbbell, 15 reps)
- Front squats (empty bar)
- Barbell back squats
Film your bodyweight squats sideways. If your hip crease doesn’t drop below knee level while keeping knees tracking over toes, reduce depth and add ankle mobility drills. Shallow squats under load guarantee injury.
Fix These Two Deadly Form Flaws Now
Knees caving inward? Place a resistance band just above knees and push outward during every rep. This activates glutes to prevent valgus collapse—the #1 cause of beginner knee pain per Escamilla (2001).
Heels lifting off floor? Elevate them 0.5 inches with small weight plates. Tight ankles restrict depth, forcing dangerous forward lean. Fix this before adding load.
Execute Every Rep with Military Precision
Your descent and ascent must follow this exact sequence—deviate by one step, and form collapses.
The 3-Second Descent:
1. Inhale deeply into your belly (360° core brace like preparing for a punch)
2. Simultaneously push hips back and bend knees—never lead with just one
3. Drive knees outward to track over second and third toes
4. Stop only when hip crease passes knee level (use a box for depth guidance)
The Explosive Ascent:
– Drive through mid-foot/heels while squeezing glutes
– Exhale forcefully after passing the sticking point (usually halfway up)
– Reset breath fully before next rep—never hold breath between sets
Why Your Breathing Technique Matters More Than Weight
Holding your breath during the entire rep (Valsalva maneuver) creates intra-abdominal pressure that stabilizes your spine. But beginners often exhale too early at the bottom, causing lower-back rounding. Practice this: inhale at the top, hold descent and bottom position, then exhale during the hardest part of the ascent.
Crush These 5 Beginner Mistakes Immediately

Excessive forward lean isn’t just “bad form”—it’s your body compensating for weak core muscles. Fix it with daily 30-second planks and bird-dog exercises before squat sessions.
Rounding lower back? Reduce weight by 20% immediately. Lorenzetti et al. (2018) proved this error increases disc pressure by 40%, risking long-term injury.
Not reaching depth? Use a box set at parallel height. Sit back to it, pause for 1 second, then stand. This teaches proper hip hinge without ego lifting.
Shrugging shoulders during the lift? Reset your grip width—hands should be just outside shoulders with elbows down. This engages upper traps to stabilize the bar.
Skipping deloads causes 50% of beginner plateaus. Every 4th week, reduce weight 10–15% or switch to goblet squats for active recovery.
Follow This 30-Day Strength-Building Plan
Start lighter than your pride allows. Your goal isn’t max weight—it’s perfect form with the empty bar (45 lb men’s, 35 lb women’s).
Weeks 1–2:
– 2x/week on non-consecutive days
– 3 sets of 8 reps with empty bar at RPE 6 (2 reps left in tank)
– Add 10-minute daily ankle mobility work
Weeks 3–4:
– Increase to 55 lb once all reps feel smooth
– Introduce goblet squats (3×10 @ 30 lb) as assistance work
– Record side-view video weekly to check depth
Critical Progression Rule: Only add 2.5–5 lb when you hit all reps with perfect form. Rushing this causes regression.
Troubleshoot Pain Before It Becomes Injury
Sharp lower-back pain? Stop immediately. Film your lift—most cases stem from poor bracing. Reduce weight 20%, add daily dead bugs, and ensure your ribcage stays “down” (not flared) during descent.
Knee discomfort? This isn’t normal “soreness.” Perform glute activation drills (banded clamshells, 2×15) before every session. If pain radiates down your leg, consult a physical therapist—never push through this.
Shoulder/wrist strain? Switch to high-bar placement and use a thumbless grip. Perform shoulder dislocates with a band daily to improve mobility.
Track Progress Like a Pro
What gets measured gets improved. Track these three metrics weekly:
- Weight lifted (never skip recording this)
- RPE (Rate of Perceived Exertion) on a 1–10 scale
- Depth consistency via side-view videos
Hit these milestones to know you’re on track:
– Week 2: 3×8 @ 45 lb with parallel depth
– Week 4: 3×6 @ 55 lb with controlled 3-second descent
– Week 8: 3×5 @ 65 lb with explosive ascent
Your Final Success Checklist
Your first 30 days set lifelong squat habits. Prioritize these non-negotiables:
- Log every session in a notebook—apps distract from focus
- Sleep 7–9 hours nightly; muscle repair happens during rest
- Eat 0.7–1g protein per pound of bodyweight daily
- Get one coaching session—a certified trainer spots flaws invisible on video
The barbell squat rewards patience over speed. Master the empty bar with perfect form, and you’ll build strength that outlasts any fitness trend. Your future self—with bulletproof knees, a resilient spine, and unshakeable gym confidence—starts today with just five minutes of bodyweight practice.
Quick-Start Checklist:
– [ ] J-hooks set 1–2″ below shoulders
– [ ] High-bar placement on upper traps
– [ ] Knees pushed out over toes
– [ ] Hip crease below knee at bottom
– [ ] Core braced like expecting a punch
– [ ] Deload every 4th week
– [ ] Video recorded weekly for form checks


