
Hauling grocery bags up three flights of stairs shouldn’t leave you wincing. That’s where the dumbbell bent over row becomes your secret weapon. This single exercise builds the exact pulling strength you use daily while simultaneously sculpting the powerful, athletic back you’ve been chasing. Forget complicated machines—this fundamental movement activates your entire posterior chain from shoulder blades to spinal erectors, teaching your body to move heavy objects safely and efficiently.
Whether you’re correcting years of desk-hunched posture or adding serious muscle mass, mastering the dumbbell bent over row delivers functional strength that transfers directly to real-world tasks. No more back spasms when lifting your toddler or awkwardly struggling with suitcases. Let’s cut through the confusion and transform your technique with actionable cues you can implement immediately.
Target Muscle Groups You’ll Activate

Primary Back Muscles Working During Rows
Your posterior deltoids fire first to initiate the pull, creating that coveted rear shoulder definition that balances out chest development. The trapezius muscles along your upper spine engage to stabilize your shoulder blades against your ribcage—critical for preventing that rounded-shoulder slump. Deep beneath, your rhomboids contract powerfully to pull your shoulder blades together, directly combating the forward-slouch of modern life. Meanwhile, your latissimus dorsi—the broad “wing” muscles spanning your back—generate the raw pulling power that creates that dramatic V-taper physique.
Don’t overlook the smaller stabilizers: Your infraspinatus and teres minor (rotator cuff muscles) lock your shoulder joint securely during movement, while the teres major assists in shoulder extension. Together, these muscles create the balanced, injury-resistant back architecture that keeps you pain-free during daily activities.
Secondary Muscles Providing Stability
Your brachialis in the upper arm works overtime to support the pulling motion without dominating the movement like your biceps might. The pectoralis major provides subtle assistance during the initial pull phase, creating balanced chest-to-back development. Most crucially, your entire core musculature—from abs to obliques to spinal erectors—contracts isometrically to maintain your neutral spine position. This core engagement is non-negotiable; without it, the exercise shifts from back builder to lower back danger zone.
Perfect Form Setup: Avoid Back Pain Before You Start
Stance and Positioning for Spinal Safety
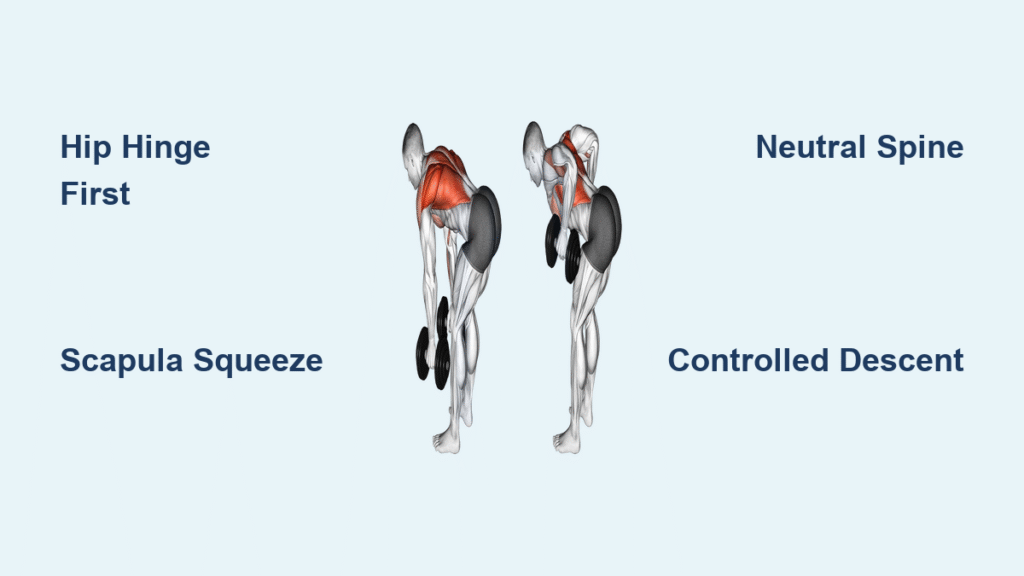
Plant your feet shoulder-width apart with knees softly bent—imagine you’re about to jump vertically. Grip dumbbells with palms facing each other in a neutral position (not forward like a traditional row). Now initiate the movement by hinging at your hips, not your waist. Push your hips backward as if closing a car door behind you until your torso reaches a precise 45-degree angle to the floor. This hip hinge—not a squat or waist bend—is what protects your lumbar spine.
Lock your spine in a neutral position with a slight natural arch (never rounded like a Halloween cat). Engage your abs as if bracing for a stomach punch—this intra-abdominal pressure creates a natural weight belt. Let the dumbbells hang straight below your shoulders with arms fully extended; they should hover just below knee level when properly positioned.
Arm Position and Grip Adjustments
Keep your elbows pointed directly backward, not flared out to the sides. This rearward elbow path maximizes back muscle engagement while minimizing shoulder strain. If your biceps dominate the movement, switch to a false grip (thumb positioned next to fingers rather than wrapped around the dumbbell). Maintain completely neutral wrists throughout—no flicking or bending at the wrist joint. This subtle adjustment prevents elbow strain and ensures the work stays in your back muscles.
Movement Execution: The Pull That Builds Real Strength
The Pull Phase: Engage Your Scapulae
Initiate each rep by driving your elbows backward toward the wall behind you—imagine trying to touch your shoulder blades together behind your back. Focus on pulling through your elbows rather than your hands; this mental cue instantly shifts the workload from biceps to back muscles. Pull the dumbbells toward the sides of your lower rib cage (not your waist), stopping when your elbows reach or slightly pass your torso’s midline. At peak contraction, you should feel intense squeezing between your shoulder blades.
The Lowering Phase: Control Equals Growth
Resist gravity during the descent—this eccentric phase builds 40% more muscle than the lifting portion. Lower the weights for a full 2-3 seconds while maintaining constant tension in your back muscles. Never drop the weights or swing them forward. Crucially, maintain your hip hinge position throughout all repetitions; your legs remain locked in their initial stance while your upper body performs all movement. Any squatting or standing up between reps shifts work away from your back.
Critical Form Cues for Maximum Muscle Activation
Shoulder Blade Mobility Secrets
Your shoulder blades should glide smoothly across your ribcage like wings—not remain locked in place. This dynamic movement creates the full range of motion necessary for complete muscle activation. Practice retracting and depressing your shoulder blades (pulling them down and together) before adding weight. This scapular movement is the true engine of the dumbbell bent over row—without it, you’re just doing arm curls with bad posture.
Head Position Experimentation
Test two head positions during your sets: looking forward at a fixed point 6-10 feet ahead, or maintaining a “neck-packed” position with your chin slightly tucked. Most lifters find the neck-packed position reduces cervical strain while preserving spinal alignment. Whichever you choose, maintain consistency throughout your set—never crane your neck upward or let it drop toward the floor.
Common Form Mistakes That Sabotage Your Progress

Rounded Back Syndrome: The Silent Killer
The Problem: Curved spine and forward-rolled shoulders reduces back muscle activation by 60% while exponentially increasing disc compression. This is the #1 cause of workout-related back pain.
The Fix: Immediately reduce weight by 30% and practice the movement in front of a full-length mirror. Place one hand on your lower back to monitor spinal position—your natural arch should remain constant. Perform 2 sets of 15 reps with just your bodyweight to master the hip hinge pattern before adding dumbbells.
Momentum Cheating: Why Your Back Isn’t Growing
The Problem: Using leg drive or torso swing to lift heavier weights creates false strength while bypassing back muscles. This builds nothing but injury risk.
The Fix: Strict tempo is your solution. Perform every rep with a 1-second pull, 1-second hold at peak contraction, and 2-second lowering phase. If you can’t maintain this tempo, the weight is 20% too heavy. Film yourself from the side to catch subtle cheating movements your body hides from you.
Exercise Variations for Every Fitness Level
Single-Arm Power Rows for Muscle Imbalances
Perform rows one arm at a time while maintaining your hip hinge position. This variation allows you to address strength discrepancies between sides—critical for injury prevention. Alternate arms continuously (right-left-right-left) for metabolic conditioning, or complete all reps on one side before switching to maximize power output per arm. Most lifters can handle 10-15% more weight per arm in this unilateral version.
Lunge Position Rows for Core Integration
Adopt a staggered lunge stance while rowing—this forces your core to stabilize against rotational forces while simultaneously engaging hamstrings and glutes. The split stance reduces lower back strain for lifters with pelvic mobility limitations. Keep your torso perfectly parallel to the floor throughout the movement; any twisting indicates core weakness that needs addressing.
Programming Guidelines: How to Progress Safely
Beginner Protocol (Weeks 1-4)
Start with just your bodyweight to master the hip hinge pattern. Once perfected, use 5-10 lb dumbbells for 2 sets of 12-15 reps with perfect form. Perform this twice weekly as part of full-body workouts. Focus exclusively on scapular movement—imagine you’re trying to pinch a pencil between your shoulder blades with each rep.
Intermediate Progression (Weeks 5-12)
Move to 3 sets of 8-12 reps using weights that challenge the last 2 repetitions. Add 2.5-5 lbs only when you complete all reps with perfect form and controlled tempo. Incorporate the dumbbell bent over row on dedicated pull days, pairing it with face pulls and pull-ups. Always perform this exercise early in your workout when your back muscles are fresh.
Safety Guidelines: Red Flags You Must Heed
Immediate Stop Signals
Cease the exercise immediately if you experience any sharp lower back pain (distinct from muscle fatigue), shoulder joint discomfort that worsens with movement, or inability to maintain neutral spine position. Never “push through” these warnings—they indicate imminent injury risk. If pain persists after stopping, consult a physical therapist before resuming.
Progression Safeguards
Master the movement pattern with extremely light weight (3-5 lbs) for two full weeks before increasing load. Only add weight when you can perform 3 sets of 12 reps with:
– Perfect spinal alignment
– No momentum cheating
– Full scapular retraction
– Controlled 3-second lowering phase
If you miss any of these criteria, reduce the weight by 20% and rebuild. Your future self will thank you when you’re lifting heavy without back pain at 50.
Integration Strategies for Real-World Results
Posture Correction Daily Protocol
Combat desk posture with 2 sets of 15 reps using 5-8 lb dumbbells performed 3 times daily. Stand in your kitchen while coffee brews or during TV commercial breaks. Focus exclusively on pulling your shoulder blades down and together—imagine trying to slide them into back pockets. Within 30 days, you’ll notice improved posture while driving and working.
Full-Body Power Circuit
Combine 10 dumbbell bent over rows with 15 bodyweight squats and 20 push-ups for a complete strength circuit. Rest 60 seconds between circuits and complete 3 rounds. This requires minimal equipment yet builds functional full-body strength that translates directly to carrying groceries, moving furniture, or playing with kids pain-free.
Mastering the dumbbell bent over row transforms not just your physique, but your relationship with gravity. This single exercise builds the pulling strength that keeps you moving freely through daily life while creating the powerful, balanced back that turns heads. Start light, obsess over form, and progressively challenge yourself. Your future self will thank you every time you lift something heavy without that familiar twinge. Grab those dumbbells today—the strongest version of you is one perfect row away.


