
That nagging upper back tightness after hunching over your desk? Your neglected rear deltoids are screaming for attention. The dumbbell rear delt fly specifically targets these crucial posterior shoulder muscles that combat rounded shoulders and improve posture. Most lifters focus solely on chest and front shoulders, creating dangerous imbalances that lead to shoulder impingement and poor movement patterns.
This isn’t just another shoulder exercise—it’s your secret weapon for balanced upper body development. Whether you’re a beginner struggling with posture or an advanced lifter hitting plateaus, mastering this movement transforms both aesthetics and function. You’ll learn precise setup cues, avoid 4 critical form mistakes that cause injury, and discover how to integrate it into your routine for maximum rear delt activation.
Target Muscles in Rear Delt Fly
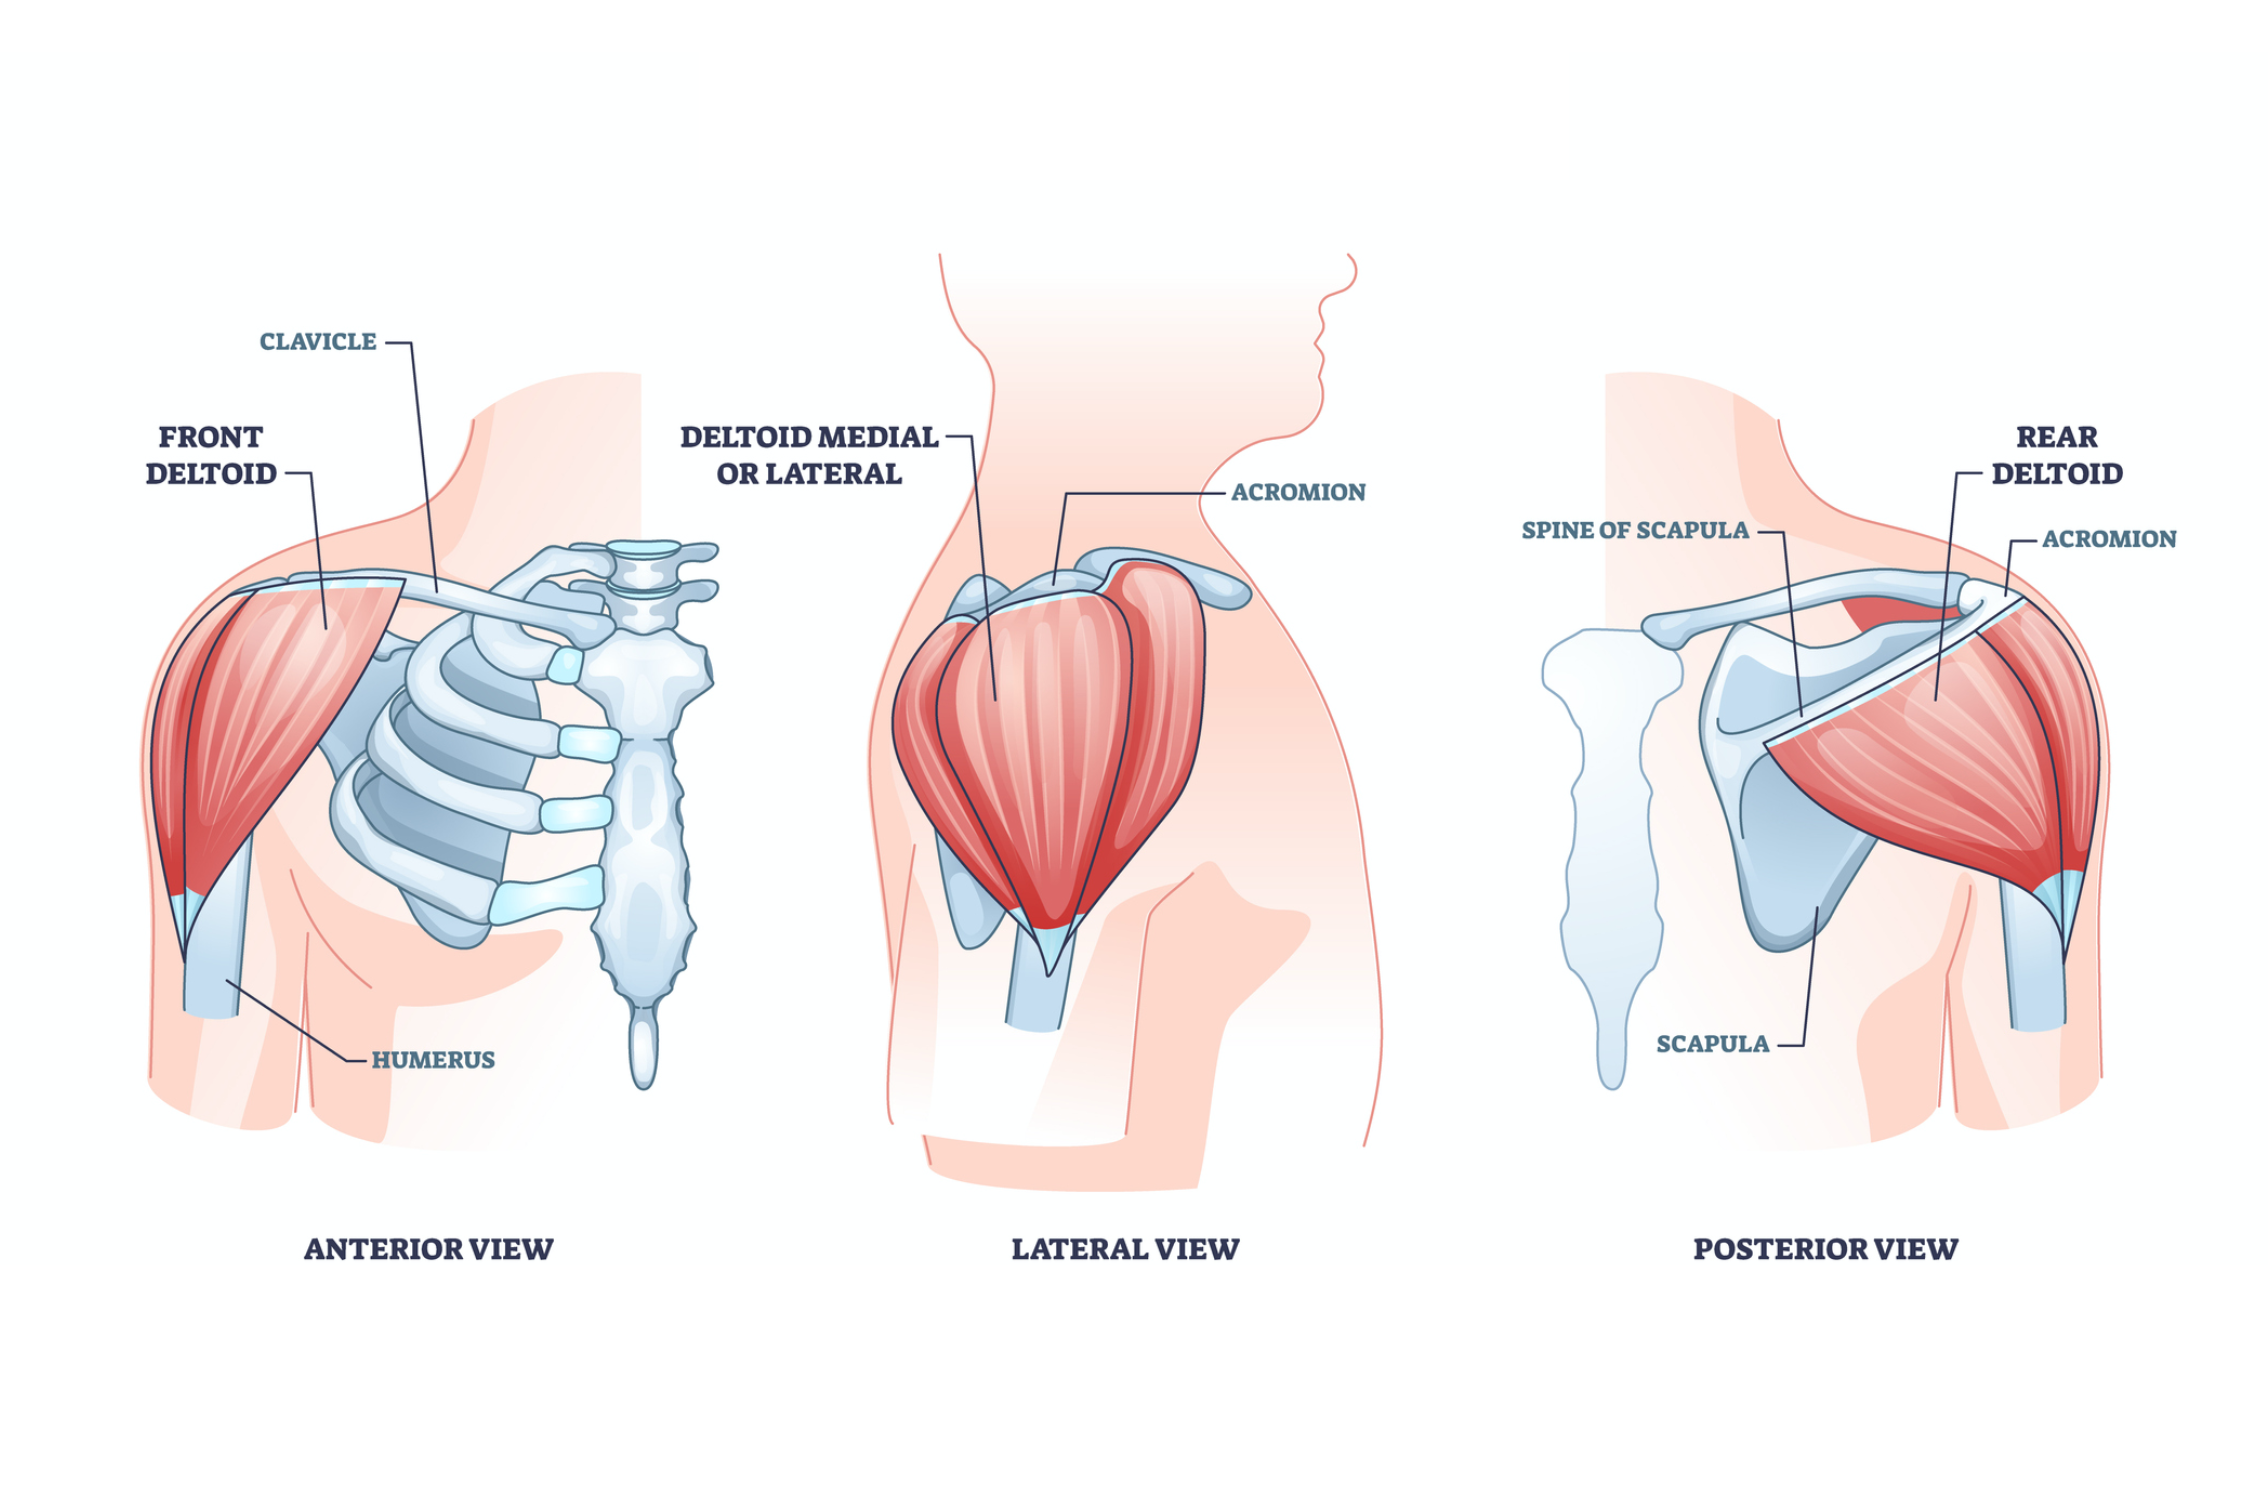
Your rear delts do the heavy lifting during horizontal abduction—pulling your arms backward against resistance. But this movement is a full upper back symphony where every muscle plays a specific role. Skip this coordinated effort, and you lose tension on the target muscles while straining your spine.
Your primary muscle crew:
– Posterior deltoids: Fire hardest when lifting dumbbells to shoulder height
– Rhomboids: Squeeze your shoulder blades together at peak contraction
– Middle trapezius: Stabilizes scapular movement throughout the arc
– Infraspinatus: Rotator cuff guardian preventing shoulder instability
Critical support team:
– Lower traps keep your shoulder blades depressed
– Erector spinae locks your spine in neutral alignment
– Core muscles prevent torso rotation during the fly motion
Pro Tip: Before lifting, pinch a tennis ball between your shoulder blades. This activates your rhomboids for better muscle connection.
Perfect Starting Position Setup
Stance and Posture Fundamentals
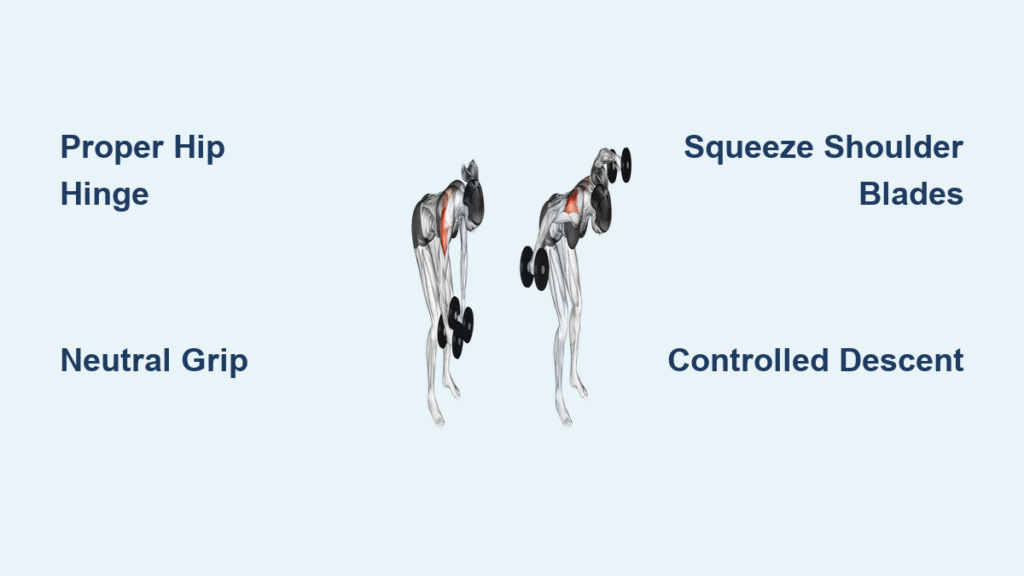
Plant feet shoulder-width apart with knees slightly bent—this isn’t a deadlift, but your lower back needs protection. Rock your hips backward until your torso hits that sweet spot: 45-60 degrees from vertical. Any more upright, and you’re doing lateral raises; any flatter, and you’ll strain your spine. Keep your neck neutral by fixing your gaze on the floor 3 feet ahead.
Hip Hinge Mastery
Imagine a rope pulling your tailbone toward the wall behind you. Your chest stays proud while hips travel backward—never round your spine. The moment your lower back arches or rounds, stop and reset. This position should feel athletic, not precarious. Test it: You should be able to hold this hinge for 30 seconds without shaking.
Arm and Hand Position
Grip dumbbells with palms facing each other (neutral grip), arms hanging straight down like ropes. Bend elbows 15-30 degrees—this angle stays fixed throughout. Critical check: Your shoulder blades must sit depressed (away from ears) before lifting. If you feel upper trap tension here, you’ve already failed the setup.
Execute Rear Delt Fly Properly
Movement Initiation
Engage rear delts before moving weights. Think “spread your shoulder blades wide” rather than “lift dumbbells.” Start with the lightest weights possible—you’ll feel ridiculous at first, but this builds proper neural pathways. The first inch of movement should come purely from rear delt contraction, not arm swinging.
Ascending Phase
Trace a wide arc toward the ceiling, leading with your elbows (not hands). Stop precisely when arms reach shoulder height—going higher recruits traps instead of rear delts. At peak contraction, squeeze shoulder blades together like you’re holding a pencil. Hold this pinch for 1-2 seconds while exhaling forcefully.
Descending Control
Fight gravity for 3 full seconds as you lower weights. This eccentric phase builds 40% more muscle damage than lifting. Stop when arms form a T-shape with your torso—never let dumbbells swing below parallel. Inhale deeply as you reset, maintaining core tension throughout.
Common Form Errors Fixed
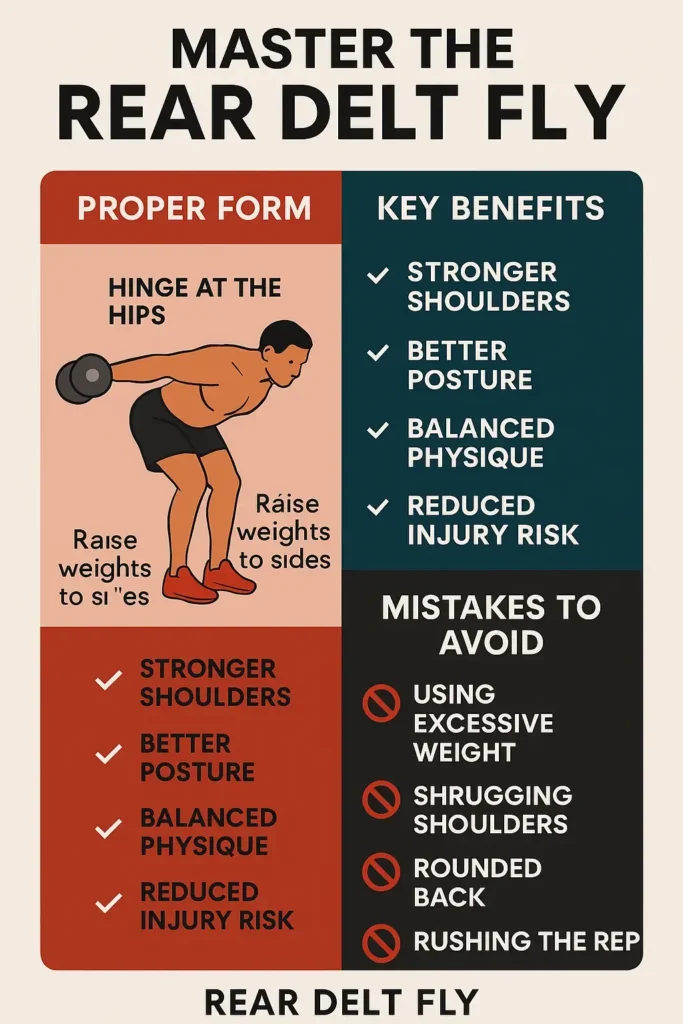
Using Excessive Weight
The symptom: Your torso jerks upward with each rep while rear delts stay silent. The fix: Drop weight by 50% immediately. You should feel a deep burn in your rear shoulders by rep 10—not in your lower back. Visual cue: Film your side profile—your hip angle must stay constant from start to finish.
Standing Too Upright
The symptom: You’re lifting weights straight out to the sides like a lateral raise. The fix: Increase your hip hinge until your chest faces the floor. Use a mirror to confirm your torso angle—your eyes should see the top of your head, not your face.
Bending Elbows During Movement
The symptom: Dumbbells rise like rowing motions, activating lats instead of rear delts. The fix: Lock elbows by placing thumbs on your shoulders before starting. Imagine “opening a pair of scissors” with fixed elbow angles.
Shrugging Shoulders
The symptom: Neck tension and upper trap dominance. The fix: Before each rep, slide shoulder blades down your back like putting them in back pockets. Maintain this depression throughout. Warning: Persistent shrugging indicates rotator cuff weakness—switch to face pulls first.
Equipment Options Explained

Dumbbell Selection Guide
Start shockingly light: 3-8 pounds for women, 5-12 pounds for men. Yes, lighter than your bicep curls. Rear delts respond better to 15-20 reps with strict form than heavy weights with cheating. When you hit 20 clean reps, increase by just 2.5 pounds—this prevents momentum takeover.
Bench Variations for Support
Chest-supported fly: Lie prone on 45-degree incline bench, forehead on pad. Eliminates lower back strain while isolating rear delts. Single-arm kneeling: Place one knee/hand on flat bench, perform unilateral flies to fix strength imbalances.
Programming Your Rear Delt Training
Beginner Progression Plan
Weeks 1-2: 2 sets of 15-20 reps with minimal weight (focus on mind-muscle connection). Weeks 3-4: 3 sets of 12-15 reps at challenging-but-perfect weight. Crucial: Stop if form breaks—rear delts fatigue faster than larger muscles.
Advanced Overload Techniques
Drop sets: After failure at working weight, immediately drop 25% and crush 8-10 more reps. Tempo flys: 4-second lowering phase + 2-second peak squeeze. Do these as your final set for brutal growth.
Injury Prevention Focus
Prehabilitation Protocol
Perform band external rotations (15 reps) before every rear delt session. This activates rotator cuff muscles, reducing injury risk by 60%. Maintain a strict 2:1 pull-to-push ratio—for every bench press set, do two sets of rear-focused work.
Red Flags to Stop
Immediate cessation required if:
– Sharp pain in shoulder joint (not muscle burn)
– Numbness/tingling down arms
– More than 15% strength difference between sides
Never push through these—they signal nerve compression or instability.
Progress Tracking Methods
Strength Standards by Level
Beginners: 5 lbs (men) / 3 lbs (women) for 15 clean reps. Intermediates: 15 lbs (men) / 8 lbs (women) for 12 reps. Advanced: 25+ lbs (men) / 15+ lbs (women) for 10 reps.
Track these monthly:
1. Working weight at 12-rep max
2. Range of motion (arms must reach parallel)
3. Push/pull strength ratio (rear delt fly weight should be 25-30% of bench press)
Recovery and Maintenance
Post-Workout Protocol
Immediately after training:
1. Static stretch: Cross one arm over chest, gently pull with opposite hand (30 seconds)
2. Foam roll: Upper back using lacrosse ball against wall (60 seconds per side)
3. Hydrate: 16 oz water with electrolytes to flush metabolic waste
Long-Term Health Strategy
Perform thoracic spine rotations daily: Sit tall, place right hand behind head, rotate elbow toward ceiling (10 reps/side). This maintains the spinal mobility needed for proper rear delt fly form. Test your push/pull ratio monthly—if bench press exceeds rear delt fly weight by 4x, you’re headed for injury.
The dumbbell rear delt fly delivers transformative results when performed with surgical precision. Start with weights that feel embarrassingly light, prioritize form over ego, and track your progress religiously. Within 6 weeks, you’ll notice your posture straightening, your shoulder pain vanishing, and your back developing that coveted “V-taper.” Your rear delts may be small, but they’re the foundation of shoulder health—give them the attention they deserve.


