
Your biceps plateau isn’t a genetics problem—it’s likely a form flaw. The incline dumbbell bicep curl delivers unmatched long-head development when executed correctly, yet 90% of lifters perform it with shoulder-dominant mechanics that sabotage results. This exercise uniquely elongates your biceps through a deeper stretch than standing curls, triggering growth in the hard-to-target outer bicep head. Most trainers overlook its critical angle requirements and tension maintenance techniques, turning what should be your most effective arm builder into wasted effort.
The magic happens when your arms hang behind your torso at the optimal incline, creating mechanical tension precisely where standard curls fall short. Forget lifting heavier weights—mastering the incline dumbbell bicep curl’s specific positioning and controlled eccentric phase builds the peaked biceps that standing curls alone can’t achieve. In this guide, you’ll discover the exact bench angle, grip technique, and movement cues proven to activate maximum muscle fibers without shoulder compensation.
Optimal Bench Angle for Long-Head Activation
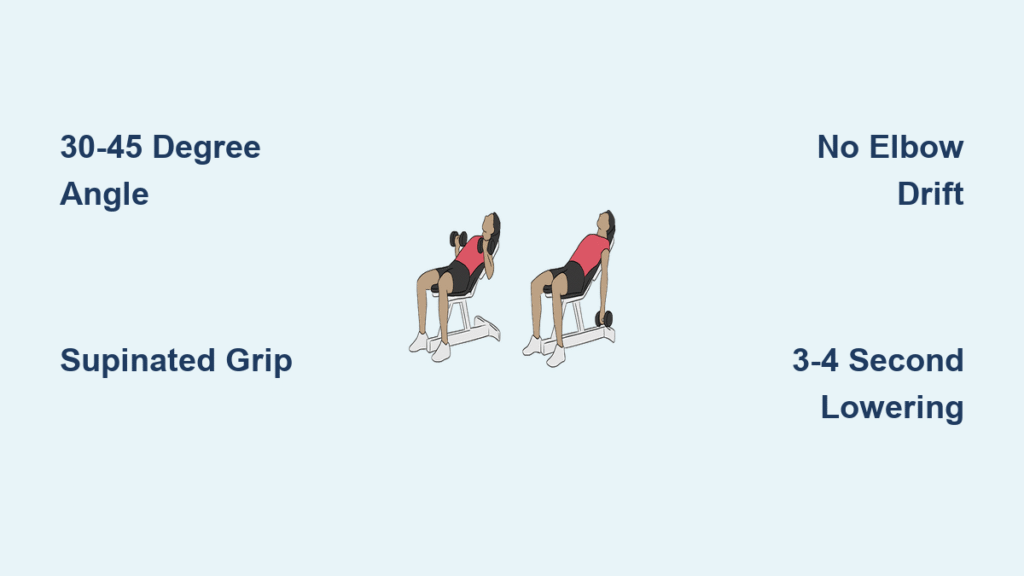
30-45 Degree Precision Zone
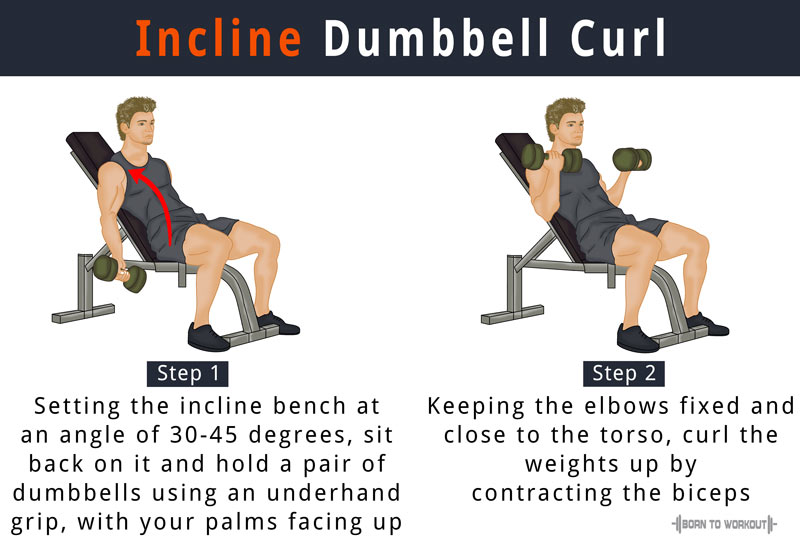
Your incline dumbbell bicep curl effectiveness lives or dies by bench angle selection. The 30-45 degree range creates the perfect biomechanical environment for long-head biceps activation while eliminating shoulder takeover. At this precise incline, your arms naturally position behind your torso, generating maximum muscle elongation during the stretch phase. Angles exceeding 45 degrees—like the commonly recommended 55-65 degrees—force excessive shoulder external rotation, shifting tension away from your biceps.
Angle Impact on Muscle Engagement
- 30-45 degrees: Optimal long-head stretch with complete biceps isolation
- Over 45 degrees: Increased shoulder involvement reduces biceps activation
- Under 30 degrees: Loses the critical behind-torso arm positioning
Pro tip: Start at 30 degrees to master the stretch position before progressing to 45 degrees as your shoulder mobility improves. Never exceed 45 degrees regardless of workout intensity.
Essential Equipment Setup Checklist

Bench and Dumbbell Positioning
Use an adjustable incline bench without rack attachments to ensure unrestricted arm movement behind your torso. Verify the bench locks securely at your target angle—any wobble destroys tension continuity during your incline dumbbell bicep curl. For dumbbells, grip handles at the exact center point, not near the plates. This balanced hold prevents rotational forces that compromise wrist alignment and biceps tension.
Critical Weight Selection Strategy
Choose dumbbells 20-30% lighter than your standing curl weight. The incline position creates immediate mechanical disadvantage—attempting your normal weight guarantees shoulder compensation. Start light enough to maintain strict form through 8-12 controlled repetitions while keeping constant tension on your biceps.
Perfect Starting Position Protocol
Body Alignment Non-Negotiables
- Back contact: Press head, upper back, and lower back firmly against the pad
- Foot placement: Plant both feet flat on floor to stabilize your pelvis
- Arm position: Let arms hang straight down with supinated grip (palms forward)
- Spinal integrity: Maintain neutral neck position without craning forward
Pre-Lift Sequence
Sit on the bench with dumbbells already in hand. Attempting to lift weights from the floor while seated strains shoulder joints and disrupts initial positioning. Ensure your upper arms remain stationary against your torso throughout setup—any forward drift before the first rep sabotages the exercise’s effectiveness.
Step-by-Step Execution Breakdown
The Growth-Triggering Movement Sequence
- Inhale deeply while engaging your core to stabilize your spine
- Curl both dumbbells simultaneously toward shoulders through pure elbow flexion
- Maintain strict elbow position—never allow elbows to drift behind your body
- Squeeze biceps maximally at the top position until further curling is impossible
- Lower weights slowly over 3-4 seconds to maximize eccentric tension
- Stop just short of full extension to preserve continuous biceps tension
Breathing and Tension Control
- Inhale at the bottom position before initiating the curl
- Exhale during the concentric (lifting) phase to maintain core stability
- Never fully extend elbows at the bottom—maintain a slight bend to keep biceps under tension
Critical Form Mistakes to Eliminate

Shoulder Compensation Fixes
When your shoulders shift forward during the lowering phase, you lose the critical biceps stretch. Fix: Actively pull your shoulder blades down and back against the bench throughout the entire incline dumbbell bicep curl. If your shoulders creep up, reduce weight immediately and reset your position.
Momentum Elimination Protocol
Swinging weights upward using body momentum transforms this isolation exercise into a shoulder/back movement. Quick test: If you can’t pause for 2 full seconds at the midpoint of the curl, you’re using excessive momentum. Lower the weight until you achieve complete control through the full range of motion.
Elbow Drift Correction
Elbows moving behind your body during the curl transfers tension to your rear delts. Visual cue: Imagine your elbows are pinned to an invisible vertical line extending from your shoulders. Any backward drift means you’ve exceeded your current strength capacity—drop the weight by 25% and rebuild strict form.
Muscle Activation Science
Long Head Targeting Mechanism
The incline dumbbell bicep curl uniquely isolates the outer bicep (long head) through its behind-torso arm positioning. This creates maximum stretch at the bottom position—where traditional curls provide minimal tension—triggering hypertrophy in the muscle head responsible for biceps peak development. The 30-45 degree incline specifically elongates this head beyond what standing or preacher curls achieve.
Secondary Muscle Engagement
- Short head biceps: Assists in elbow flexion but receives less stretch
- Medial forearm flexors: Stabilize wrist position during supinated grip
- Brachioradialis: Minimal involvement due to palms-up positioning
Programming for Hypertrophy Results
Strategic Implementation Guidelines
Perform incline dumbbell bicep curls after compound pulling movements like rows or pull-ups when your biceps are pre-fatigued but not exhausted. This exercise serves purely for aesthetic biceps development with minimal strength carryover—prioritize controlled tempo over heavy weight. Aim for 8-12 repetitions per set with strict form, focusing on the 3-4 second eccentric lowering phase that triggers muscle growth.
Volume and Frequency Protocol
Include incline dumbbell bicep curls once weekly as your primary biceps isolation movement. Start with 2-3 sets per session, ensuring each repetition maintains perfect form through the full stretch-contract cycle. Never exceed 12 total sets weekly—this isolation movement requires lower volume than compound lifts for optimal recovery.
Advanced Execution Techniques
Eccentric Enhancement Method
Extend the lowering phase to 5-6 seconds while maintaining unbroken tension on your biceps. This prolonged eccentric:
– Increases time under tension by 30-50%
– Creates micro-tears in hard-to-reach muscle fibers
– Triggers greater metabolic stress for growth
Critical: If your form breaks during extended eccentrics, return to standard 3-4 second lowering until strength improves.
Grip Rotation Variation
Begin each repetition with a neutral grip (palms facing) and rotate to supinated position (palms up) at the midpoint. This variation:
– Reduces early forearm fatigue
– Allows deeper stretch at the bottom position
– Increases peak contraction intensity
Troubleshooting Common Failures
No Biceps Pump During Exercise?
You’re experiencing elbow drift—the #1 form failure. Reset your position: press upper arms firmly against your torso and reduce weight by 30%. Your elbows must stay vertically aligned with your shoulders throughout every repetition of the incline dumbbell bicep curl.
Shoulder Pain During Lowering?
Your bench angle exceeds 45 degrees. Drop to 30 degrees immediately—higher angles force excessive shoulder external rotation. If pain persists, discontinue the exercise until you improve shoulder mobility through dedicated stretching.
Forearm Fatigue Ending Sets Early?
Switch to neutral grip throughout the movement. While this reduces long-head activation slightly, it allows you to complete full sets with proper biceps tension. Gradually transition back to supinated grip as your forearm endurance improves.
Key Takeaways for Biceps Transformation
The incline dumbbell bicep curl delivers unmatched outer bicep development when executed within the 30-45 degree sweet spot with strict form. Its power lies in the deep stretch position that standard curls can’t replicate—provided you eliminate elbow drift and shoulder compensation. Remember: lighter weights with perfect 3-4 second eccentrics build more muscle than heavy swinging repetitions. This isolation movement won’t increase your deadlift, but it will create the biceps peak that standing curls alone can’t achieve.
Start every session with this exercise after proper warm-up, using weights that allow flawless form through 8-12 repetitions. Track your progress by measuring eccentric control—not just added weight—and within 6 weeks, you’ll see new separation in your biceps. The incline dumbbell bicep curl isn’t just another arm exercise—it’s your secret weapon for biceps that pop from every angle.


