
Ever watched someone at the gym swinging heavy dumbbells like a pendulum, their body jerking with each rep? That’s the exact opposite of proper dumbbell curl form. The difference between building impressive biceps and wasting months of effort lies in microscopic details most lifters ignore—elbow positioning, controlled tempo, and muscle engagement that transforms a simple curl into a growth-producing powerhouse. Whether your arms feel like spaghetti after curls or you’re stuck at the same weight for months, mastering these mechanics will revolutionize your arm training. Let’s break down the precise steps that separate effective curls from ego lifts.
Muscle Activation Secrets You’re Missing

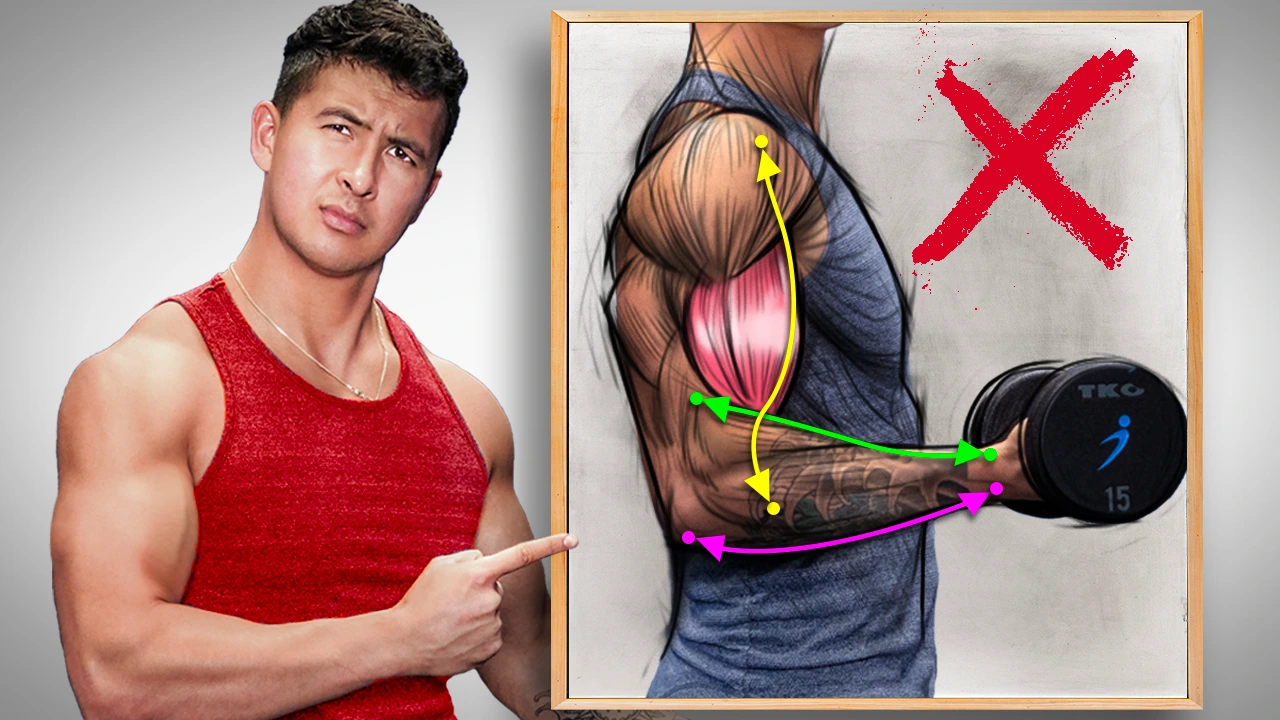
Your biceps aren’t the only stars in this movement. Proper dumbbell curl form strategically engages three critical muscles that build arm mass from every angle. The biceps brachii (both long and short heads) creates that coveted peak when fully contracted. Hidden beneath it, the brachialis pushes your biceps upward, adding thickness that fills out shirt sleeves. Meanwhile, the brachioradialis along your forearm builds lower-arm width that makes your entire arm look powerful.
What most lifters ignore is how secondary muscles sabotage your gains when form breaks. Your anterior deltoids eagerly take over when elbows drift forward, while weak core muscles allow torso swinging that cheats your biceps out of growth. Locking down these stabilizers keeps tension exactly where it belongs—on your target muscles.
Bulletproof Starting Position Checklist
Stance and Core Setup That Prevents Cheating
Stand with feet hip-width apart in an athletic stance—knees soft, not locked. Brace your core by drawing your navel toward your spine as if preparing for a punch. This protects your lower back and eliminates the body English that turns curls into full-body exercises. Keep your chest proud and shoulders pulled down and back; shrugged shoulders invite shoulder takeover.
Arm and Grip Placement for Maximum Tension
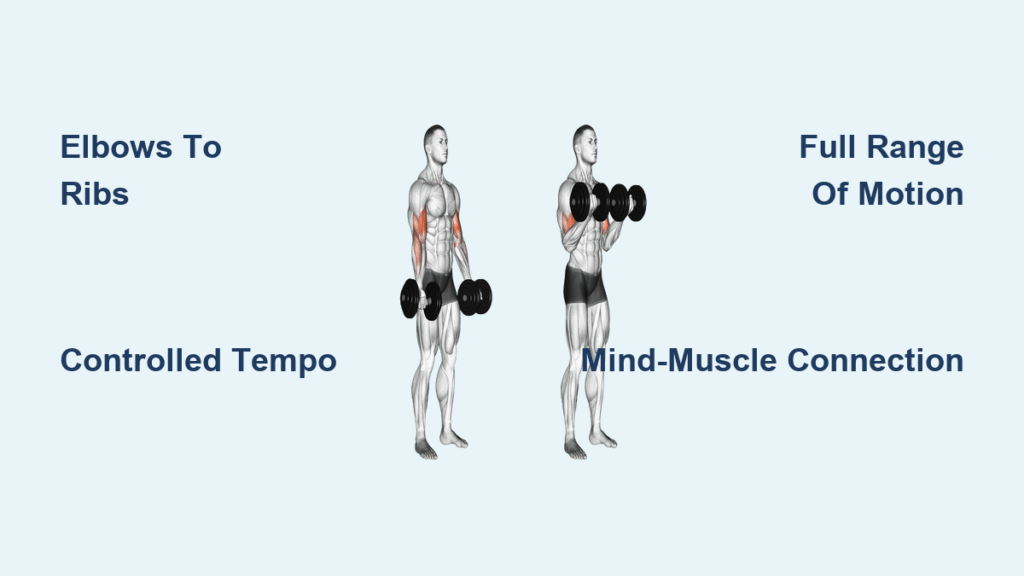
Hold dumbbells with palms facing forward in a supinated grip, arms hanging naturally at your sides. Lock elbows against your torso like they’re glued to your ribs—this is non-negotiable for isolating biceps. Experiment with a thumb-less grip (thumb alongside fingers) only after mastering standard grip, as it intensifies peak contraction but reduces safety. Before your first rep, remove slack by slightly flexing elbows to maintain constant tension from rep one.
Concentric Lifting Phase: Power Without Swinging
Controlled Curl Initiation
Start each rep by exhaling forcefully while slowly flexing elbows. Your upper arms must stay cemented in place—only forearms move. As dumbbells rise, rotate palms upward toward the ceiling to fully engage the biceps’ forearm rotation function. Never let elbows drift forward; picture them as hinges screwed to your ribs. If your torso rocks, reduce weight by 20% immediately.
Peak Contraction That Builds Real Mass
Stop when dumbbells reach shoulder level, just before touching your torso. Squeeze biceps hard for one full second—imagine cracking walnuts between your elbows and forearms. Avoid resting weights against your body; this kills tension. The top position should feel like your biceps are shortening maximally, not like you’re balancing dumbbells on your shoulders.
Eccentric Lowering Control: Where Growth Happens
The 3-Second Descent Rule
Fight gravity on the way down with a deliberate three-second lowering phase. This eccentric loading triggers 40% more muscle growth than the lifting portion alone. Maintain rigid elbow position—imagine lowering dumbbells along invisible tracks toward your hips. Stop just short of full elbow extension to avoid hyperextension while maintaining tension. If you can’t control the descent, the weight is too heavy.
Breathing Pattern for Endurance
Inhale deeply during the lowering phase, filling your belly like a balloon. This prevents dangerous blood pressure spikes while oxygenating working muscles. Shallow breathing starves your biceps of oxygen, forcing you to quit reps early. Pair this with the 2-0-3 tempo (2 seconds up, no pause, 3 seconds down) for optimal growth stimulus.
Form Mistakes That Kill Your Gains
Momentum and Body English
If your hips thrust or torso rocks, you’ve turned curls into front raises. Drop weight immediately and perform curls with your back pressed against a wall to eliminate cheating. This humbling fix exposes weak biceps and builds real strength. Never sacrifice control for heavier weights—partial reps with perfect form beat sloppy heavy lifts every time.
Elbow Drift That Invites Shoulder Takeover
When elbows flare outward or drift backward, anterior deltoids hijack the movement. Cue “elbows to ribs” with every rep. If this feels impossible, switch to incline dumbbell curls where the bench physically locks your arms in place. Proper elbow path creates that deep biceps stretch you can’t fake.
Range of Motion Errors
Partial reps = partial results. Use the fullest pain-free range: full stretch at the bottom (without elbow lockout), peak contraction at the top. If you can’t straighten arms completely at the bottom, the weight’s too heavy. Check your form: Can you feel a deep stretch through your biceps at full extension? If not, reduce weight.
Advanced Performance Hacks
Mind-Muscle Connection That Boosts Fiber Recruitment
Visualize your biceps shortening with each lift and lengthening during the descent. This mental focus increases muscle activation by up to 22% according to EMG studies. Feel the burn precisely in the biceps belly—not general arm fatigue. If your forearms burn first, you’re bending wrists or using momentum.
Wrist Position Mastery
Keep wrists rigid and neutral throughout—no bending toward or away from your body. Wrist flexion shifts load to smaller forearm muscles, robbing biceps of growth. If wrists fatigue before biceps, strengthen them separately with farmer’s carries. During curls, imagine holding a glass of water on the back of your hand—any wrist bend spills it.
Smart Load Selection Strategy
Choose weights allowing 8-12 perfect reps where the last 2-3 feel challenging but controllable. If you can’t maintain the 2-0-3 tempo, reduce weight. Progress comes from perfect reps, not ego lifts. A 5-pound jump that breaks form sets you back weeks; a 2.5-pound increase maintained with perfect form builds lasting mass.
Safety and Injury Prevention Essentials
Warm-Up Protocol That Prevents Tears
Skip cold curls at your peril. Spend 5-7 minutes on light rowing or arm circles, then perform dynamic shoulder dislocations and elbow circles. Cold muscles tear under load—warm muscles grow. Never start curls with heavy weights; begin with 30% of your working weight for 15 controlled reps.
Pain Recognition: Stop Immediately
Sharp elbow, wrist, or shoulder pain means STOP. Distinguish between muscle burn (good) and joint pain (dangerous). If you have existing elbow tendinitis, consult a physiotherapist before curling. Pushing through pain creates chronic injuries that sideline progress for months.
Progressive Loading Rules
Limit weight increases to 5% weekly. Tendons adapt slower than muscles—respect this timeline. Jumping 10 pounds overnight stresses biceps tendons beyond their capacity. Track every workout; when you hit 12 reps with perfect form, increase by just 2.5 pounds per dumbbell. Small, consistent jumps build bulletproof arms.
Mastering proper dumbbell curl form transforms wasted gym time into explosive arm growth. Forget swinging heavy weights—true strength comes from making lighter weights feel brutal through precise control. Your biceps will respond faster to 10 pounds with perfect 3-second eccentrics than 25 pounds with cheating. The next time you grab dumbbells, remember: it’s not about how much you lift, but how well you lift it.
Immediate action: Film yourself curling from the side right now. Check for elbow drift, torso swing, and full range of motion. The camera reveals what mirrors hide—and one honest form check beats months of stalled progress. Your future arms thank you in advance.


