
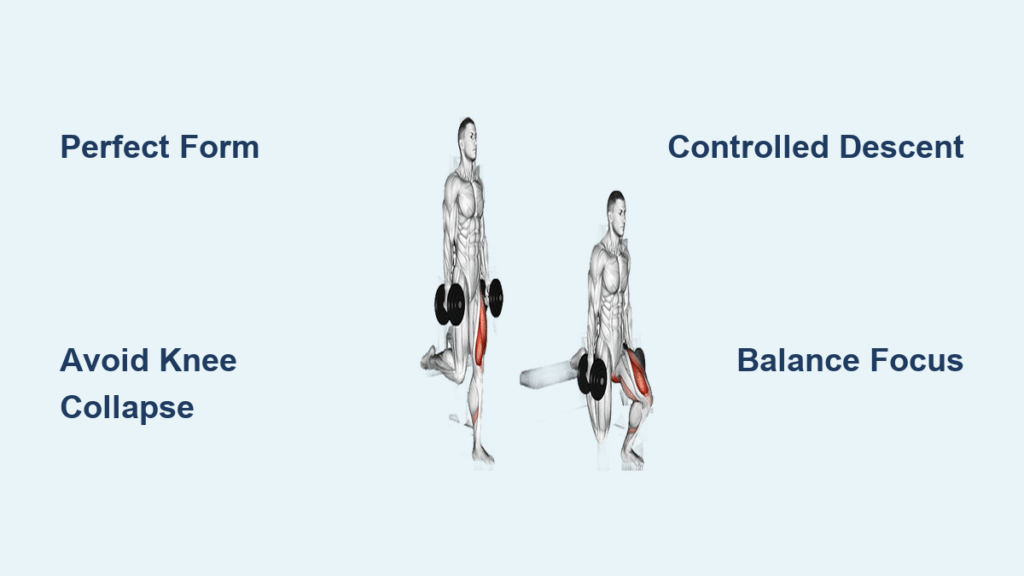
Your legs shake as you struggle up the stairs after leg day. That familiar burn means your workout hit the right muscles—but are you maximizing every rep? The dumbbell split squat transforms ordinary leg training into targeted strength building that sculpts quads, glutes, and hamstrings while fixing muscle imbalances most exercises miss. Unlike basic squats that distribute weight evenly, this static lunge variation forces each leg to work independently, revealing and correcting strength differences between your dominant and non-dominant sides.
Whether you’re building foundational strength or breaking through plateaus, mastering the dumbbell split squat delivers results that translate directly to athletic performance and daily movement. This unilateral movement challenges your balance while building serious lower body power. In this guide, you’ll discover exactly how to perform the dumbbell split squat with perfect form, avoid common mistakes that lead to injury, and leverage advanced variations to target specific muscle groups.
Why Your Dumbbell Split Squat Feels Different Than Regular Lunges
The split squat often gets mistaken for a lunge, but one key difference changes everything about muscle activation. Your feet stay planted throughout the entire movement, creating constant tension that eliminates momentum cheating. This static position forces greater stability demands on your core and hip muscles compared to walking lunges where you reset between steps.
Traditional lunges involve stepping forward or backward, then pushing back to start. This movement allows brief rest periods between reps. The dumbbell split squat removes these micro-rests, keeping muscles under continuous load for superior time-under-tension benefits. Your stabilizing muscles work overtime maintaining balance, making lighter weights feel significantly heavier. You’ll notice immediate differences in muscle engagement when performing 10 consecutive reps versus walking lunges with the same weight.
How Static Positioning Boosts Muscle Growth
Without the opportunity to reset between reps, your working leg remains under constant tension—this is where serious muscle growth happens. The back leg’s hip flexors experience a deep stretch while the front leg handles the primary workload. This continuous tension triggers greater metabolic stress—a key driver of hypertrophy—compared to traditional lunges where muscles get brief recovery between steps.
You’ll feel this difference immediately in your quads and glutes. The lack of momentum means you can’t “cheat” through weak points in the range of motion. Every inch of movement requires muscular control, making the dumbbell split squat superior for building functional strength that translates to real-world movement patterns.
Muscles Targeted by the Dumbbell Split Squat

Every rep of the dumbbell split squat creates a full lower body chain reaction. Quadriceps fire explosively during the ascent, particularly the vastus lateralis and rectus femoris. Your glutes activate powerfully as hip extensors, especially when driving through the heel. Hamstrings work eccentrically during descent and concentrically during the drive upward.
The core muscles engage continuously to prevent rotation and maintain upright posture. Your calves stabilize ankle position throughout the movement. Even smaller muscles like the hip flexors of the back leg experience deep stretching while the adductors of the front leg work to maintain knee tracking over toes. This comprehensive muscle recruitment makes the dumbbell split squat one of the most efficient lower body exercises you can perform.
Visual Cues for Proper Muscle Engagement
Watch for these signs that you’re hitting the right muscles: Your front quad should feel a deep burn during the descent phase. At the bottom position, you should feel your glute engage as you prepare to drive upward. The back leg’s hip flexor will stretch significantly—this is normal and indicates proper positioning. If you feel excessive strain in your lower back, your torso is leaning too far forward or your core isn’t properly engaged.
Essential Setup for Perfect Dumbbell Split Squat Form
Grab two dumbbells matching your current strength level—start lighter than you think. The beauty of this exercise lies in muscle isolation, not ego lifting. Flat-soled shoes or barefoot training provides better ground connection than cushioned running shoes. You’ll need 2-3 feet of clear space in front and behind your starting position.
Achieving the Ideal Stance Position
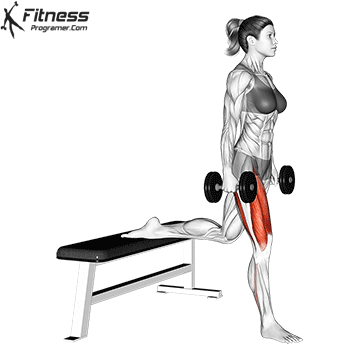
Stand tall holding dumbbells at your sides with neutral grips. Step one foot forward approximately 2-3 feet—the exact distance depends on your height and limb length. Your back heel should lift naturally, with weight on the ball of your back foot. Square your hips forward like headlights pointing straight ahead. Keep your torso tall but not rigid—imagine a string pulling your chest up while your shoulders remain relaxed.
The dumbbells should hang directly beside your hips, not swinging forward or backward. Your front foot stays flat, ready to drive through the entire foot. This starting position determines your entire movement pattern—adjust your stance until you feel balanced with equal weight distribution between both legs.
Executing the Controlled Descent
Initiate the movement by simultaneously bending both knees. Your front knee tracks directly over your ankle—never let it cave inward or push past your toes. Lower until your back knee nearly touches the ground beneath your hip. This depth ensures full range of motion without compromising form.
Maintain vertical shin alignment on your front leg throughout the descent. Your torso naturally leans forward slightly—don’t fight this lean by arching your back. Instead, hinge slightly at the hips while keeping your chest proud and core braced. The entire lowering phase should take 2-3 seconds for maximum muscle engagement.
Driving Through the Powerful Ascent
Drive explosively through your front heel, imagining you’re pushing the floor away from you. Your back foot provides balance only—avoid pushing off with your back toes. Squeeze your glutes hard at the top, fully extending both knees without locking out aggressively.
Control the speed—2-3 seconds down, 1-2 seconds up creates optimal muscle tension. Each rep should feel smooth and controlled, not jerky or rushed. After completing reps on one side, switch legs completely rather than alternating between reps. This unilateral approach ensures each leg receives equal attention and workload.
Common Dumbbell Split Squat Mistakes That Sabotage Your Progress
Knee valgus collapse ranks as the most dangerous error—when your front knee caves inward during ascent. This often stems from weak glutes or poor motor control. Fix it immediately by reducing weight and focusing on knee tracking over your second and third toes. Imagine spreading the floor apart with your front foot to activate the proper stabilizing muscles.
Excessive forward lean places unnecessary stress on your lower back. While some torso lean is natural, don’t fold like a taco. Keep your chest proud and core braced throughout the movement. Shortening your stance often corrects this tendency by reducing the required hip hinge angle. If you’re an overextended athlete, allow a slightly greater forward lean to maintain a neutral spine position.
Rushing through reps eliminates muscle-building tension. Each rep should take 3-5 seconds total—fast concentric movements reduce muscle fiber recruitment significantly. Count tempo out loud if you’re speeding unconsciously. The eccentric (lowering) phase creates most muscle damage and growth stimulus, so don’t skip this critical component.
How to Modify Your Split Squat for Specific Muscle Targets
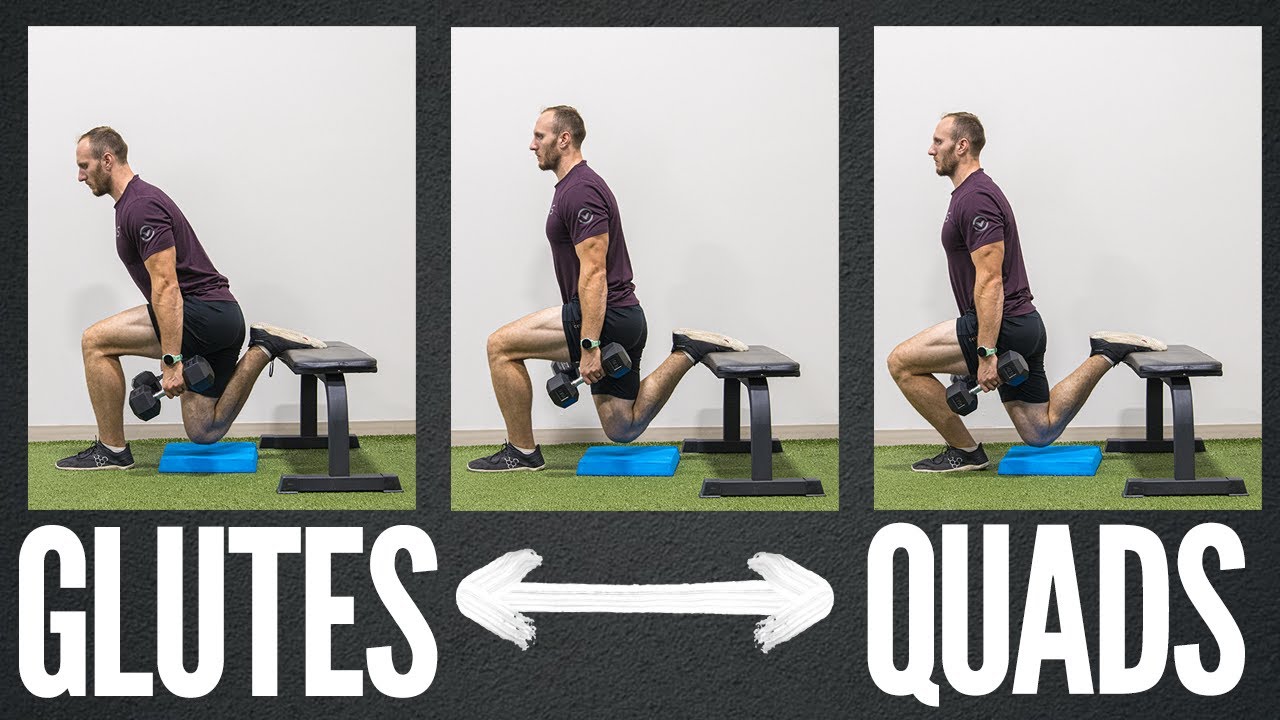
Take a longer stride—your feet should be 3-4 feet apart. This extended stance reduces knee angle and increases hip flexion. Drive exclusively through your front heel, lifting your front toes slightly off the ground during the ascent. This modification forces maximum glute activation.
Lean your torso forward 15-20 degrees, maintaining a neutral spine. This hip hinge position loads the posterior chain heavily. Pause for 2 seconds at the bottom, feeling the stretch through your back leg hip flexor and front leg glute. For quad-focused work, shorten your stance by 6-8 inches to increase knee flexion while keeping your torso more upright.
Advanced Band Techniques for Muscle Activation
Loop a light resistance band around the front of your front knee, anchored to a rack behind you. The band pulls your knee inward, forcing your glute medius to fire and maintain proper tracking. Start with minimal resistance—this technique magnifies muscle activation dramatically. If your knee keeps diving inward, this corrective exercise rebuilds proper movement patterns while strengthening stabilizing muscles.
For added difficulty, loop bands around your hips or shoulders to create accommodating resistance. The band tension increases as you rise, matching your strength curve perfectly. Combine band resistance with tempo work for brutal muscle-building stimulus. These advanced techniques transform the basic dumbbell split squat into a precision muscle-building tool.
Programming Your Dumbbell Split Squat for Maximum Results
Perform split squats early in your leg workout when fresh—after squats but before isolation exercises. Superset with upper body movements to maximize training density without overloading your legs. Pair with push-ups or rows for efficient full-body circuits.
Program 2-3 times per week for optimal strength gains, allowing 48-72 hours recovery between sessions. Use different variations across the week—quad-focused Monday, glute-emphasis Thursday. Track weights and reps meticulously; small increases add up significantly over months. Start with 3 sets of 8-10 reps per leg using just bodyweight, then gradually add weight as your form improves.
Knee Pain Prevention During Split Squats
Start with bodyweight only if you experience any knee discomfort. The dumbbell split squat often reveals existing imbalances that heavier bilateral exercises mask. Elevate your back foot on a small platform to reduce hip flexor strain and improve balance—this variation (Bulgarian split squat) shifts emphasis to the front leg while reducing knee stress.
Focus on controlled eccentrics—the lowering phase creates most muscle damage and strength gains anyway. Ice post-workout if you feel any sharp pain, and consider consulting a professional before progressing. Band-assisted knee tracking exercises strengthen stabilizing muscles over time, addressing the root cause of many knee issues during lower body movements.
Mastering the dumbbell split squat transforms your leg training from basic to exceptional. Each controlled descent builds unilateral strength while every powerful ascent corrects muscle imbalances most lifters never address. Start light, perfect your form, and watch your overall squat numbers climb as weak links become strengths. Your legs—and your performance—will never be the same. Implement these techniques today and feel the difference in your next leg day.


