
Your hamstrings feel tight after leg day, yet they still look flat from the side. You’re not alone—most lifters hammer squats and deadlifts but skip direct knee-flexion work. The dumbbell hamstring curl fills that gap, carving out the muscle definition that hip-hinge moves often miss. Without this targeted movement, you’re leaving crucial posterior development on the table. Below you’ll learn the exact setup, cues, and progressions to turn this old-school move into your secret weapon for fuller legs. Expect visible thickness in the back of your thighs within 6–8 weeks when programmed correctly.
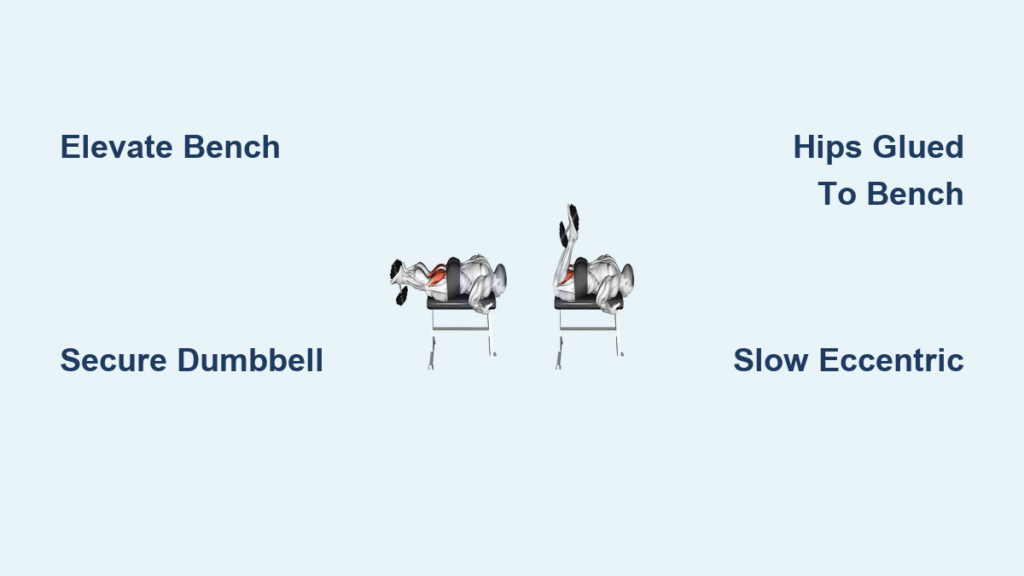
Elevate Your Bench for Maximum Hamstring Stretch
Skip this step and you sacrifice 2–3 inches of growth-driving range. Stack two bumper plates or a sturdy aerobic step under the foot end of a flat bench to raise it 15–30 cm off the floor. This elevation lets your shins drop below parallel, creating a deeper stretch at the start and stronger contraction at the top. The knowledge base confirms this position maximizes mechanical tension by allowing full knee extension without bench interference. When elevated properly, you’ll feel an immediate pull through the entire hamstring belly—not just near the knee.
Why Ground-Level Benches Limit Growth
Using a grounded bench restricts your range of motion by preventing complete leg extension. Your shins hit the floor before achieving the full stretch, cutting tension short by 15–20%. The knowledge base notes this reduces eccentric overload—the critical muscle-building phase. If elevation isn’t possible, place a rolled towel under your ankles to create minimal clearance, but expect suboptimal results compared to the elevated method.
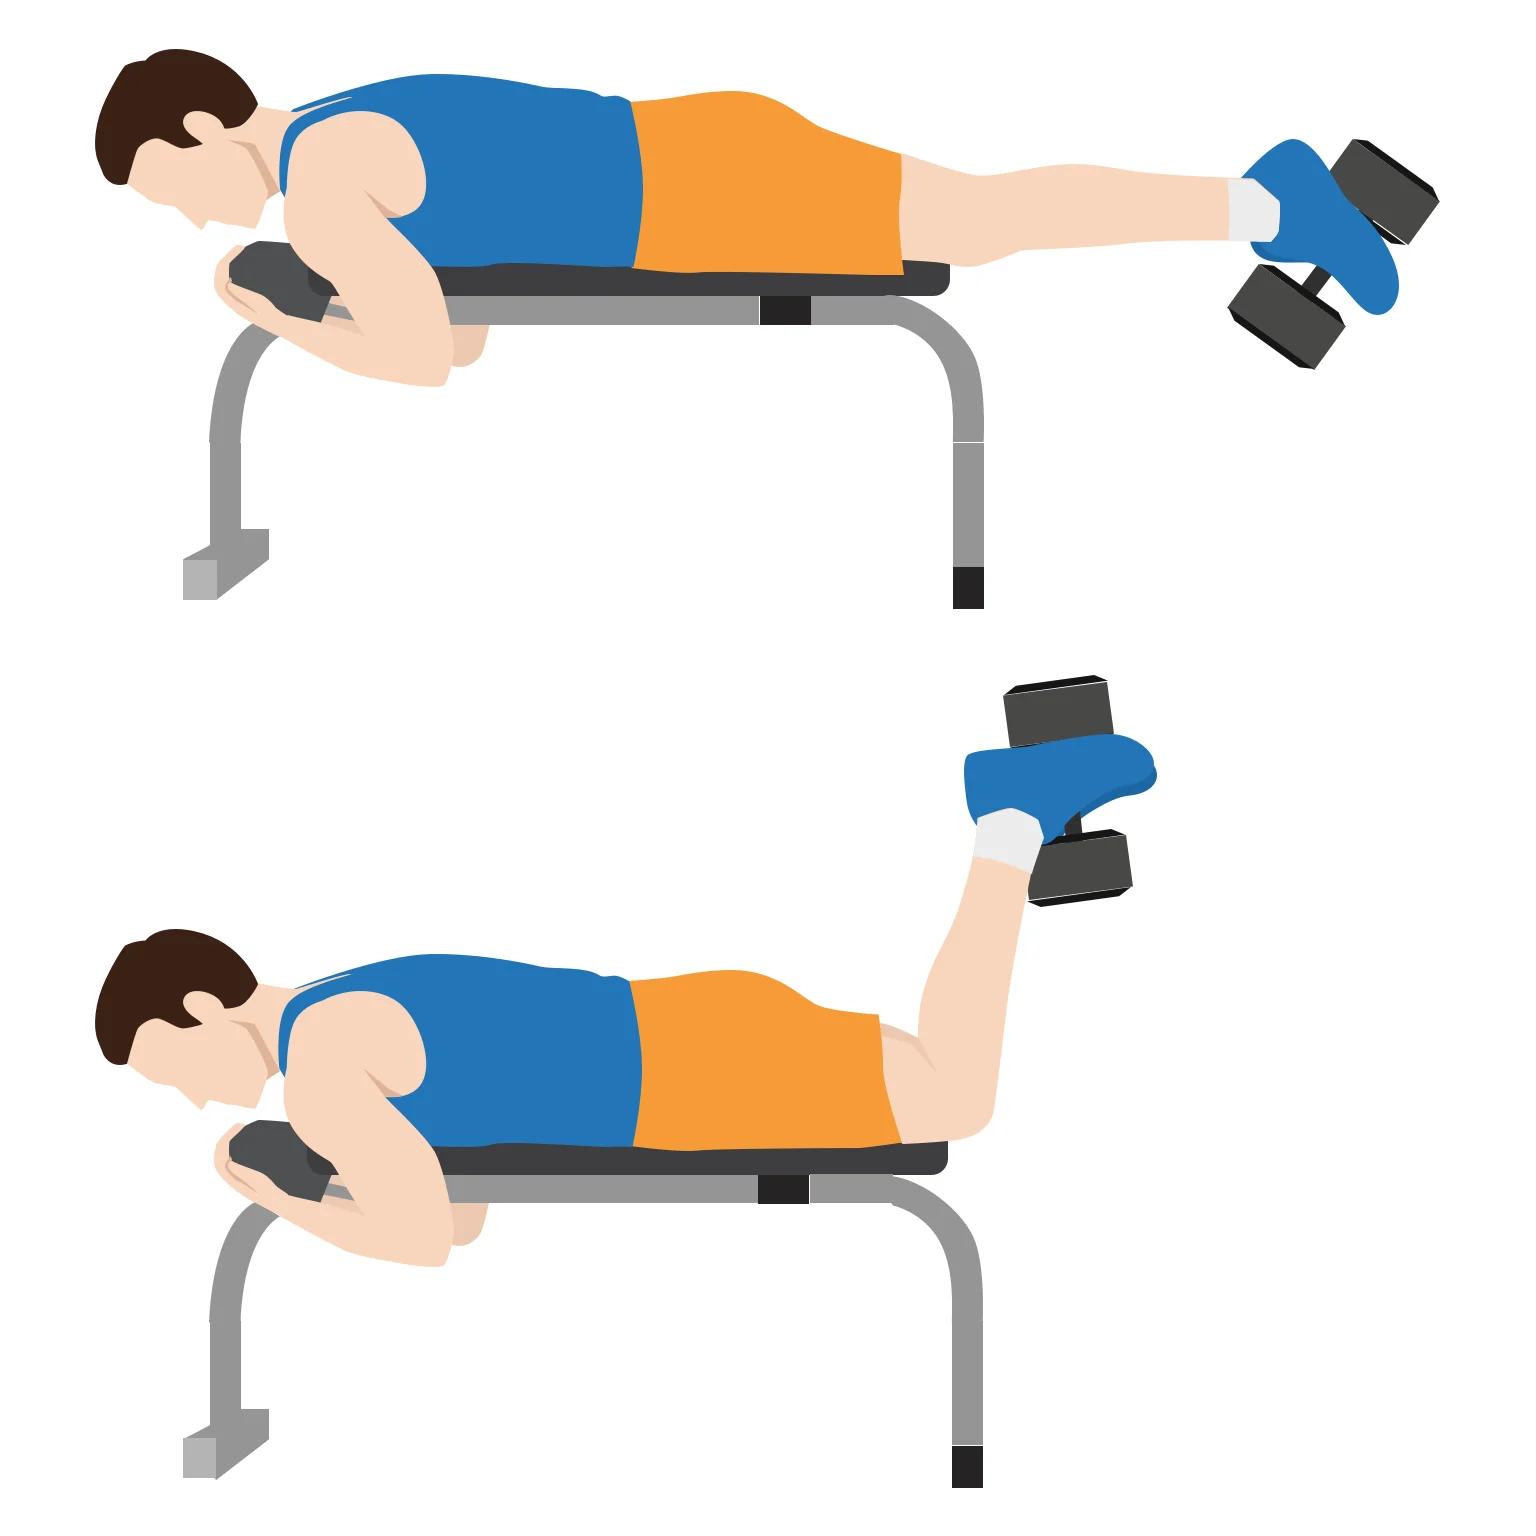
Secure Your Dumbbell Like a Pro (No More Slips)
Hex-head dumbbells are non-negotiable—round pro-style handles roll off your arches mid-set. Pinch the handle firmly between the arches of both feet with ankles flexed (toes pointed slightly downward). Beginners often grab too high on the foot, causing the weight to tip. Place it dead-center where your arches meet, creating a stable “cradle.” For extra security, wrap athletic tape around the dumbbell handle for better grip friction. If you hear the dumbbell clanking against the bench during lowering, reset your foot position immediately—this indicates dangerous instability.
Fix Slipping Dumbbells in 10 Seconds
When your dumbbell slips repeatedly, loop a mini resistance band under the bench and over your ankles. The band’s upward tension counteracts the weight’s downward pull, creating artificial stability. As noted in the knowledge base, this “band assistance” technique is ideal for beginners learning the movement pattern. Alternatively, place a thin yoga block between the dumbbell and your soles—it acts as a non-slip platform while maintaining full range of motion.
Perfect Body Positioning Checklist
Lie face-down and walk forward until your kneecaps just clear the bench edge. Your thighs must remain fully supported while lower legs hang freely. Grab the bench rails tightly with both hands—this prevents torso rotation that steals tension from your hamstrings. Press your hips hard into the bench; any gap here means your glutes will compensate. Perform this quick test: lift one foot slightly off the dumbbell. If your hip rises, reset your position. The knowledge base emphasizes this “hips glued to pad” cue prevents lumbar hyperextension and isolates the hamstrings.
Critical Hand Placement Mistake
Most lifters rest hands loosely on the bench, allowing subtle hip lift. Instead, grip the bench frame like you’re pulling yourself up. This engages your lats and core, creating a rigid torso platform. Feel your lower ribs press into the bench—this is your stability checkpoint. When executed correctly, you’ll notice your hamstrings burning within 3 reps while your lower back stays cool.
Execute the 5-Second Rep for Hypertrophy
1. Start Long (2 seconds):
Let legs hang straight with dumbbell suspended. Feel a deep stretch behind your knees. Core braced, hips pressed into bench—no movement here.
2. Curl Up Smoothly (1 second):
Exhale and pull the dumbbell in a controlled arc. Stop when shins reach 90° to quads (thighs parallel to floor). Pushing higher lifts hips, shifting work to glutes.
3. Squeeze Hard (1 second):
Pause at the top, actively cramping hamstrings. Imagine trying to pinch a coin between your calves and hamstrings.
4. Lower Slowly (3 seconds):
Inhale while fighting gravity for 3 full seconds. The knowledge base specifies this eccentric phase drives 80% of growth—never drop the weight.
5. Reset Tension (1 second):
At full extension, actively resist the dumbbell’s pull for 1 second before next rep. This maintains constant hamstring engagement.
Diagnose Your Form Failures in Real-Time

Why Your Hips Pop Off the Bench
When your belt line lifts during curls, two issues are at play: weight is too heavy or core disengagement. The knowledge base identifies this as “hip extension substitution”—your glutes take over when hamstrings fatigue. Fix it immediately by reducing weight 25% and focusing on “belly button to bench” pressure. Continue until you can complete sets without pelvic movement.
Stop Ankle Roll Injury Risk Now
If your ankles wobble or roll inward, your foot positioning is unstable. This strains the Achilles and risks dropping the dumbbell. Place the weight higher on your insteps (near the ball of your foot) for better leverage. Wear minimalist shoes with flat soles—thick-cushioned running shoes create dangerous slippage as noted in safety guidelines.
Program for Visible Hamstring Thickness
Hypertrophy Protocol: 3 sets × 10–12 reps after Romanian deadlifts. Use 2-1-3 tempo (2s up, 1s squeeze, 3s down). Rest 90 seconds. When hitting 12 reps easily, increase weight by 2.5–5 lb. The knowledge base confirms this volume triggers maximal growth for isolation moves.
Endurance Finisher: After main lifts, do 2 sets × 15–20 reps with 45-second rests. Pair with hip thrusts: 15 curls immediately followed by 15 thrusts. This superset floods hamstrings with blood while balancing posterior development.
Track Progress Like a Strength Coach
After four weeks, test your 8-rep max using the Brzycki formula: 1RM = Weight ÷ (1.0278 – 0.0278 × 8). Example: 25 lb for 8 reps = 25 ÷ (1.0278 – 0.2224) = 31 lb estimated 1RM. Log these four metrics per session:
– Date & weight used
– Reps achieved
– RPE (Rate of Perceived Exertion 1–10)
– Form notes (“hips lifted on rep 10”)
The knowledge base stresses this tracking prevents plateaus. When your 8RM increases by 10%, you’ve earned a weight jump.
Safety-First Gym Maintenance
Wipe sweat off bench pads and dumbbell handles after every set—corrosion from salt accelerates wear. Check bench upholstery monthly; small tears grow rapidly when feet kick during curls. Patch with athletic tape immediately. Inspect dumbbell knurling quarterly; smooth handles cause slips. Rotate dumbbells regularly to prevent uneven wear on specific pairs.
Why This Beats Machine Curls for Real-World Strength
The dumbbell hamstring curl forces unilateral stability that machines can’t replicate. While seated curl machines allow heavier loading, they remove the balance challenge that engages stabilizer muscles. As the knowledge base states, this free-weight version “hammers stabilizers” while building functional strength transferable to sprinting and jumping. For home gym warriors, it delivers machine-like isolation with minimal equipment.
Master these details and your hamstrings will transform from flat to fully capped within two months. When you catch that side-profile sweep in the mirror—tension rippling from glutes to calves—you’ll know why dedicated lifters call the dumbbell hamstring curl the “posterior chain sculptor.” Stop skipping knee flexion work; your leg day isn’t complete without it.


