
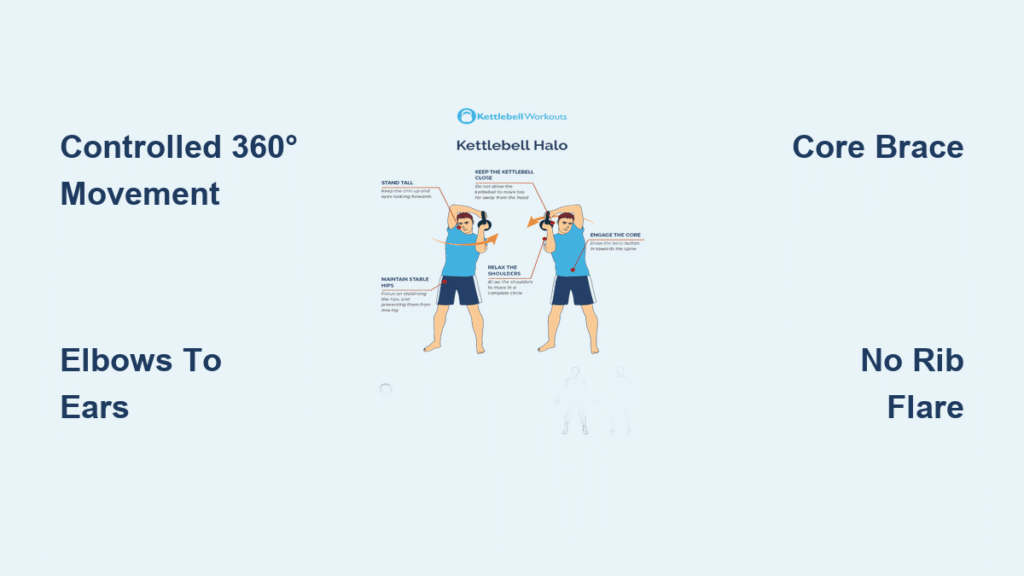
Your shoulders ache from hunching over a keyboard, and overhead presses feel like climbing a mountain. The kettlebell halo exercise delivers instant joint lubrication and builds bulletproof rotator cuff strength through controlled 360-degree movement. This dynamic drill takes just 120 seconds to melt tension, prime your scapular stabilizers, and transform your posture—making it the ultimate pre-workout ritual for desk warriors and lifters alike. Forget static stretches; this circular movement creates real-world shoulder resilience while strengthening the tiny stabilizers traditional training ignores. Let’s break down how to execute this mobility powerhouse for maximum benefit.
Target Rotator Cuff Weakness with Kettlebell Halo Muscle Activation
Unlike standard shoulder exercises, the kettlebell halo exercise forces your rotator cuff to fire continuously through full circumduction. As the bell orbits your head, each of the four cuff muscles (supraspinatus, infraspinatus, teres minor, and subscapularis) engages sequentially to keep your humeral head centered in the socket—preventing impingement during overhead movements.
Critical Muscle Engagement Sequence
Your anterior deltoid powers the front arc while the posterior deltoid dominates the behind-neck segment. Simultaneously, the serratus anterior and upper traps coordinate scapular upward rotation—stopping that embarrassing winging when you reach overhead. This precise synchronization is why lifters report immediate improvements in snatch and press stability after consistent halo practice.
Hidden Stabilizers You’re Neglecting
While shoulders take center stage, your core maintains a rigid cylinder to prevent rib flare and lumbar strain. Forearm flexors lock the bell in position against rotational torque, and rhomboids fire isometrically to counter the bell’s forward pull. This full-body integration explains why halos boost posture during long workdays—they retrain your entire upper kinetic chain to resist slouching.
Prevent Shoulder Injury with Flawless Kettlebell Halo Technique

Start light—most beginners need just 8-12 kg to groove the pattern without compensation. Stand with feet hip-width apart, grip the kettlebell by the horns (inverted position) at chest height, and bend elbows to 90 degrees with scapulae neutral. Brace your core like preparing for a punch before initiating movement to protect your spine.
Step-by-Step Halo Execution for Safety
- Inhale deeply while pulling kneecaps up and engaging glutes
- Initiate clockwise movement keeping elbows glued to your ears
- Behind the neck, allow natural scapular upward rotation without rib flare
- Complete 5-8 controlled revolutions before reversing direction
- Return to starting position with bell at chin height
Pro tip: Count “one-thousand” through each quadrant to maintain 3-second tempo control—this eliminates momentum and maximizes joint lubrication.
Grip Variations for Specific Goals
- Horns grip (inverted): Wrist-friendly entry point for beginners—ideal for daily mobility
- Body grip (upright): Increases external rotation demand for strength building
- Bottom-up hold: Transforms halos into a brutal grip/core challenge for advanced lifters
Fix These 3 Kettlebell Halo Mistakes Before They Hurt You

Lumbar hyperextension (visible as rib flare and pelvis tilt) is the most dangerous error. Immediately drop to half-kneeling position or exhale fully while bracing abs harder—this eliminates spinal compensation. Never push through this fault; it transfers shear forces to vulnerable discs.
Elbow flare reduces mobility benefits and strains neck ligaments. Fix it by wrapping a resistance band around both forearms as tactile feedback or repeating the cue “elbows to ears” before each rep. Head movement indicates poor cervical control—lock your gaze on a wall point and practice unloaded circles first.
Program Kettlebell Halos for Your Specific Goals

Daily Shoulder Maintenance Protocol (Desk Workers)
- 8 kg bell, 8 revolutions each direction
- 2121 tempo (2 seconds per quadrant)
- Perform before checking email to combat slouching
- Expected result: Reduced tension within 72 hours
Strength-Building Progression (Lifters)
| Week | Load | Sets × Reps | Key Focus |
|---|---|---|---|
| 1 | 16 kg | 3 × 8 | Strict 3010 tempo |
| 2 | 20 kg | 4 × 6 | 1-second overhead pause |
| 3 | 24 kg | 4 × 5 | Split-stance for core challenge |
| 4 | 24-28 kg | 5 × 4 | Single-arm alternating |
Critical note: Never increase load while reducing range—progress depth before weight. If you can’t reach ear level behind your neck pain-free, stay at that depth for 2 weeks before lowering further.
Choose the Right Kettlebell for Halo Success

Beginners: Start with 4-8 kg vinyl-coated bells ($15-25) to protect wrists while learning the path. The lighter weight prevents momentum cheating and builds proprioception. Advanced lifters need competition steel bells (28-32 kg) for consistent sizing during high-rep density work—standard cast iron often varies in handle diameter.
Budget hack: Adjustable plate-loaded handles ($80-150) let you micro-load between standard increments. Add 0.5 kg weekly for true progressive halo overload—especially valuable when plateauing at common weights like 24 kg.
Avoid These Kettlebell Halo Safety Risks
Stop immediately if you have recent shoulder dislocation, severe rotator cuff tear, or frozen shoulder flare-ups—these require medical clearance. Post-rehab clients should begin with 4-6 kg bells and limit behind-neck depth to ear level, monitoring pain for 24 hours after sessions.
Senior modification: Perform seated against a wall with 2-4 kg bell. The wall blocks lumbar compensation while providing balance support. For cervical issues, substitute resistance-band shoulder circles—maintain the 360° motion pattern without spinal loading.
Integrate Kettlebell Halos Into Your Training Cycle
Pair halos with overhead pressing days as active shoulder prep—2 sets of 10 reps with 12 kg before military presses creates instant mobility gains. During heavy sets, use halos as active recovery: 30 seconds of halos between press attempts resets scapular positioning and clears joint fluid.
The 2-minute posture fix: Perform 2 sets of 10 revolutions each direction upon waking and before lunch. Office workers report straighter posture and eliminated neck cricks within 10 days by treating halos as “shoulder insurance” against desk-job damage. When paired with slingshots in kettlebell complexes, halos transform mobility work into strength-building loaded flows.
Why Your Shoulder Health Depends on This Exercise
The kettlebell halo exercise uniquely combines joint lubrication, scapular re-patterning, and rotator cuff strengthening in one movement. Unlike static stretches that provide temporary relief, halos build functional strength through full ranges of motion—directly translating to pain-free overhead pressing and injury-proof shoulders. By dedicating just 120 seconds daily to this circular drill, you’ll reverse years of desk-hunch damage while priming your joints for heavier lifts. Start light, master the path, and watch your shoulder resilience skyrocket—one perfect revolution at a time.


