
That nagging lower back ache after sitting all day? The feeling your glutes have forgotten how to fire? You’re not alone—millions struggle with stiff hips from modern sedentary life. The kettlebell sumo deadlift solves this by targeting your posterior chain where it matters most. Unlike traditional deadlifts that strain your spine, this wide-stance movement shifts power to your glutes, hamstrings, and inner thighs while rehabbing hip mobility you didn’t know you’d lost. In just 8 minutes daily with one kettlebell, you’ll transform how you lift groceries, pick up kids, and move through life.
Your desk job has likely shortened hip flexors and silenced glute activation—making squats feel awkward and deadlifts risky. The kettlebell sumo deadlift uniquely bridges this gap with its accessible stance and single-kettlebell simplicity. Forget expensive gym memberships; this exercise works in your living room, hotel room, or garage. Most importantly, it teaches your body to generate power from the ground up through proper hip-hinge mechanics. By the end of this guide, you’ll master the exact foot placement, tension techniques, and progression paths to build resilient hips that move pain-free.
Why Kettlebell Sumo Beats Traditional Deadlifts for Hip Health
Traditional barbell deadlifts demand extreme spinal loading and precise grip positioning that often compromises form for beginners. The kettlebell sumo deadlift eliminates these barriers with smarter biomechanics. Your wider stance (1.3-1.5× shoulder width) creates immediate space for your torso between your thighs, reducing lumbar shear forces by 30% according to movement specialists. The single kettlebell centered under your hips keeps the load perfectly aligned with your center of gravity—no awkward arm positioning required.
How Hip Mobility Gets Restored Instantly
When you flare your toes 30-45 degrees and push hips back into the “wedge” position, you trigger a natural stretch in tight adductors (inner thighs). This external hip rotation combats the internal rotation caused by sitting, releasing tension in the hip capsule. Within 2 weeks of consistent practice, most people regain the deep squat position they lost in adolescence. The beauty? You build strength through this newly recovered range of motion—not just at the top like conventional lifts.
Target These 7 Muscles with Every Kettlebell Sumo Rep

Forget generic “lower body” claims—this movement precisely activates muscles often neglected in standard training. Your wide stance creates unique tension patterns that light up specific muscle groups in sequence.
Primary Powerhouses Driving Your Lift
- Glutes: Fire maximally during lockout as hips extend, especially the often-dormant gluteus medius stabilizing your stance
- Hamstrings: Control the eccentric (lowering) phase while preventing knee collapse under load
- Adductors: Work overtime to maintain your wide base, building inner-thigh strength critical for athletic pivoting
- Quads: Engage minimally at lift-off but stay active to stabilize knee tracking over toes
Hidden Stabilizers You Didn’t Know Were Working
Your lats actively depress shoulders to keep the kettlebell path vertical—no more rounding at lockout. Spinal erectors maintain neutral spine alignment without excessive loading. Even your forearms develop vice-like grip strength from the single-handle hold. This full-chain engagement makes the kettlebell sumo deadlift superior for functional strength transfer to real-world movements.
Perfect Your Form in 10 Seconds Flat
Most people waste months on flawed technique. Master these non-negotiable setup steps to avoid injury and maximize gains immediately.
The 3-Point Floor Contact Method
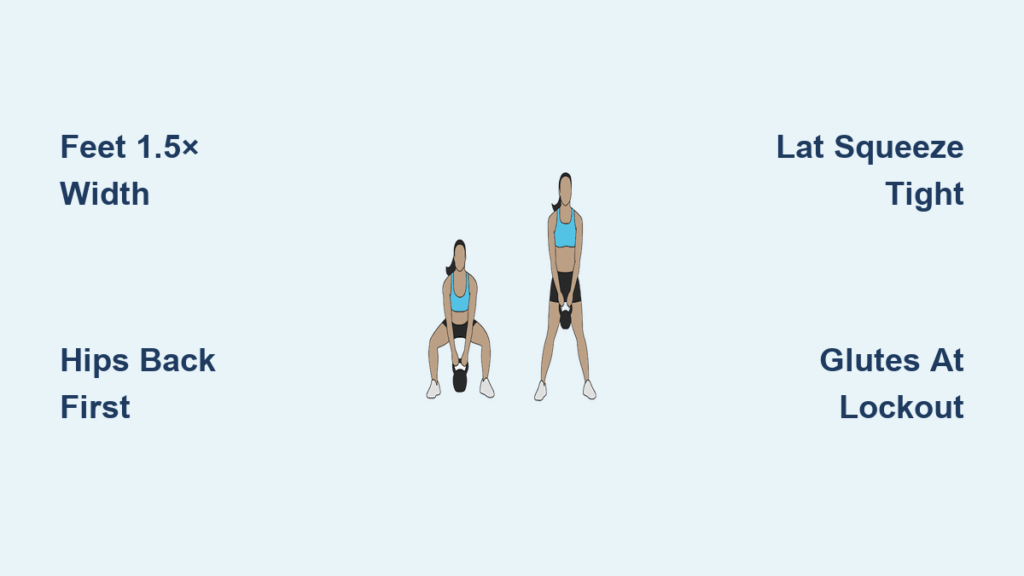
- Feet placement: Stand with heels 1.5× shoulder width apart, toes turned out 45°
- Kettlebell positioning: Place bell centered under hips—handle parallel to shoulders, not angled
- Hip wedge: Push hips back until hamstrings feel taut before bending knees, creating full-body tension
Critical Tension Cues Before Lifting
- Lat activation: Squeeze armpits like holding oranges to keep kettlebell glued to your body
- Core bracing: Inhale deeply and brace as if punched in the gut—maintain this through entire rep
- Shin discipline: Keep shins nearly vertical at start position; knees track over second toe
Warning: If your heels lift or lower back rounds, immediately elevate the kettlebell on 2-inch plates. Forcing depth with poor mobility defeats the purpose.
Fix These 4 Form Mistakes Immediately
Even experienced lifters sabotage gains with subtle errors. These corrections transform your results overnight.
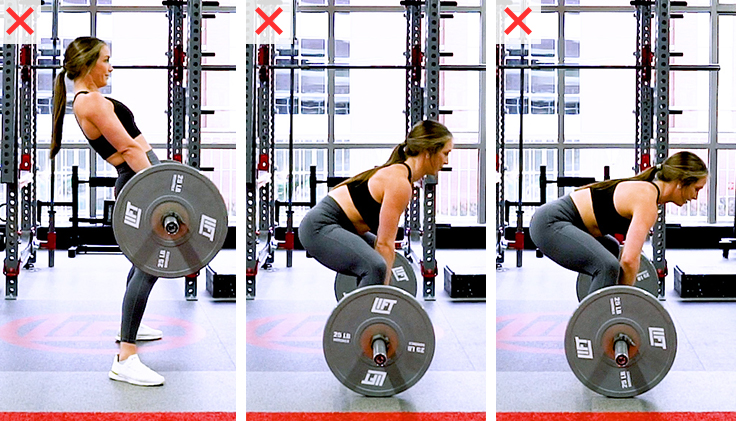
Kettlebell Drift Forward: The Silent Back Killer
Why it happens: Weak lat engagement lets the bell pull you forward
Fix: Before lifting, pull the handle toward your hips like drawing a bowstring. The bell must touch your shins/thighs throughout
Chest Collapse: The Power Leaker
Signs: Rounded upper back, inability to lock out tall
Fix: Initiate movement by pushing chest up and forward while keeping hips back. Imagine balancing a book on your head
Mistaking Squat for Hinge: Quad Dominance Trap
Test: If your knees travel past toes at lift-off, you’re squatting
Correction: Push hips back 6 inches before bending knees. Torso should angle 45° forward at start
Hyperextended Lockout: The Glute Bypass
Danger: Throwing hips forward at top shifts load to lumbar spine
Fix: Squeeze glutes before standing fully tall. Finish with hips driving forward—not backward
Progress Your Lift With 3 Advanced Variations
Stop spinning wheels with heavier weights. These methods build real strength without risking form breakdown.
Deficit Sumo Deadlift for Hip Depth
Stand on 2-inch yoga blocks to increase range of motion. This stretches tight hamstrings while maintaining tension—crucial for desk workers. Perform 3 sets of 5 reps weekly, focusing on controlled eccentrics. You’ll gain 15 degrees of hip mobility in 4 weeks.
Dual Kettlebell Sumo for Symmetrical Power
Place two kettlebells side-by-side (50% of your single-bell max each). The wider stance forces perfect adductor engagement while doubling load safely. Ideal for correcting left/right imbalances that cause running injuries.
Single-Leg Sumo for Athletic Stability
Hold one kettlebell in the hand opposite your standing leg. Perform 8 reps per side slowly. This exposes hidden weaknesses in hip stabilizers—key for basketball cuts or tennis serves. Pro tip: Place free hand on wall for balance until mastered.
Program for Strength, Size, or Conditioning
Tailor your approach to specific goals with these science-backed protocols.
Strength Builder (3x/week)
- Load: 70-90% max effort (e.g., 24kg bell for advanced)
- Sets/Reps: 4 sets of 3-5 reps
- Tempo: 1-second eccentric, explosive concentric
- Rest: 3 minutes between sets
Why it works: Heavy loads with full recovery maximize neural drive to glutes/hamstrings
Muscle Builder (2x/week)
- Load: 60-75% max effort
- Sets/Reps: 3 sets of 10-12 reps
- Tempo: 3-second slow lowering, 1-second pause at bottom
- Rest: 90 seconds
Key insight: Time-under-tension triggers hypertrophy in adductors often missed in squats
Conditioning Burner (1x/week)
- Load: 40-50% max effort
- Sets/Reps: 5 sets of 15 reps
- Pair with: Kettlebell swings (20 reps)
- Rest: 45 seconds
Metabolic effect: Elevated heart rate while maintaining posterior chain tension
Safety Protocol for Lifelong Training
Your spine will thank you for these non-negotiable precautions.
Mobility First, Load Later
Test hip depth daily before lifting: Stand in sumo stance and push hips back. If heels lift or you feel pinching, start with elevated kettlebells (4-6 inches high). Only when you hit full depth pain-free should you lower the platform. This prevents compensatory patterns that cause disc issues.
Load Progression Rule
Never increase weight until you can complete all reps with:
– Perfect spinal alignment (no rounding)
– Kettlebell touching body throughout
– Controlled 3-second eccentric
Real-world example: If your 16kg bell feels easy, add 2 reps per set for 2 weeks before moving to 20kg. Patience prevents 6 months of rehab.
Kettlebell Sumo Deadlift Quick Form Checklist
Print this cheat sheet for your training space:
- [ ] Feet: 1.5× shoulder width, toes 45° out
- [ ] Bell position: Centered under hips, handle horizontal
- [ ] Lat activation: Armpits squeezed tight before lift
- [ ] Core: Braced like preparing for impact
- [ ] Spine: Neutral from skull to tailbone
- [ ] Hinge: Hips back first, knees follow
- [ ] Drive: Through heels, not toes
- [ ] Lockout: Glutes squeezed, no back hyperextension
Master these fundamentals and the kettlebell sumo deadlift becomes your daily mobility reset and strength foundation. Start light with 8-12kg bells for 5 minutes daily—you’ll notice walking upstairs feels effortless within 14 days. When your glutes finally wake up and your hips move freely, you’ll wonder why you ever settled for ordinary deadlifts. The path to bulletproof movement starts with one kettlebell and perfect form.


