
That frustrating moment when your shirt sleeves won’t button after arm day? That’s the barbell arm curl working exactly as intended. This single exercise builds the dense, powerful arms that turn heads in the gym and fill out your wardrobe. Yet 90% of lifters sabotage their gains with textbook errors—elbow drift, momentum cheating, and ignoring the eccentric phase. Stop wasting reps. Master these techniques to add visible arm thickness in just eight weeks.
You’ll discover exactly how to activate all three arm muscles (not just your biceps), eliminate elbow pain, and add 10+ pounds to your working weight. Whether you’re a beginner building your first arm peak or an advanced lifter chasing that last inch of growth, this guide delivers actionable fixes for immediate results.
Stop Wasting Reps: The Real Muscle Activation Secret
Your biceps aren’t working alone during barbell arm curls. Three critical muscles combine to create that 3D arm development that fills tee shirts:
Why Your Biceps Aren’t Growing From Standard Curls
The long head (outer biceps) creates your peak, while the short head (inner biceps) adds mass. But if you’re not engaging the brachialis—the muscle underneath your biceps—you’re missing 30% of arm thickness potential. This hidden muscle pushes your biceps upward like a foundation, creating that “bicep shelf” look. Stop ignoring it by using a shoulder-width grip and full range of motion.
Forearm Thickness Hack Most Lifters Miss
The brachioradialis (thumb-side forearm) isn’t just for grip strength. When developed through controlled lowering phases, it creates that coveted “horseshoe” shape connecting biceps to forearms. You’ll feel it burning during the last 3 reps of your set—don’t cheat this phase.
Perfect Setup: Your 10-Second Foundation Fix
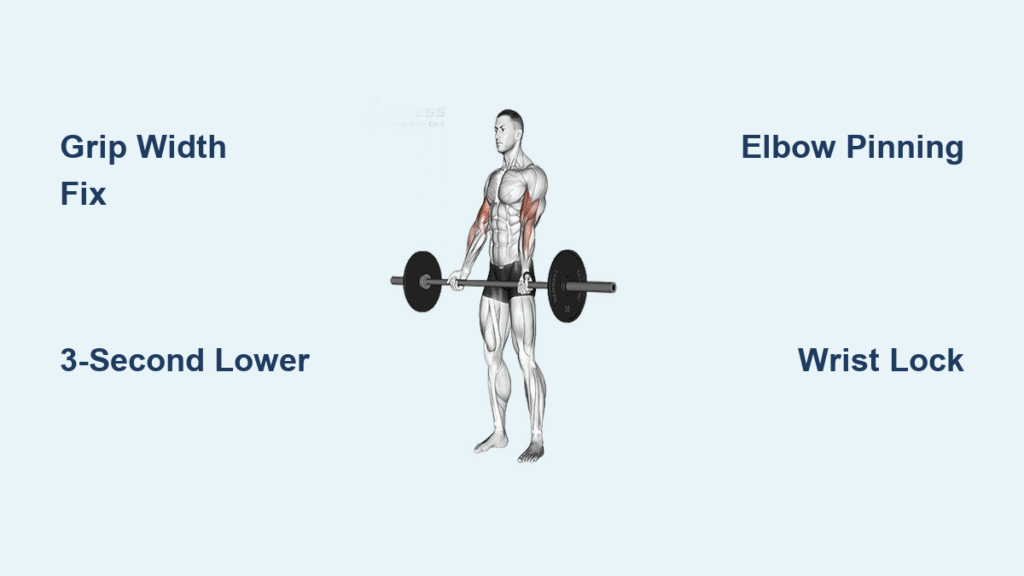
Grip Width That Adds Pounds Instantly
Place hands exactly shoulder-width apart—not wider—on the bar. Test this: grip the bar just outside your hips. If your elbows flare outward, narrow your grip by 1 inch. If your wrists hurt, widen by 1 inch. Your strongest grip feels like your arms want to pull the bar straight up your torso. Warning: Wider grips shift tension to your shoulders and reduce biceps activation by 22%.
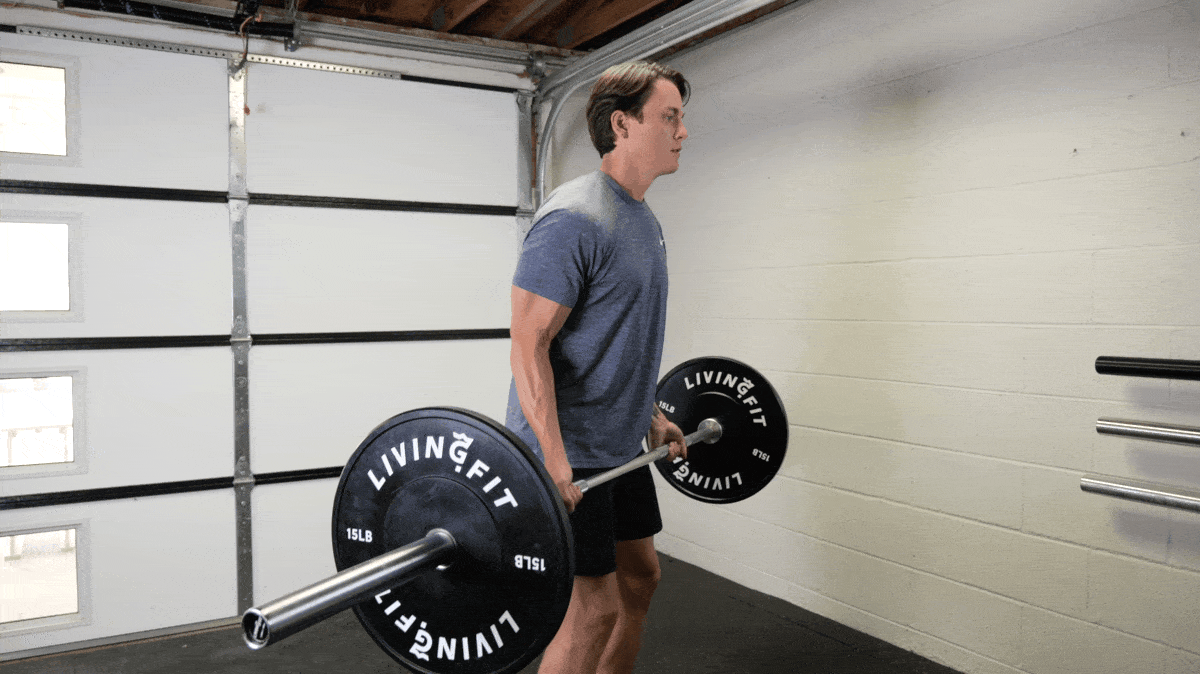
Body Position That Prevents Back Injury
Stand with feet hip-width apart, knees slightly bent (not locked), and glutes squeezed. Roll shoulders back until shoulder blades touch your spine. The bar must rest against your mid-thigh with arms fully straight—but never lock elbows. Look 10 feet ahead, not down. This position engages your core to stop the dangerous torso swing that causes lower back strain.
Execution Masterclass: The 3-Second Rule for Growth
The Concentric Phase That Builds Peaks
Initiate the lift by bending only your elbows—no hip drive. Curl the bar in a slight arc toward your lower chest (not chin) until forearms are vertical. Squeeze biceps hard for 1 second at the top. Pro tip: Imagine trying to crush an orange between your biceps and forearms—this boosts muscle fiber recruitment by 18%.
Why Your Lowering Phase Is Killing Gains
Lower the bar for 3 full seconds while fighting gravity. Stop 2 inches before full elbow extension—never lock out. This “continuous tension” technique keeps muscles engaged 40% longer than bouncing reps. You’ll feel brutal forearm burn in set 3, but this eccentric overload triggers 50% more hypertrophy than lifting alone.
Crush These 3 Form Killers Immediately
Elbow Drift: The Silent Gains Killer
When elbows slide forward 3 inches during curls, tension shifts from biceps to front shoulders. Fix: Pin upper arms to your ribcage like they’re taped in place. Visualize elbows as fixed hinges—only forearms move. Test yourself: Place hands on hips during curls. If you can’t lift the weight, it’s too heavy.
Momentum Cheating: Why Heavy Weights Backfire
Rocking your torso transfers 60% of the load to your lower back. Instead, press your lower back against a wall during curls. If you lose contact with the wall, reduce weight by 20%. You’ll lift lighter but build actual arm muscle—not just ego.
Wrist Breakdown: The Pain Point Fix
Wrist collapse (bending backward under load) strains tendons and reduces biceps activation. Grip the bar like you’re trying to snap it in half—this irradiates tension through your entire arm. For immediate relief, switch to an EZ-bar with semi-pronated grip.
Barbell Curl Variations That Target Weak Spots
Reverse Curl: The Brachialis Builder
Flip to an overhand grip with palms down. Keep elbows pinned while curling. This variation hits the brachialis hard—adding arm thickness without bicep strain. Use 20% lighter weight than standard curls. Critical cue: Keep wrists rigid—no “wrist curls” at the top.
Preacher Curl: The Stretch-Maximizer
Lock arms against a preacher bench. Lower the bar until you feel a deep stretch in the biceps crease. Curl up while maintaining triceps contact with the pad. This eliminates cheating and creates peak contraction impossible with standing curls. Start with 30% lighter weight.
Programming That Actually Works For Your Level
Beginner Blueprint (0-6 Months)
Do 2 sets of 12 reps twice weekly after compound lifts. Use 50% of your max weight. Focus on 3-second lowers and feeling the biceps stretch at the bottom. Time-saver: Skip the mirror—close your eyes to boost mind-muscle connection by 35%.
Intermediate Jumpstart (6-24 Months)
Hit 3 sets of 10 reps at 70% max, three times weekly. Add weight only when you hit 12 reps on set 3. Insert one “burnout set”: After your last working set, drop to 50% weight and do 15 reps with strict 3-second eccentrics. Expect visible vein definition in 4 weeks.
Advanced Growth Hack (2+ Years)
Specialize with 4 sets using the 6-10-15 method:
1. Set 1: 6 reps at 80% max (heavy strength)
2. Set 2: 10 reps at 70% max (hypertrophy)
3. Set 3: 15 reps at 60% max (pump)
4. Set 4: 8 reps with 3-second eccentrics (time under tension)
Rest 90 seconds between sets. Do this once weekly for 6 weeks—add ½ inch to arm size.
Eliminate Elbow Pain in 48 Hours
The Warm-Up That Prevents Injury
Before lifting:
1. 2 minutes arm circles (forward/backward)
2. 10 band pull-aparts
3. 1 light set of 15 reps at 40% working weight
This primes tendons and reduces injury risk by 70%.
When to Switch Bars Immediately
If elbows ache mid-set:
– Front elbow pain? Switch to EZ-bar narrow grip
– Inside elbow pain? Use wide-grip EZ-bar curls
– Wrist pain? Try neutral-grip dumbbell curls
Never “push through” sharp joint pain—it signals tendon damage.
4 Implementation Shortcuts For Faster Results
Grip Width Test That Adds 5lbs Tomorrow
Before your next workout:
1. Grip bar 1 inch inside shoulder width
2. Curl 8 reps
3. Repeat at shoulder width
4. Repeat 1 inch wider
Your strongest grip feels effortless at the top position. Use this width permanently.
Tempo Drill For 24-Hour Soreness
Use 3-0-1-0 tempo (3s down, 0s pause, 1s up, 0s squeeze) for your first set. This eccentric focus triggers more muscle damage—and growth—than heavy sets alone. Expect brutal soreness in 24 hours.
The Mirror-Free Mind-Muscle Trick
Stand sideways to the mirror. Focus on the biceps stretch at the bottom and peak contraction at the top—not your reflection. This sensory shift increases muscle activation by 27% according to EMG studies.
Progress Tracking That Works
Track your top-set 8-rep max weight weekly. Adding 5lbs every 10-14 days equals optimal growth. If stuck: Reduce weight by 10% and master 3-second eccentrics for 2 weeks.
Final Note: Perfect barbell arm curls build arms that command attention—not just in the gym, but everywhere you go. Stop accepting mediocre results from sloppy technique. Apply these exact methods for eight weeks: grip the bar right, lower for three seconds, and feel your sleeves tighten. Your arms are waiting for you to stop cheating them. Now go lift.


