
Your quads scream, your knees click like a rusty hinge, and that bottom position feels like quicksand. If standard squats leave you stuck mid-rep or nursing joint pain, you’re missing a critical tool: the barbell box squat. This isn’t just “squatting onto furniture.” Powerlifters like Ed Coan and strongmen like Hafþór Björnsson built legendary posterior chains by exploiting its unique physics—breaking the stretch reflex to forge explosive starting strength. When your free squats plateau or your knees protest, the box squat delivers heavier loads with less joint stress. Below, you’ll learn exactly how to set up, execute, and program this movement to break through plateaus while protecting your knees.
Barbell Box Squat vs. Free Squat: The Critical Difference
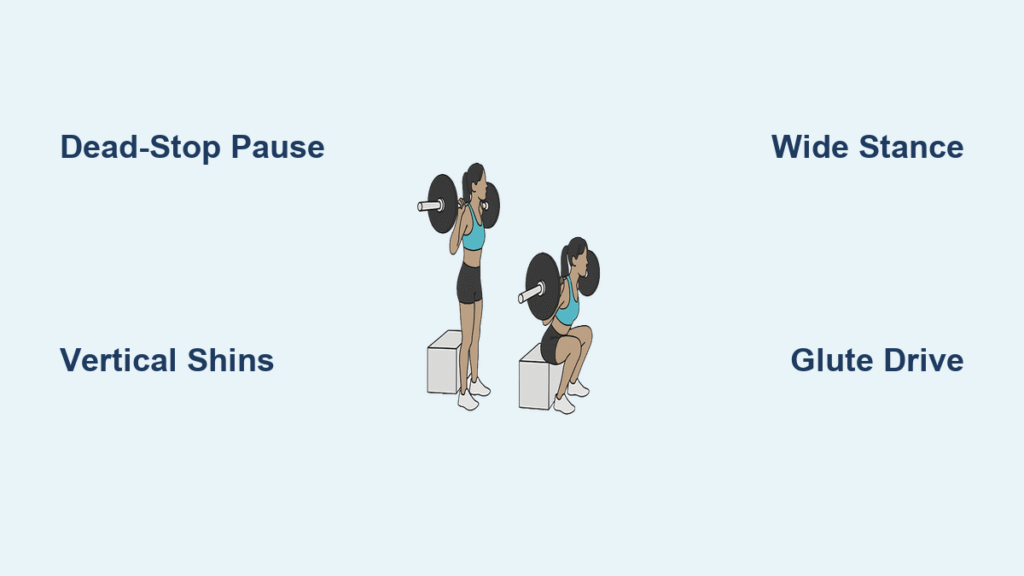
The barbell box squat forces a dead-stop restart by design. You sit back until your glutes rest on the box, pause motionless for 1–2 seconds, then drive upward without bouncing. This eliminates the elastic energy stored in tendons during a free squat’s “bounce” out of the hole. Without that rebound, your glutes and hamstrings must generate force from zero velocity—mimicking real-world athletic starts like sprinting or jumping. Most lifters fail here by rocking on the box (leaning forward then jerking upright), which kills tension. Stand beside a mirror: if your torso shifts vertically during the pause, you’re cheating the posterior chain.
Precise Equipment Setup for Zero Guesswork
Sturdy Box Selection That Won’t Fail You
Your box must be immovable—no wobble when you sit back hard. Standard plyo boxes (24″x24″x24″) work if bolted down, but stacked bumper plates or jerk blocks eliminate slide risk. Test it: push the box sideways with your foot. If it budges, anchor it with weight plates. Never use a folding chair or unstable platform—your spine depends on this.
Rack, Bar, and Stance Positioning
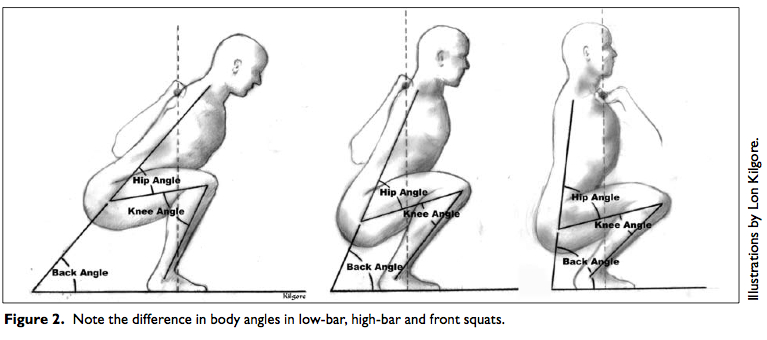
- Bar placement: Slide it 2–3 cm below your rear delt shelf (low-bar position). High-bar squats shift stress to quads and knees—counter to the box squat’s purpose.
- Foot stance: Wider than shoulder width, toes flared 15–30°. Your knees should track over your second toe at the bottom.
- Box distance: Set it 3 feet behind the rack. This ensures your plates clear the uprights during the walkout. Measure once: step back from the rack until your heels hit the box—mark that spot.
Safety non-negotiables: Safety arms at hip height, flat-soled shoes (no cushioning), and chalked box edges to prevent foot slippage.
Step-by-Step Execution: From Descent to Explosion
Descent Cues That Prevent Knee Collapse
- Pull your chest UP into the bar—don’t let shoulders round forward.
- Sit BACK first like sitting in a car, not down. Your hips should move farther than your knees.
- Keep shins vertical—knees stay behind toes. If your shins angle forward, widen your stance.
- Lower for 3–5 seconds until your glutes lightly touch the box. A loud “thud” means you’re plopping—slow down.
The 2-Second Pause: Where Most Lifters Fail
Relax your hip flexors just enough to transfer weight to the box, but keep your core braced like you’re about to be punched. Your spine must stay neutral—no rounding. If your chest drops, you’ve lost tension. Fix it by driving elbows down and squeezing shoulder blades.
Driving Out of the Hole Like a Pro
- Explode upward by driving through your entire foot (heels AND midfoot).
- Shove knees OUT as you rise—this maintains glute tension.
- Exhale hard through your sticking point (mid-thigh). Holding breath causes dizziness.
Pro tip: If you feel unstable, reduce weight by 20% and practice 5-second pauses. Speed out of the hole comes from tension, not momentum.
Box Height Rules: Stop Guessing Your Depth
| Height | Hip Angle | When to Use | Danger Signs |
|---|---|---|---|
| Above parallel (hip higher than knee) | >90° | Knee pain, post-injury rehab | Lower only if pain-free after 2 weeks |
| Parallel (hip level with knee) | ≈90° | General strength, beginners | Stick here until you hit 1.5x bodyweight |
| Below parallel (hip below knee) | <90° | Advanced lifters, posterior-chain focus | Stop immediately if lower back rounds |
Start high if you feel knee strain—never force depth. Lower the box by 1 inch only when parallel squats feel effortless.
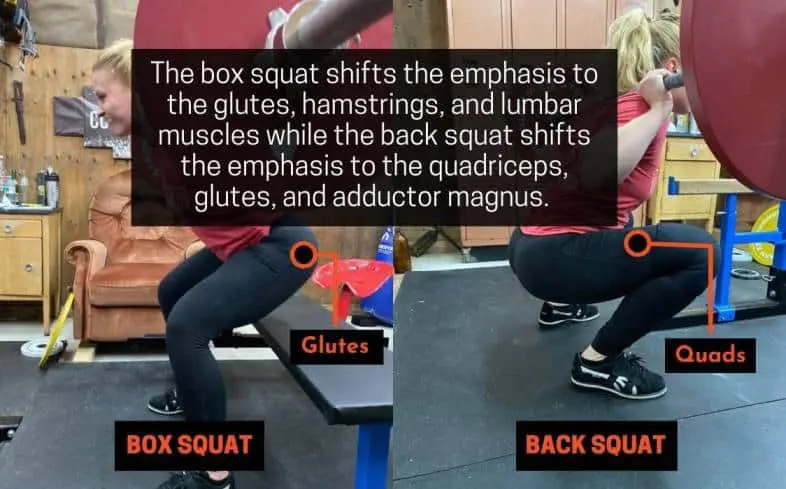
6 Science-Backed Benefits Beyond Knee Relief
- Triple your rate of force development: Westside Barbell data shows 3–4× greater starting power versus free squats.
- Builds bulletproof hamstrings: The prolonged eccentric (lowering) phase creates more microtears for growth.
- Knee stress drops 40%: Vertical shins reduce shearing forces on patellar tendons (per Journal of Strength and Conditioning Research).
- Fixes “good morning” squats: Forces hips back, preventing forward torso collapse.
- Plateau breaker: Lift 70–80% of your free-squat max with heavier muscular demand.
- Transfers to sports: Football linemen use it to explode off the line; powerlifters break deadlift sticking points.
Specialty Bars That Transform Your Weak Points

| Bar Type | Best For | Loading Tip |
|---|---|---|
| Safety Squat Bar (SSB) | Shoulder pain, quad dominance | Use 75% of your free-squat 1RM |
| Cambered Bar | Weak lockout, posterior-chain lag | Start at 65% 1RM—oscillations demand core control |
| Straight Barbell | Technique mastery | Always start here before using specialty bars |
Never add bands/chains until you can box squat 1.25x bodyweight for 5 reps. Bounce resistance ruins the dead-stop benefit.
Programming: How to Add It Without Overtraining
For New Lifters (Knee Pain or Plateaus)
- Twice weekly: Alternate with free squats (e.g., Mon: box squats, Thu: free squats)
- 3 sets x 8 reps at 65% of free-squat max, parallel box height
- Rest 3 minutes between sets—full recovery is non-negotiable
Powerlifters Breaking a Sticking Point
- Max-effort day: 1–3 reps at 85–90% 1RM on a low box
- Dynamic day: 8 sets x 2 reps at 50% 1RM with light bands
- Critical: Never do max-effort and dynamic work the same week
Rehabbing Knee Pain
- High box height (hips above knees)
- 3 sets x 6 reps at 50% 1RM
- Pair with banded glute bridges (3×15) post-workout
Instant Fixes for 4 Costly Mistakes
| Mistake | What It Looks Like | Fix Within 1 Rep |
|---|---|---|
| Rocking on the box | Torso leans forward during pause | Maintain 45° torso angle; “sit back” harder on descent |
| Plopping onto box | Loud thud, spine rounding | Lower for 4 seconds; touch like a feather |
| Knees caving in | Knees collapse inward at bottom | “Screw feet into floor” before descending |
| Bar slipping off traps | Hands gripping bar tightly | Adjust bar 2 cm lower; squeeze shoulder blades |
4-Week Strength Jumpstart Plan
| Week | Heavy Day (Mon) | Technique Day (Thu) |
|---|---|---|
| 1 | 4×8 @ 65% 1RM, parallel box | 3×10 @ 50%, high box + SSB |
| 2 | 5×6 @ 70%, 2-sec pause | 4×8 @ 55%, speed focus |
| 3 | 6×4 @ 75%, low box | 3×12 @ 50%, band-resisted |
| 4 | 3×5 @ 60% (deload) | Single-leg work + mobility |
Note: 1RM = your free-squat max, not box squat max
When NOT to Box Squat (Critical Safety Rules)
Avoid box squats entirely if you have:
– Acute lower back pain (especially disc herniation)—substitute with leg press
– Recent knee surgery—use a high box only after PT clearance
– Balance issues—start with bodyweight box squats holding a TRX strap
Never use Olympic lifting shoes—they force ankle dorsiflexion, wrecking the vertical shin position. Flat-soled Converse or deadlift slippers are mandatory.
Why Your Next Heavy Lift Will Feel Lighter
The barbell box squat isn’t a “cheat” variation—it’s a precision tool for building starting strength where you need it most. By mastering the dead-stop pause with vertical shins and a wide stance, you’ll overload your glutes and hamstrings while sparing your knees. Start at parallel height with 65% of your free-squat max for 3×8. In 4 weeks, your deadlift lockout will feel effortless, and your squat depth will deepen without pain. Your sticking point isn’t a weakness—it’s just waiting for the box squat to break it. Today, measure your box height and load the bar. Your strongest lifts start from zero velocity.


