
Your front squat feels awkward. The bar chokes you, your wrists scream, and you tip forward like a seesaw. You’ve watched videos, tried different grips, but nothing clicks. The barbell front squat shouldn’t feel like torture—it’s one of the most effective lower-body builders when done right. Research confirms this quad-dominant movement builds serious leg strength while reducing spinal compression compared to back squats.
This guide transforms your shaky front squat into a powerful quad-building movement. You’ll learn exactly where to place the bar, which rack style suits your body, and the subtle cues that separate good form from great form. Whether you’re dealing with mobility restrictions or just starting out, we’ll build your front squat from the ground up. By the end, you’ll understand why most athletes benefit more from front squats than back squats unless pure hypertrophy is your sole goal.
Why Your Barbell Front Squat Fails Quad Activation
Most lifters miss the front squat’s unique muscle recruitment pattern because they treat it like a back squat. The forward bar position forces your torso upright, dramatically increasing knee flexion and shifting emphasis to your quadriceps. Studies show front squats achieve similar muscle activation to back squats with approximately 50% less weight—making them joint-friendlier while still building serious strength.
Quad Dominance vs. Back Squat Mechanics
Your quads work 30% harder in front squats due to the forward shin angle required to keep the bar over your midfoot. While back squats let you lean forward to engage posterior chains, the front squat’s bar position self-corrects poor form—you can’t cheat depth without dumping the bar. This enforced upright posture makes front squats superior for pure quad development and athletic carryover to sports like downhill skiing or hockey.
Core Stability Demands You Can’t Ignore
Your entire core complex fires at maximum capacity to prevent forward collapse. Unlike back squats where the bar supports your torso, the front squat forces your abs and obliques to become the primary stabilizers. If your core engagement falters even slightly, the bar rolls forward. This is why front squats improve functional core strength faster than planks or crunches—they train stability under real load.
Three Rack Styles That Fix Wrist and Shoulder Pain

Most people fail at front squats because they use the wrong rack style for their body. Each method has distinct advantages and requires different mobility levels—choosing correctly eliminates 80% of front squat discomfort.
Olympic Lifters’ Rack for Maximum Loading
This traditional position demands the most mobility but offers optimal load distribution. The bar rests directly on your clavicles with your fingertips providing light support—not bearing weight. Your elbows drive forward and up, creating a secure shelf. Critical fix: If your wrists hurt, rotate your elbows until they’re parallel to the ground. This reduces wrist extension while maintaining stability. Athletes with good thoracic mobility should use this method for heaviest loads.
Cross-Arm Rack for Limited Wrist Flexibility
Cross your arms in front of your body, resting the bar on your front deltoids. This eliminates wrist flexibility demands but may limit maximum loads due to shoulder stress. Pro tip: Place your hands wider than shoulder-width to create a deeper “pocket” for the bar. Perfect for lifters with carpal tunnel issues or previous wrist injuries—just expect slightly less stability than the Olympic rack.
Straps Method for Powerlifters and Strongmen
Attach lifting straps to the bar, creating handles that reduce wrist extension demands. This hybrid approach allows heavier loading while maintaining comfort. Dr. Hartle reached 350 lbs for 5 reps using this method. Setup secret: Position straps just outside shoulder width so your elbows stay high. Ideal for powerlifters who need heavy quad work without compromising grip strength for deadlifts.
Perfect Bar Placement That Prevents Forward Rolls

The bar must sit as close to your throat as possible—yes, it feels weird. Resting the bar directly on your clavicles (not your deltoids) creates a unified body-bar unit rather than treating them as separate components. This positioning prevents the most common front squat failure: bar rolling forward during descent.
Create the wedge: Drive your elbows up and forward while simultaneously pushing your torso up into the bar. You should feel compression between your throat and the bar—this tension is your safety net. If the bar feels like it’s choking you, you’ve nailed the position. Without this wedging action, even perfect form will fail under moderate weight.
Step-by-Step Front Squat Execution Without Knee Cave
Pre-Lift Setup Sequence
Position safety stops at waist height—roughly where the bar sits when you’re standing tall. Step under the bar and drive your elbows high and forward. Take 2-3 small, robotic steps back after achieving full knee extension. Foot positioning: Place feet just inside shoulder width with toes angled 15-30 degrees outward. Test your stance by performing a bodyweight squat—if your heels lift, narrow your stance slightly.
Descent Control That Maximizes Quad Engagement
Initiate by simultaneously bending your knees and pushing your hips back. Maintain high elbows parallel to the ground—this keeps your torso upright. Descend until your thighs reach parallel or below, depending on your mobility. Visual cue: Imagine sitting between your heels. If your knees collapse inward (valgus), immediately push them out over your second toes. This prevents dangerous shear forces on your knee ligaments.
Ascent Power That Prevents Bar Dump
Drive through your entire foot—big toe, little toe, and heel. Focus on driving your elbows up out of the hole while maintaining a braced core. Fully extend hips and knees simultaneously as you exhale forcefully. Critical mistake: Don’t rush the top position. Pause briefly with hips fully extended to reinforce proper glute activation before unracking.
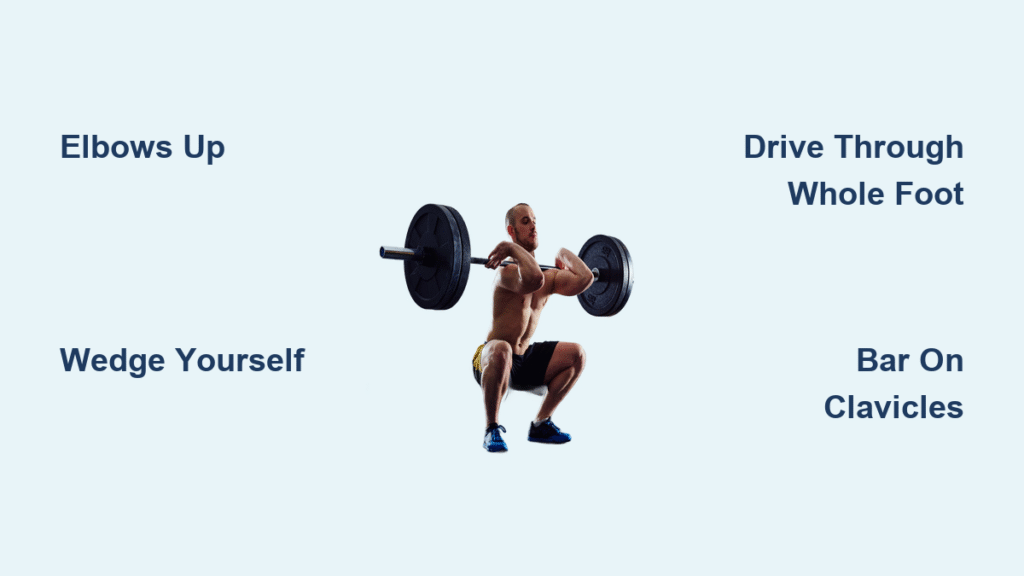
Essential Form Cues That Work Immediately
“Elbows up”: This single cue prevents 90% of front squat failures. If your elbows drop even slightly, the bar rolls forward. Practice holding this position for 10 seconds before adding weight.
“Wedge yourself”: Create maximum tension between bar and body before descending. Without this, the bar shifts during movement. Think of compressing your upper chest into the bar like a spring.
“Drive through whole foot”: Maintain three points of contact throughout the movement. Avoid shifting weight to your heels—that kills quad activation. Place a penny under each big toe, little toe, and heel to test pressure distribution.
Mobility Requirements That Actually Matter
Before loading weight, ensure you meet these prerequisites. The front squat amplifies restrictions that back squats hide.
Thoracic Spine Test
Perform a goblet squat—if you can’t maintain a flat spine, work on thoracic mobility first. Use yoga blocks under your elbows while sitting in a squat position for 2 minutes daily. This mimics front rack positioning without load.
Ankle Dorsiflexion Fix
Stand facing a wall with toes 4 inches away. Try to touch your knee to the wall while keeping your heel down. If you can’t, perform banded ankle mobilizations: 3 sets of 15 reps before squat sessions. Temporary heel elevation (5-10mm) is acceptable until mobility improves.
Programming Front Squats for Quad Growth
Beginner Protocol
Start with an empty 45-pound barbell for 3 sets of 5 reps. Focus entirely on technique before adding weight. Once you can perform 3×5 with perfect form, add 5 pounds per session. Time commitment: 15 minutes twice weekly for 4 weeks.
Hypertrophy Focus
Use front squats as your primary quad movement on leg days. Work in the 8-12 rep range with 60-75 seconds rest. Pair with Romanian deadlifts for balanced development. Example: Front squats 4×10 followed by RDLs 3×12. Expect visible quad development within 8 weeks.
Common Front Squat Mistakes That Cause Injury
Bar Rolling Forward
This happens when elbows drop or you lose core tension. Immediate fix: Perform front-rack holds—stand with bar in position (no squatting) for 20 seconds. Do 3 sets before your working sets. This builds rack stability.
Heel Elevation
If your heels lift, improve ankle mobility or place small plates under them temporarily. Warning: Never force depth beyond your mobility—this strains Achilles tendons. Use a box set to your parallel depth as a guide.
Insufficient Depth
Stopping above parallel reduces quad activation significantly. Depth hack: Place a yoga block between your glutes and heels. Touch it consistently to ensure full range of motion.
Safety Dump Technique Every Lifter Must Know
The front squat’s self-limiting nature makes it safer than back squats—you can dump the bar forward without a spotter. Critical step: Always clear 6 feet of space in front of your squat rack. If you lose control, simply drop your elbows and let the bar roll forward off your shoulders. The bar will naturally roll away from you, eliminating crushing risk. Never attempt to catch a failing front squat—your wrists aren’t designed for that impact.
Front Squat Alternatives When Mobility Fails
Dumbbell Front Squat
Hold a single dumbbell vertically against your chest with both hands. This teaches the upright torso position without requiring shoulder mobility. Pro tip: Squeeze the dumbbell handle like you’re crushing an apple to engage upper back muscles.
Kettlebell Front Squat
Hold kettlebells in the rack position with elbows pointing down. This variation emphasizes core stability and grip strength. Use lighter weight (35-50% of barbell equivalent) but focus on perfect form for 10-15 reps.
Master the barbell front squat and you’ve unlocked one of the most effective lower-body builders available. The quad development, core strength, and athletic carryover make this exercise worth the initial learning curve. Start with the rack style matching your mobility level. Progress slowly—add weight only when you’ve mastered the previous load. Within 6 weeks, you’ll feel stronger quads, improved posture, and greater confidence under the bar. Remember: the front squat rewards patience and punishes rushing. Build your foundation correctly, and you’ll have a movement that serves your strength goals for decades.


