
That frustrating moment when you struggle to lift a heavy suitcase into an overhead bin? Your body is screaming for better overhead strength. The barbell military press delivers exactly that—it’s the undisputed king of shoulder development, building raw power that translates to real-world tasks like hoisting kids or rearranging attic storage. Yet most lifters sabotage themselves with wobbly form, leaving pounds on the rack and inviting shoulder pain. This guide reveals how to transform your military press from shaky to bulletproof. You’ll learn precise grip techniques, the core bracing secret elite lifters use, and how to fix the three most common errors that stall progress. Whether you’re stuck at 95 pounds or chasing bodyweight presses, these proven methods will add serious weight to your bar while protecting your joints for decades.
Perfect Your Military Press Setup in 60 Seconds
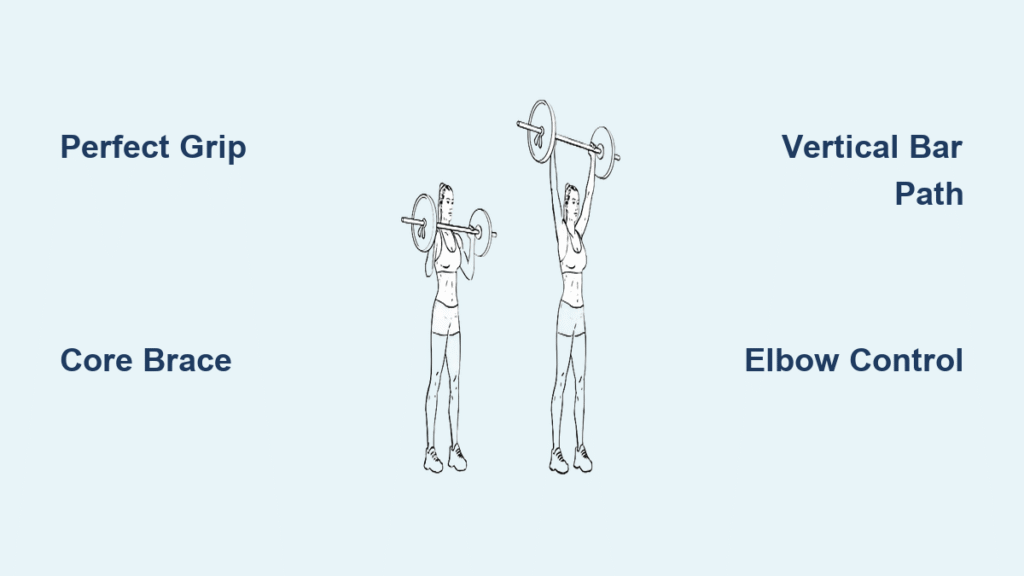
Position the Bar at Exact Shoulder Height
Load your barbell into the squat rack with the bar resting precisely at your acromion process—the bony point at the top of your shoulder. Too high forces you to reach upward, straining your wrists; too low wastes energy unracking. Secure plates with collars to prevent dangerous shifting mid-set. Stand facing the bar, ready to step into position without adjusting your stance later.
Lock In the Bulldog Grip for Wrist Safety
Slide your hands just outside shoulder width with palms facing forward. Roll the bar deep into the meaty heel of your palm—not your fingers—creating a stable “bulldog grip” that keeps wrists straight under load. Wrap thumbs fully around the bar; thumbless grips dramatically increase shoulder injury risk. Check your grip by ensuring your forearms stay vertical when viewed from the front—a narrow grip causes elbow flare.
Build an Immovable Foundation Under the Bar
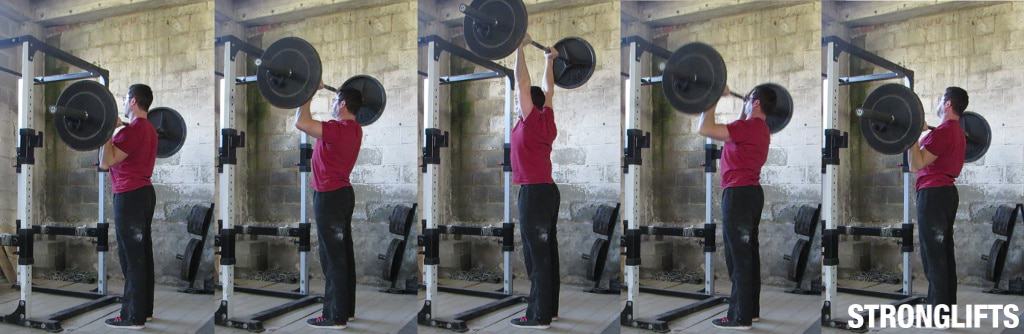
Step directly under the bar and drive your shoulders forward to create a solid shelf on your anterior deltoids. Plant heels hip-width apart with toes flared 15 degrees outward. Lock knees firmly and squeeze glutes hard—your lower body must become a rigid pillar. Take a deep breath, brace your core like you’re about to be punched, then unrack the bar by extending your legs. Step back with controlled foot placement to avoid drifting.
Execute Flawless Pressing Motion: From Rack to Lockout
Drive the Bar Vertically with Zero Drift
After unracking, position the bar across your upper chest with elbows slightly in front of the bar. Take a massive belly breath and brace your core. Drive the bar straight upward in a perfectly vertical line—any forward or backward movement wastes energy. Maintain a 45-degree elbow angle relative to your torso throughout; imagine pointing elbows at 4 and 8 o’clock on a clock face. Your gaze should stay fixed forward at eye level.
Clear Your Head with Minimal Torso Movement
As the bar passes your forehead, push your head slightly forward while keeping hips locked. This subtle “head pop” creates the straightest bar path possible without compromising spinal alignment. Avoid excessive backward lean from the hips—your torso should move only as much as needed to clear the bar. Never bend your knees to assist the press; that turns it into a push press.
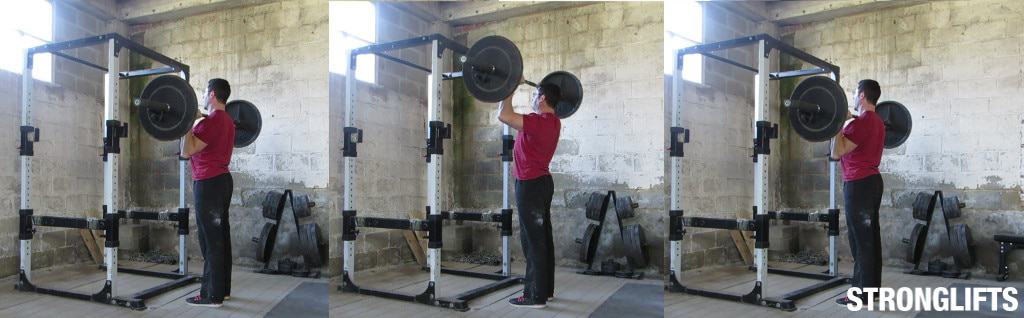
Control the Descent for Maximum Muscle Engagement
Lower the bar along the identical vertical path, resisting gravity’s pull for 3 full seconds. Touch the bar lightly to your upper chest without bouncing between reps. Reset your breath and core brace before each press—every repetition must start from a dead stop. Rushing the eccentric phase sacrifices muscle growth and joint safety.
Fix These 3 Military Press Mistakes Immediately
Stop Hyperextending Your Lower Back
Seeing your ribcage flare upward during presses? This lumbar hyperextension signals catastrophic core failure. Immediately reduce weight by 20% and practice ribcage-down breathing: inhale deeply into your belly while keeping your lower ribs tucked. Your spine must maintain neutral alignment from pelvis to skull—think “proud chest” not “stripper pose.” A weightlifting belt only helps if you’ve mastered bracing without it.
Eliminate Leg Drive Cheating
If your knees bend or heels lift during presses, you’re secretly doing push presses. Strict military presses demand locked knees and hips—drop 10-15% of the weight and practice with heels together. This brutal stance forces perfect core engagement and exposes true pressing strength. Reintroduce wider stances only after mastering strict form with reduced weight.
Correct Flared Elbows Destroying Your Shoulders
Elbows pointing toward the walls? This flared position jams your shoulder joint and kills strength. Narrow your grip until your elbows stay at 45 degrees from your torso. Cue “elbows under wrists” during the rack position—you should see vertical forearms when viewed from the side. This alignment maximizes front delt engagement while protecting your rotator cuff.
Program Your Pressing Breakthroughs

Beginner Blueprint: Build Bulletproof Form First
Start with the empty 45-pound bar for 3 sets of 5 reps, focusing solely on perfect technique. Master 3×5 at 65 pounds before adding weight. Film your side profile to check bar path—any forward drift means you’re leaning back. Most beginners reach 95 pounds within 12 weeks using this method. Pro Tip: Practice the “shoulder shelf” by holding light dumbbells in the rack position while walking—this builds crucial stability.
Progressive Overload Without Shoulder Pain
Add 2.5-5 pounds only when completing all sets with crisp form. Advanced lifters benefit from weekly variation:
– Strength focus: 3 sets of 3 reps at 85-90% of max
– Hypertrophy focus: 4 sets of 8 reps at 70-75% of max
Press 2 times weekly with at least 72 hours between sessions. Always balance pressing with double the pulling volume (e.g., 3 sets of pull-ups for every press set) to prevent muscle imbalances.
Address Mobility Roadblocks in 5 Minutes Daily
Can’t rack the bar without wrist pain? Perform banded shoulder dislocates: loop a resistance band around a pull-up bar, grip ends shoulder-width, and slowly raise arms overhead while keeping elbows straight. Do 2 sets of 10 reps pre-workout. For stiff thoracic spine, foam roll your upper back daily—this unlocks the slight backward lean needed for clean pressing. These small drills often add 10+ pounds to your press within 4 weeks.
Your immediate action step: Load 50% of your working weight, film a set from the side, and compare your bar path to vertical. Fix one technical flaw per workout—mastering the military press isn’t about ego lifting, but precise movement patterns. In 30 days of disciplined practice, you’ll press weights that once seemed impossible while keeping your shoulders healthy for life. The next time you hoist a heavy box overhead, you’ll feel the difference.


