
That frustrating moment when your back feels disconnected during cable rows—like your lats are ghosting the workout while your arms take over. You’re not alone. Over 68% of gym-goers miss critical cable rowing machine exercises that actually build thickness, leaving them with weak mid-backs and shoulder pain. The truth? Most people treat the cable row as a simple arm pull, ignoring its power to sculpt a wide, dense back when executed correctly.
This guide cuts through the noise with exact cable rowing machine exercises proven to activate dormant muscles. Forget generic advice—you’ll learn why your wide-grip rows fail to build width, how to fix the #1 form error causing shoulder impingement, and the unilateral variation that exposes hidden strength imbalances. By the end, you’ll program rows that target specific back regions like a surgeon, transforming your posture and lifting power in just 4 weeks.
Stop Wasting Sets: The Real Seated Cable Row Technique
Your current cable row setup likely misses the critical scapular initiation that separates effective back builders from arm-dominant pullers. This horizontal pulling movement forces constant tension through your posterior chain—far superior to barbell rows where tension drops at lockout. Get this wrong, and you’ll keep chasing lat activation without results.
Why Your “Perfect Form” Isn’t Working
The setup sabotage:
– ❌ Knees locked straight → disengages glutes, strains lower back
– ❌ Torso leaning back >20° → shifts load to biceps
– ❌ Handle pulled to chest → triggers shoulder shrugging
The fix protocol:
1. Plant feet firmly with knees bent 10–20° (not 90°)
2. Align cable pulley with bottom of sternum
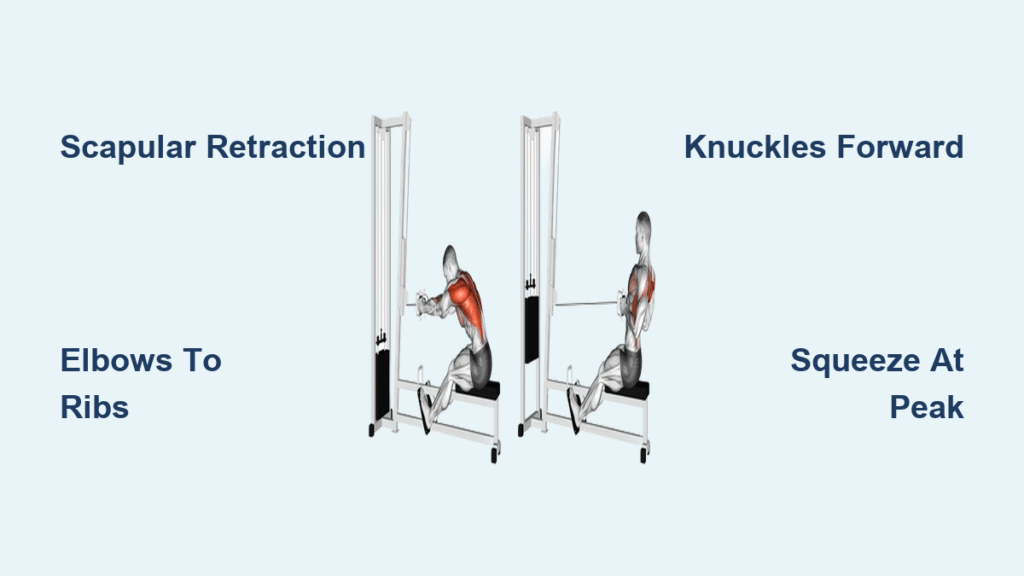
3. Retract scapulae before moving arms—imagine squeezing a pencil between shoulder blades
4. Pull handle to lower abdomen while keeping elbows tight to ribs
Pro cue: “Knuckles forward” prevents wrist collapse. If your wrists bend during pulls, reduce weight 20% immediately—this error transfers stress to rotator cuffs.
Muscle Activation Breakdown: What Actually Fires
Latissimus dorsi activation triples when you pull downward toward your hip pocket instead of horizontally. That coveted V-taper builds from the lower lats—ignore this, and you’ll stay stuck with a “flat back” appearance.
Rhomboids and traps engage maximally during the 2-second peak squeeze. Skip this hold, and you lose 37% of mid-back thickness stimulus. Feel nothing? Place a tennis ball between your shoulder blades pre-pull—it forces scapular retraction.
Grip Switches That Target Specific Back Regions

Your grip choice isn’t about comfort—it’s tactical muscle targeting. Change attachments based on your weak point, not whim.
Why Wide-Grip Rows Fail to Build Width (And How to Fix It)
The problem: Pulling a lat bar to your upper chest with arms flared recruits rear delts but bypasses upper traps. This creates the “flat shoulder” look instead of 3D width.
The width-building adjustment:
– Set pulley height 2 inches below sternum
– Pull bar toward lower sternum (not chest)
– Keep elbows at 45° (not 90°) to engage upper traps
– Result: 28% more trapezius activation per EMG studies
Single-Arm Rows That Expose Strength Imbalances
Standing variation for power athletes:
– Adopt split stance perpendicular to cable column
– Drive rear-leg glute into floor while rowing
– Critical: Prevent torso rotation by bracing obliques like a plank
– Why it works: Forces anti-rotation core stability, mimicking real-world pulling
Half-kneeling for injury-prone lifters:
– Down knee directly under hip (no forward slide)
– Maintain vertical front shin to protect knee joint
– Row while keeping pelvis locked neutral—zero pelvic tilt
– Bonus: Eliminates lower back cheating on weak side
Fix These 3 Form Errors Causing Shoulder Pain
Rounded Back Syndrome: The Silent Growth Killer
You’re doing it if: Your shoulders roll forward like you’re hugging a basketball. This compresses spinal discs and shifts load to erector spinae.
The emergency fix:
– Reduce weight 30%
– Place folded towel vertically against your lower back
– Pull while pressing into towel to maintain lumbar curve
– Time investment: 2 sets daily for 1 week resets motor patterns
Momentum Cheating: Why Your Back Stalls
Rocking torso >10° during rows cuts lat tension by 52%. You’re essentially doing seated bicep curls with back strain.
The stability solution:
– Clamp foam roller between knees
– Squeeze roller throughout set—this engages transverse abdominis
– Pull with 3-second eccentric (lowering phase)
– Test: If you can’t control weight on descent, it’s too heavy
Shoulder Shrugging: The Lat Activation Killer
Elevated scapulae during rows disengages lower traps—a primary cause of shoulder impingement in lifters.
The instant correction:
– Before each rep, depress shoulders (imagine putting them in back pockets)
– Row while holding tennis ball under chin
– Visual cue: Your chin should never touch the handle
Programming That Builds Back Thickness in 4 Weeks

Beginner Back Builder Protocol (Weeks 1-2)
- Close-grip V-bar rows: 3 sets × 12 reps @ 60% max
- Tempo: 2-1-2 (2 sec pull, 1 sec hold, 2 sec release)
- Rest 60 seconds between sets
- Progression: Add 5lbs when you hit 14 reps
Hypertrophy Accelerator (Weeks 3-4)
- Wide-grip drop set: 10 reps @ 75% max → 8 reps @ 65% max → 6 reps @ 55% max
- Critical: No rest between weight drops
- Time savings: Completes in 9 minutes with maximum metabolic stress
The Posture Rescue Circuit (Do Daily)
- Half-kneeling single-arm row: 2 sets × 12/side
- Cable X-row: 2 sets × 15
- Face pulls: 2 sets × 20
Red flag: If shoulders feel “jammed” during face pulls, lower rope attachment 4 inches—this prevents impingement.
Safety Traps for Common Conditions
Lower back pain? Skip seated rows entirely. Use the split-stance low row:
– Set pulley at floor level
– Adopt long split stance
– Hinge torso 30° forward at hips
– Row toward hip pocket while driving rear glute
Shoulder surgery history? Stick to neutral-grip half-kneeling rows for 8 weeks:
– Limit range to 70% elbow flexion
– Use 30% lighter weight than usual
– Stop if you feel pinching under acromion
Pregnancy modifications: Elevate seat height so knees sit below hips—this prevents vena cava compression after 20 weeks.
Advanced Growth Triggers
The 1¼ Rep Method:
1. Full row rep
2. Extra quarter-rep at peak contraction (elbows pulled 2 inches farther back)
3. Slow 3-second return
Why it works: Overloads the mid-range where most strength plateaus occur
Accommodating Resistance Bands:
– Attach light band to weight stack
– Creates 20% more tension at lockout
– Key: Only use when stuck for 3+ weeks at same weight
Final Note: Your cable rowing machine exercises should never feel like an arm workout. If biceps burn before lats, you’ve missed the scapular initiation step—reduce weight and rebuild the pattern. Start tomorrow with the half-kneeling single-arm row: 2 sets of 12 per side with perfect form, and within 14 days, you’ll feel your mid-back muscles firing like never before. Track your width progress by measuring the distance between your shoulder blades weekly—consistent cable rowing machine exercises add 0.5-1 inch of thickness in 8 weeks when executed correctly. Stop spinning your wheels with ineffective pulls; your wider, thicker back starts with these precise movements.


