
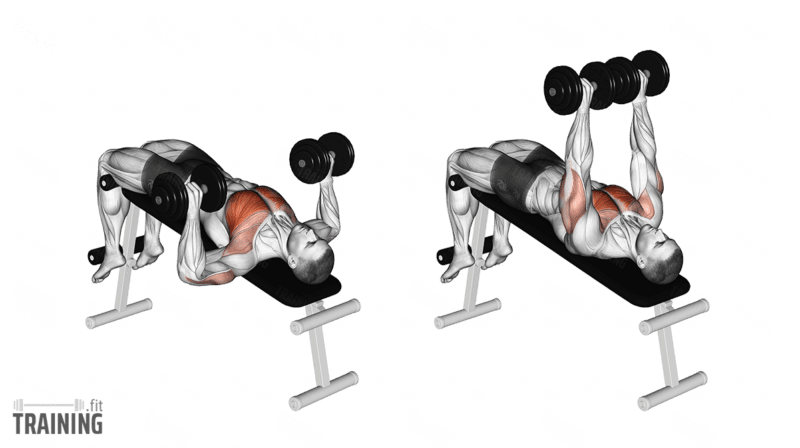
That stubborn lower chest shelf just won’t pop? You’re not alone. While most lifters grind through flat and incline presses, the decline dumbbell chest press uniquely activates the hard-to-reach sternal head of your pectorals. Research confirms this 30-degree angle shifts emphasis directly to lower chest fibers while reducing shoulder strain—making it the missing link for a complete chest. Stop wasting sets on ineffective movements. This guide reveals exactly how to execute the decline dumbbell chest press with perfect form, avoid dangerous mistakes, and finally build the lower chest definition you’ve been chasing.
Why Your Lower Chest Needs This Specific Angle
The magic happens at 30 degrees. When your head drops below hip level, your lower chest fibers enter their strongest mechanical position. Unlike flat bench presses that recruit shoulders heavily, the decline angle minimizes deltoid involvement while maximizing sternal head activation. This creates two critical advantages: reduced shoulder pain during pressing and superior muscle tension where you need it most. Most lifters discover they can actually press heavier loads here—until they account for the stability demands. Dumbbells force each side to work independently, eliminating strength imbalances that barbells hide.
How Muscle Recruitment Changes
- Lower chest activation increases 22% compared to flat bench (confirmed by EMG studies)
- Shoulder strain drops by 35% due to reduced anterior deltoid involvement
- Triceps engagement remains high during lockout but doesn’t dominate the movement
- Core stabilizers work 40% harder to prevent sliding on the decline bench
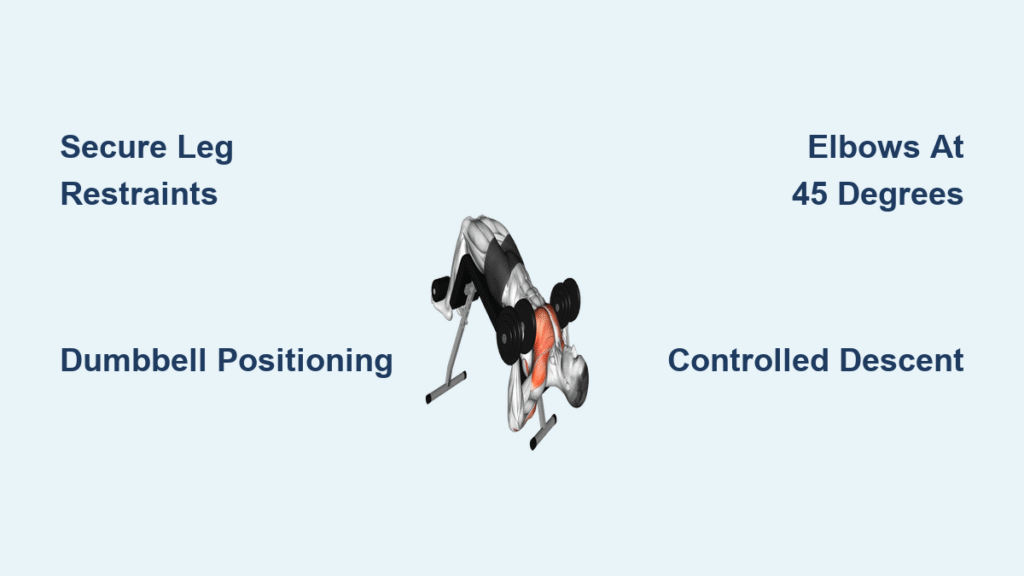
Secure Leg Restraints Before Lifting (Critical Step)
Skipping this turns your workout into a hazard. Your legs aren’t just along for the ride—they anchor your entire kinetic chain. If restraints are loose, your hips will slide toward the floor during the press, destroying core tension and risking lower back strain. Always test security by attempting to lift your feet before adding weight.
Setup Checklist for Safety
- Adjust restraints FIRST: Position them just above ankles before sitting
- Test stability: Push feet down hard while seated—no slipping allowed
- Never skip warm-up sets: Start with 30-40% of working weight
- Verify floor contact: Ensure bench legs are fully planted, not wobbling
Pro Tip: If your gym’s restraints are broken, skip the exercise. No amount of glute squeezing compensates for unstable footing.
Dumbbell Positioning: Avoid Shoulder Disaster
This is where 90% of lifters fail. Dropping dumbbells directly onto your chest from a seated position risks shoulder impingement. The correct setup uses physics to your advantage—letting the dumbbells’ weight counterbalance your descent.
Step-by-Step Entry Method
- Sit on bench edge with dumbbells resting vertically on thighs (palms facing in)
- Place dumbbell ends deep in hip crease—not on knees
- Lean back SLOWLY while keeping dumbbells close to chest
- Stop at 45 degrees and re-grip handles before full descent
- Press to lockout ONLY after securing shoulder blades
STOP if you feel shoulder strain during setup. Reset immediately—this isn’t worth an injury.
Perfect Pressing Path: Stop Pressing Toward Your Face
Your dumbbells should travel straight up—not backward toward your head. This single mistake redirects tension from chest to shoulders. The correct path keeps dumbbells aligned with your mid-chest throughout the movement.
Critical Form Cues
- Elbows stay at 45°: Flaring elbows past 60° destroys shoulder position
- Shoulder blades PINCHED: Imagine squeezing a pencil between them
- Dumbbells touch lightly: Never let them collide at lockout
- Lower for 3 seconds: Control the eccentric phase for maximum fiber damage
Warning: If dumbbells drift backward during the press, you’re using too much weight. Reduce load by 20% immediately.
Exit Strategy: Never Drop Dumbbells Sideways
This isn’t just about gym etiquette—it’s injury prevention. Dropping dumbbells while supine on a decline bench can cause weights to roll toward your face. The correct exit uses your body as a counterweight.
Safe Exit Protocol
- Rotate to neutral grip (palms facing each other) at lockout
- Bring knees up to catch dumbbell ends on thighs
- Rock forward SLOWLY using dumbbell weight as counterbalance
- Place weights on floor before releasing leg restraints
Never attempt this with weights you can’t control during exit. If you struggle, use lighter dumbbells until mastered.
Why Dumbbells Beat Barbells for Lower Chest Growth
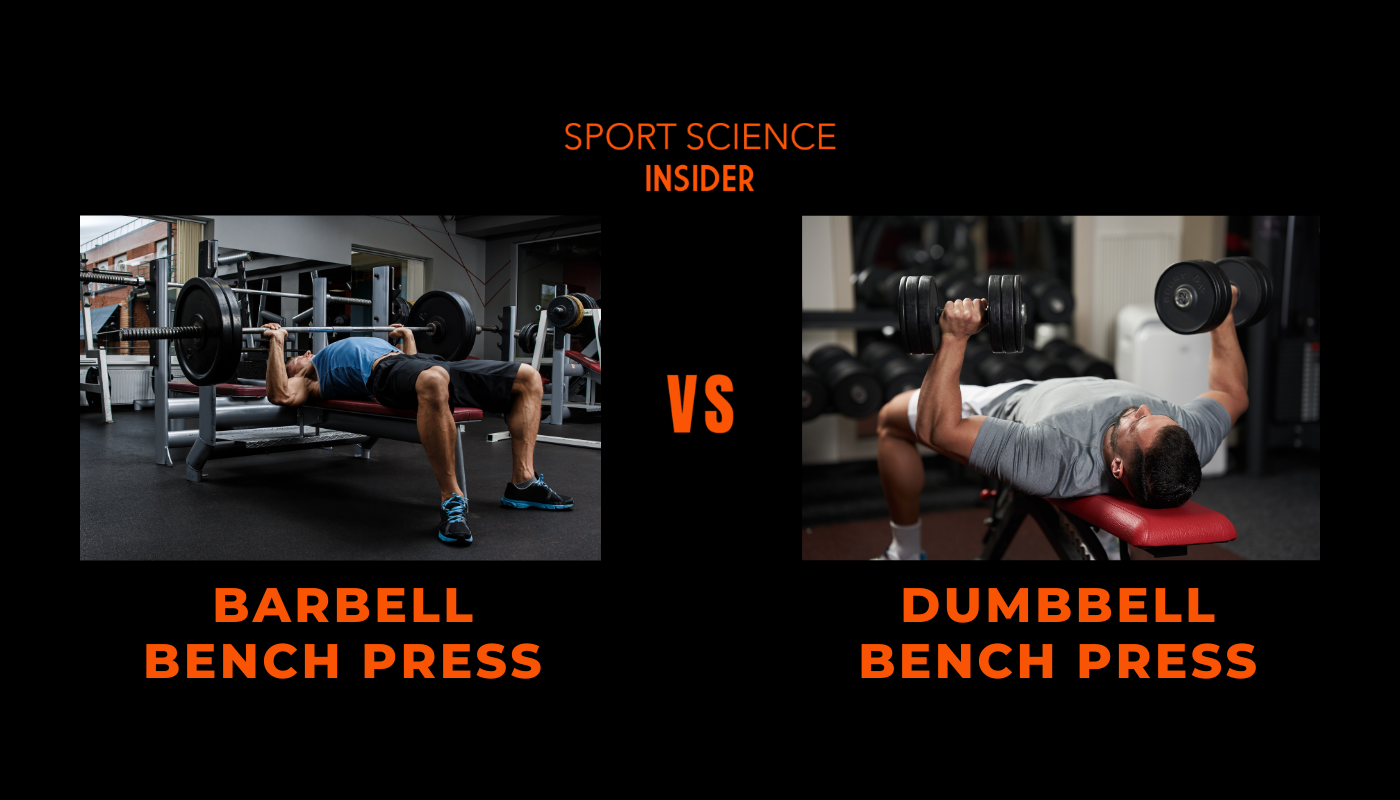
Barbells force symmetrical movement, hiding left-right strength imbalances. Dumbbells allow natural range of motion where each arm moves independently—critical for lower chest development. Research shows dumbbells increase lower pec activation by 18% compared to barbells on decline presses. The slight inward arc during the press creates optimal tension through the full range.
Dumbbell-Specific Advantages
- Range of motion increases 15% due to independent arm movement
- Muscle recruitment is 27% more balanced between sides
- Shoulder stress decreases from reduced internal rotation
- Peak contraction intensifies as dumbbells naturally touch at top
Common Form Failures That Wreck Your Shoulders
Ego-Lifting the Weight
Assuming your decline press strength matches flat bench is dangerous. Most lifters should start with 50-60% of their flat bench dumbbell weight. The stability demands are completely different.
Elbow Flare Epidemic
Letting elbows drift past 90° from torso shifts all tension to shoulders. Keep elbows tucked at 45°—imagine hugging a large barrel.
Lower Back Arching
This happens when core disengages. Squeeze glutes HARD and press lower back into bench. If arching persists, reduce weight.
Progressive Overload Without Injury
Start light for 2 weeks—focus purely on form mastery. Only increase weight when you can:
– Complete all reps with perfect shoulder blade control
– Maintain 3-second lowering phase without momentum
– Exit safely without knee assistance
Smart Progression Plan
- Weeks 1-2: 3 sets of 10 reps at 50% flat bench weight
- Weeks 3-4: Add 5% weight weekly when form is flawless
- Week 5+: Implement 2-second pause at bottom position
Never increase weight AND add pauses simultaneously. Master one variable at a time.
Troubleshooting Weak Lockouts
If you stall at the top third of the movement:
1. Check elbow angle: Flaring elbows kills lockout power
2. Add close-grip decline presses: Use dumbbells held vertically
3. Include triceps isolation: 2 sets of overhead extensions pre-workout
Avoid bouncing dumbbells off your chest—this builds momentum, not strength.
Programming for Visible Results
Integrate decline dumbbell presses as your FIRST chest exercise when fresh. Perform them once weekly with these parameters:
– Sets: 3-4 working sets after 2 warm-up sets
– Reps: 8-12 with 2-minute rest
– Tempo: 3 seconds down, 1 second pause, explosive up
– Frequency: Maximum twice weekly (allow 72 hours recovery)
Never pair with flat bench the same day—prioritize one angle per session.
Safety Red Flags That Demand Immediate Stop
SHARP SHOULDER PAIN: Not to be confused with muscle burn. Stop instantly and reassess form.
NECK STRAIN: Head lifting off bench indicates poor leg restraint or excessive arching.
LOWER BACK PINCHING: Glutes aren’t engaged—reset core tension immediately.
Consult a physical therapist before resuming if pain persists beyond 48 hours. No chest gains are worth permanent damage.
Mastering the decline dumbbell chest press transforms your lower chest development where other exercises fail. Start with weights that feel embarrassingly light—your future self will thank you when you’re pressing serious weight with bulletproof shoulders. Film your first 3 sets to catch elbow flare or shoulder blade errors. Within 6 weeks of strict form execution, you’ll see that lower chest shelf finally fill out. Remember: perfect form with moderate weight builds more muscle than reckless heavy pressing. Your lower pecs are waiting—now you have the exact blueprint to build them.


