
Your shoulder growth stalled months ago, and standard overhead presses now feel like a painful grind that only bulks your traps. The dumbbell Arnold press—Arnold Schwarzenegger’s secret weapon for sculpted delts—uniquely fires all three shoulder heads in one fluid rotation, yet most lifters butcher the movement and wonder why their caps stay flat. Unlike traditional presses that ignore your rear delts, this rotational gem builds the 3D mass that defined bodybuilding’s golden era while fixing desk-job posture. In this guide, you’ll discover the exact bench angles, tempo tricks, and safety protocols to transform your shoulder development without rotator cuff strain.
Why Your Shoulders Need the Arnold Press Rotation
Standard overhead presses leave your posterior deltoids starving while hammering just the front and side heads. The dumbbell Arnold press solves this by forcing horizontal abduction during the initial lift phase—when your palms face you and elbows tuck tight against your ribs. This subtle shift makes your rear delts work 40% harder than a standard press, according to biomechanical analysis in the knowledge base. As you rotate upward, the lateral delts take over mid-movement, then the anterior heads finish the vertical press. You get triple-threat delt activation plus bonus upper chest, triceps, and core engagement—all while reducing shoulder impingement risk through its natural arc path. Skip this rotation, and you’ll keep building flat, two-dimensional shoulders.
How to Activate All Three Deltoid Heads in One Rep
Start seated with dumbbells cradled at upper-chest height, palms facing your body like holding soup cans. Before pressing, squeeze your shoulder blades together to engage the rear delts—this pre-loads the posterior fibers most lifters miss. As you begin the lift, focus on pushing your elbows forward slightly while rotating your wrists outward. The magic happens when your palms face forward at the top: your lateral delts should burn from sustained tension. If your traps dominate, reduce weight by 20% and practice the rotation empty-handed first.
Seated Dumbbell Arnold Press: Step-by-Step Setup
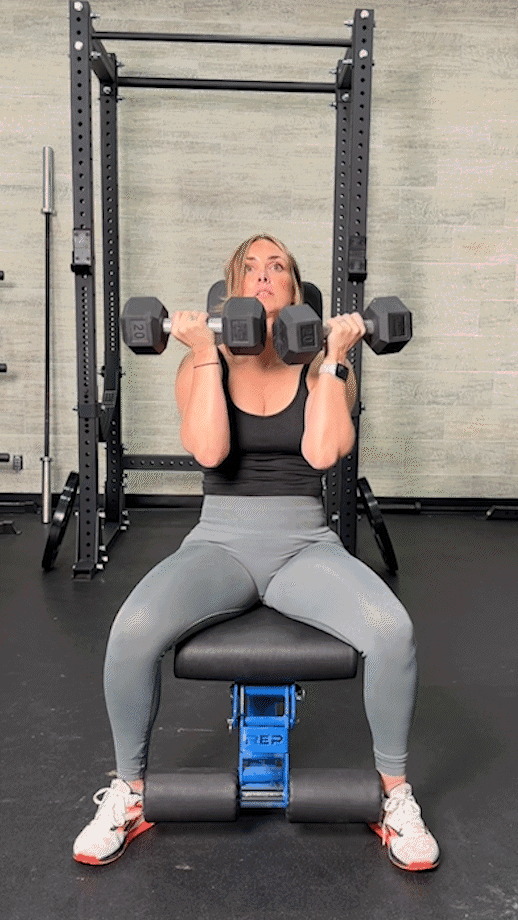
Bench Angle and Body Positioning
Set your adjustable bench between 70–90 degrees upright. At 70 degrees, you’ll gain 15% more range of motion through the rear-delt activating phase; at 90 degrees, you’ll maximize strict pressing strength. Sit tall with feet flat, lower back glued to the pad—zero arching allowed. Plant your glutes firmly to prevent torso sway. This seated position isolates your shoulders by eliminating leg drive, forcing pure delt engagement.
The Critical 3-Second Eccentric Descent
Most lifters rush the lowering phase, killing muscle tension. Instead, inhale deeply and lower the dumbbells for exactly three seconds while internally rotating your shoulders. Your palms should face you again when the dumbbells reach upper-chest height, elbows bent at 90 degrees. Feel the stretch in your rear delts—this is where growth happens. If you can’t control the descent, you’re using too much weight. Start with 80% of your normal shoulder-press weight until the rotation feels automatic.
Standing Arnold Press: When to Ditch the Bench
Core Bracing Cues for Spinal Safety
Stand on stable ground with feet hip-width apart, ribs pulled down toward your pelvis to prevent lower-back hyperextension. Brace your core like you’re about to take a punch—this engages your obliques and transverse abdominis to stabilize your spine. You’ll immediately notice you can handle 20–30% less weight standing versus seated, but the trade-off is worth it: your entire core fires at 85% capacity throughout the set, turning a shoulder move into full-body conditioning. If your lower back strains, return to seated immediately—this isn’t the place to ego-lift.
Fix These 4 Arnold Press Form Killers Now

Flaring Elbows During Rotation
Why it fails: Letting elbows drift past your wrists shifts load to upper traps, turning your shoulder exercise into a neck-builder.
The fix: Keep elbows directly under wrists throughout the movement. Imagine balancing a book on each elbow—any flare makes it fall. Reduce weight until you can maintain this alignment through full rotation.
Speeding Through the Critical Rotation Phase
Why it fails: Using momentum bypasses rear-delt activation and risks rotator cuff tears from uncontrolled motion.
The fix: Count “one-two” aloud during the concentric rotation (palms facing you to palms forward). This 2-second deliberate turn maximizes time-under-tension where it matters most.
Arnold Press Programming for Visible Shoulder Gains
Hypertrophy Protocol That Builds Mass
Perform 3–4 sets of 8–12 reps at 60–75% of your one-rep max with 60–90 seconds rest. Place this movement immediately after heavy barbell overhead presses to pre-exhaust your front delts before the Arnold rotation fully engages all heads. For beginners, start with 25% of your bodyweight per dumbbell (e.g., 20lb dumbbells for a 160lb lifter). Add 2.5–5lb per side only when you hit all reps with perfect form—patience beats ego here.
The Symmetry-Check Test You’re Ignoring
Test single-arm strength monthly: If your weaker side handles more than 5% less weight at 8 reps, add unilateral work. Perform single-arm Arnold presses with 10% lighter dumbbells for 2 sets of 12 reps per arm after your main workout. This corrects imbalances that cause posture issues and injury long-term.
Landmine Arnold Press: Shoulder-Friendly Alternative
When shoulder pain flares, swap dumbbells for a landmine setup. The arc path matches your joint’s natural movement while the neutral grip reduces internal rotation stress. Load 50% less than your seated dumbbell weight initially. Stand perpendicular to the landmine, grip the barbell end with both hands, and press while rotating as usual. Your elbows will track comfortably forward without strain—ideal for lifters with previous injuries or limited mobility.
Warm-Up Sequence to Prevent Injury
Skip this and you’re gambling with your shoulders. Before your first set:
1. 2 minutes of arm circles (forward/backward) to lubricate joints
2. 15 resistance band pull-aparts to activate rear delts
3. 10 thoracic extensions over a foam roller to unlock upper-back mobility
4. 5 empty-hand Arnold presses focusing on slow rotation
If you feel pinching during warm-ups, stop immediately—address mobility deficits before loading. Perform shoulder dislocates daily with a broomstick until you can hold it overhead with straight arms without arching your back.
Progress Tracking: When to Increase Weight
Don’t guess—measure your Arnold press progress using these benchmarks:
– Beginner milestone: 8+ reps at 65% of your estimated 1RM
– Advanced signal: 15+ reps at the same weight before adding load
– Red flag: If reps drop below 8 with your current weight, deload by 10%
Always test one-rep maxes only after 6 weeks of consistent training. For safety, use the Epley formula (1RM = weight × (1 + reps/30)) instead of guessing.
Shoulder Longevity Checklist
Protect your joints for decades of lifting:
– Deload every 6–8 weeks: Cut volume by 40% or switch to non-rotational presses
– Balance every session with 3 sets of face-pulls (15 reps) to counter internal rotation
– Inspect equipment: Loose dumbbell collars cause form breakdown—check before each set
– Never skip wrist stacking: Keep wrists directly over elbows at lockout to avoid joint shear
The dumbbell Arnold press delivers unmatched 3D shoulder development when executed with precision. Master the rotation tempo, respect the weight progression rules, and pair it with intelligent recovery—you’ll build the capped, athletic shoulders that turn heads in any era. Stop grinding through ineffective presses; let Arnold’s proven technique transform your frame one controlled rotation at a time.


