
That first weighted vest session should feel like a challenge—not like you’re strapped to a cinderblock wall. Grabbing too much weight too soon is the #1 mistake new users make, leading to collapsed posture, joint pain, and abandoned fitness goals. Physical therapists see it daily: exercisers jumping straight to 20 pounds on a 150-pound frame, then wondering why their knees scream during squats. The truth? Your ideal vest weight isn’t about ego—it’s a precise calculation based on your body, goals, and current fitness level. This guide delivers the exact percentages, progression timelines, and red-flag warnings backed by sports scientists and orthopedic specialists. You’ll learn how to choose weight for weighted vest use that actually accelerates results without compromising your spine.
Stop gambling with your joints. We’ve distilled clinical research from the Journal of Strength & Conditioning and protocols from top-tier trainers into a foolproof selection system. Whether you’re walking for bone density or building explosive power for sports, the right load turns your vest into a results multiplier instead of an injury time bomb.
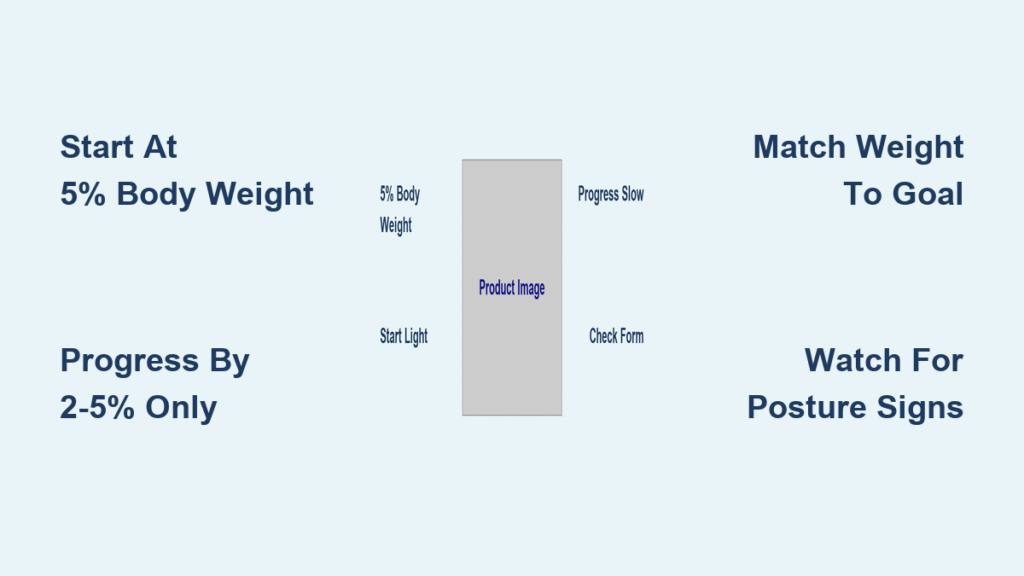
Start With 5% Body Weight Minimum
Your safest starting point is exactly 5% of your body weight—no exceptions. A 150-pound person begins with no more than 7.5 pounds. This isn’t arbitrary: Dr. Meg Darmofal, DPT at Michigan State, confirms this percentage protects spinal alignment while allowing neuromuscular adaptation. Your posture distorts within minutes of wearing excess weight, creating muscle imbalances that take months to correct.
Quick calculation: Multiply your current weight by 0.05. Round down to the nearest available plate increment—never up. If you weigh 180 pounds, target 9 pounds (not 10 or 12). ACE-certified trainer Dani Singer emphasizes this conservative start because early compensation patterns become hard-wired habits. Your vest should feel noticeable but not disruptive during basic movements. If your shoulders hike toward your ears or your lower back arches immediately, the load is already too heavy.
Progress Smart With Measured Increases
Add Only 2-5% Body Weight Per Jump
After three consecutive weeks of pain-free workouts with perfect form, increase your vest weight by just 2-5% of your body weight. For a 200-pound person, this means adding 4-10 pounds—not the 15+ pounds many impatient users attempt. The Journal of Sports Science & Medicine shows exceeding this progression rate spikes musculoskeletal injury risk by 63%. Wait until you can complete all reps with full range of motion before adding weight—never sacrifice form for heavier loads.
Hold Steady When Warning Signs Appear
Skip progression entirely if you notice:
– Forward head posture during squats or push-ups
– Shortened stride length while walking
– Knee or hip discomfort within 24 hours post-workout
– Breathing that feels unsustainable for your activity level
Pro tip: Boost intensity by hiking hills, increasing walk speed, or extending session duration instead of adding weight. This maintains metabolic challenge while protecting joints.
Match Vest Weight to Your Specific Goal
Your training objective dictates your optimal load range—using the same weight for marathon training as powerlifting guarantees subpar results.
Build Bone Density Safely
Target: 5-20% body weight, with 10-15% being ideal for women combating osteoporosis. Studies in the Journal of Bone and Mineral Research show this range triggers measurable bone density improvements without joint stress. Start at 5% and gradually increase over 8 weeks while walking on varied terrain.
Maximize Strength Gains
Target: 10-20% body weight during compound lifts. ACE research confirms heavier loads significantly increase muscle fiber recruitment for squats and push-ups. Advanced lifters can exceed 20% under supervision, but never during initial adaptation. If your chest collapses during weighted push-ups, reduce the load immediately—form always trumps weight.
Optimize Endurance Performance
Target: 5-10% body weight for running or brisk walking. The Journal of Strength & Conditioning proves this range maximizes calorie burn while preserving natural gait mechanics. Exceed 10% during running, and you’ll shorten your stride by 12% on average—sabotaging efficiency. Elite runners like Olympic coach Alex Hernandez use 5-8% for hill sprints only.
Accelerate Weight Loss
Target: Start at 5-10%, progress to 15-20% over months. The metabolic boost comes from longer session duration, not max weight. A 2022 study found exercisers using lighter loads (7.5%) walked 22 minutes longer per session than those with heavy vests (15%), burning 18% more total calories.
Exercise-Specific Loading Limits
Walking & Hiking Protocol
Begin with 5-10% body weight for neighborhood walks. Gradually build to 20% over 8-12 weeks while monitoring stride length. If your arm swing stiffens or steps shorten, revert to the previous weight. Tactical plate vests distribute weight best for this activity.
Running Restrictions
Never exceed 10% body weight—most runners perform optimally at 5-8%. Exceeding this alters vertical oscillation by 15%, increasing knee impact forces. If you notice excessive bounce or shortened ground contact time, remove weight immediately.
Push-Up Precision
Choose weight that challenges your chest without reducing range of motion. Most users need 8-15 pounds regardless of body weight. If your elbows flare outward or hips sag, the vest is too heavy. Shoulder-holster styles prevent chest compression during reps.
Squat & Lunge Loading
These tolerate heavier loads—use 10-20% body weight once form is mastered. But if your lower back rounds during descent or knees cave inward, reduce weight by 25%. James N. Gladstone, MD at Mount Sinai, stresses even front-back distribution to avoid spinal shear forces.
Plyometrics Safety
Keep loads minimal at 5-8% maximum. The goal is maintaining explosive power, not resistance. If your jump height decreases by 10% or landing stability suffers, the vest is counterproductive. Use sandbag vests for better weight dispersion during lateral movements.
Fitness Level Loading Blueprint

Beginners: The 6-Week Foundation Phase
- Start: 5% body weight maximum
- Cap: 10% body weight
- Focus: Master unloaded movements first
- Timeline: Maintain initial weight for 4-6 weeks
- Critical: Integrate vest into daily tasks (mail retrieval, dishwashing) before workouts
Intermediate: The Progressive Overload Phase
- Start: 5-10% body weight
- Cap: 15% body weight
- Focus: Circuit training with 30-second rest
- Timeline: Increase weight every 3-4 weeks
- Warning: If push-up depth decreases by 20%, regress immediately
Advanced: The Performance Phase
- Start: Up to 10% body weight
- Cap: 20% body weight (or higher under supervision)
- Focus: Sport-specific drills under load
- Timeline: Increase based on performance metrics
- Non-negotiable: Weekly mobility assessments to detect compensation
Red Flags Your Vest Is Too Heavy
Postural Distortion Signals
- Rounded shoulders visible in mirror checks
- Forward head position exceeding 2 inches past shoulders
- Excessive forward lean during squats (>15 degrees)
Joint Pain Indicators
- Lower back ache persisting 2+ hours post-workout
- Knee pain during stair descent
- Hip discomfort when transitioning from sitting
Movement Compensation Signs
- Stride length reduction >10% from baseline
- Restricted arm swing during walks
- Altered squat depth (inability to reach parallel)
Breathing Warning Signs
- Inability to speak 5-word sentences during walks
- Shallow chest breathing instead of diaphragmatic
- Unsustainable heart rate for activity level
First-Week Loading Schedule
Days 1-3: Posture Integration
Wear your vest during low-intensity daily activities—making coffee, walking to the mailbox, light gardening. Goal: Maintain neutral spine for 20+ minutes without adjusting straps. If you catch yourself slouching, remove the vest immediately.
Week 1: Half-Session Conditioning
Apply the vest only during the first half of your normal walk or workout. Example: Wear it for minutes 1-15 of a 30-minute walk. Document any form breakdown in a training log. Never push through discomfort.
Week 2+: Full-Session Progression
Complete entire workouts once you achieve three consecutive days of symptom-free vest use. Start sessions with unloaded movement prep (bodyweight squats, arm circles) for 5 minutes before vest application.
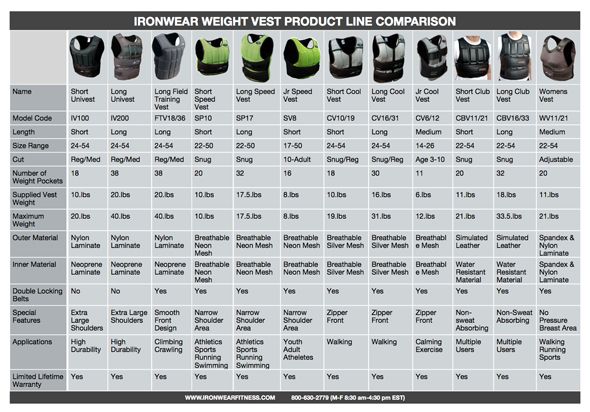
Vest Selection Non-Negotiables
Critical Fit Features
- Adjustable increments of 2-5 pounds via plates or sandbags
- Snug torso wrap preventing bounce during movement
- Even 50/50 front-back weight distribution
- Breathable mesh padding on shoulders and back
Safety Must-Haves
Quick-release buckles allow instantaneous weight removal if pain strikes. Reflective strips are essential for early morning/evening use. Reinforced stitching at load-bearing seams prevents catastrophic failure during high-impact moves.
| Your Weight | Starting Vest Weight | Maximum Safe Load |
|---|---|---|
| 120 lbs | 6 lbs | 24 lbs |
| 150 lbs | 7.5 lbs | 30 lbs |
| 180 lbs | 9 lbs | 36 lbs |
| 200 lbs | 10 lbs | 40 lbs |
| 220 lbs | 11 lbs | 44 lbs |
Remember: These are ceilings, not targets. Your body’s feedback overrides all charts. Start conservatively, progress slowly, and prioritize form over weight. The most effective weighted vest program is the one you can sustain injury-free for years—not the one that puts you on the couch after week two. Choose your weight like a pro: with precision, patience, and respect for your body’s limits. Your future self will thank you when you’re still crushing workouts while others recover from preventable injuries.


