
That half-used foam roller sitting in your garage could be your painting project’s secret weapon—or a dried-up disaster waiting to happen. Knowing exactly how to clean foam roller paint properly transforms a single-use tool into a repeat performer that delivers smooth, professional results every time. Most DIY painters throw away perfectly salvageable rollers because they don’t understand the critical first 5 minutes after painting ends. This guide breaks down the exact cleaning techniques that extend your foam roller’s life through multiple projects while ensuring flawless paint application each time you use it.
The difference between a reusable roller and a hardened paperweight comes down to immediate action and paint-type-specific cleaning methods. Water-based paints like latex and acrylic respond beautifully to hot water cleaning when you act fast, while oil-based paints require solvent-based solutions that many painters find impractical for foam rollers. Either way, understanding the precise cleaning process prevents wasted money on replacement tools and avoids frustrating streaks and imperfections in your finished paint jobs.
Essential Supplies for Cleaning Foam Rollers After Painting
Before you even dip your roller into paint, gather these critical cleaning supplies within arm’s reach. Having everything ready prevents paint from drying while you search for missing items—the single most common reason foam rollers get ruined.
- 5-gallon bucket filled with the hottest water possible for water-based paints
- Few drops of dish detergent (too much creates hard-to-rinse residue)
- Rubber gloves to protect hands from heat and chemicals
- Multiple clean rags for wiping and drying
- Putty knife or 5-in-1 tool for scraping excess paint
- Wire brush specifically for cleaning metal roller frames
- Scrap paper to absorb excess paint before cleaning
- Paint thinner or mineral spirits (only for oil-based paint cleanup)
For oil-based paint projects, consider whether cleaning makes financial sense—many professionals calculate that new rollers cost less than solvent expenses and hazardous waste disposal fees. Waterborne alkyd paints like Advance offer the best of both worlds, cleaning up with soap and water despite their durability.
How to Scrape Excess Paint from Foam Rollers Before Cleaning
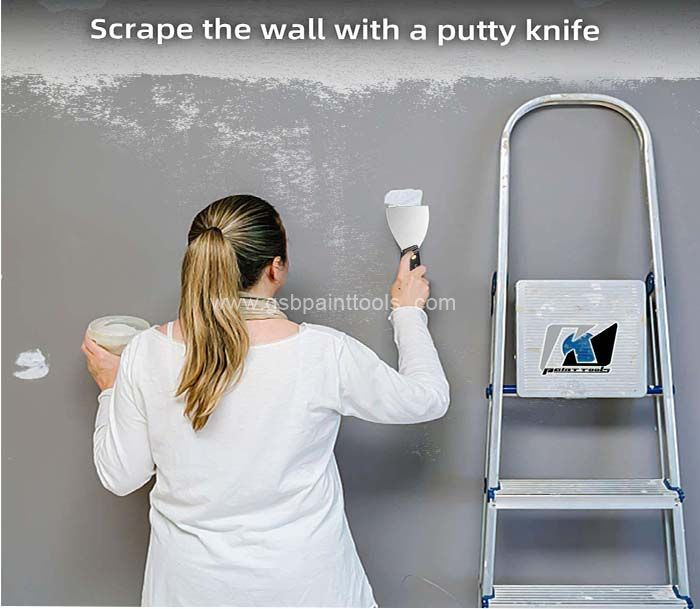
Your roller’s survival depends entirely on what happens in the first five minutes after painting ends. Start by scraping paint back into your tray using the curved edge of a putty knife or 5-in-1 tool—this single action removes 80% of the paint before it penetrates the foam.
Continue rolling the roller onto scrap paper until no more paint transfers. This step feels tedious but prevents the foam from becoming saturated with dried residue that’s impossible to remove later. Never skip this even when rushed—a roller with properly scraped paint cleans in minutes, while one left to dry overnight often becomes trash.
Critical mistake to avoid: Letting paint sit while you clean brushes or put away other supplies. The clock starts ticking the moment you finish rolling, and every minute counts toward permanent damage.
Proper Washing Technique for Latex and Oil-Based Paint Foam Rollers
With excess paint removed, prepare your cleaning solution based on paint type. For latex, acrylic, and waterborne alkyd paints, fill your bucket with the hottest water available—temperature directly impacts effectiveness as heat breaks down paint polymers.
Why Hot Water Makes the Difference
- Cold water: Paint remains viscous and sticks to foam fibers
- Warm water: Partial breakdown requiring multiple washes
- Hot water: Immediate paint breakdown with single thorough wash
Submerge the foam roller cover and work the paint out using your gloved hands. Gently squeeze and massage the foam from multiple angles to release trapped paint particles deep within the material. For stubborn spots, let the roller soak for 2-3 minutes before resuming.
Oil-based paint rollers require paint thinner in a small container instead of water. Scrape excess paint thoroughly first, then submerge and work the solvent through the foam. Note that contaminated solvents require proper hazardous waste disposal—factor this into your decision whether to clean or discard oil-paint rollers.
Complete Rinsing and Air-Drying Process for Clean Foam Rollers

Rinsing improperly leaves soap residue that mixes with fresh paint during your next project, causing color inconsistencies and finish defects. Rinse your roller under warm running water while squeezing foam repeatedly until water runs completely clear with no color traces.
Proper Drying Technique
- Never wring or twist foam (this permanently damages structure)
- Shake out excess water with firm, downward motions
- Stand roller upright on scrap paper to dry (never lay flat)
- Allow 4-6 hours minimum drying time before storage
Test dryness by squeezing the foam—if any moisture releases, continue drying. Trapped moisture promotes mold growth and material degradation, ruining your roller even after perfect cleaning.
Refrigerator Storage Method for Overnight Foam Roller Preservation
When you need to preserve a foam roller between coats or overnight, complete cleaning isn’t necessary. Wrap the roller tightly in plastic wrap to create an airtight seal, then place it in the refrigerator—the cold temperature slows drying without freezing the foam.
Critical Refrigeration Steps
- Wrap immediately after painting ends (don’t let paint skin over)
- Use multiple layers of plastic wrap for complete seal
- Store in refrigerator (not freezer) for up to 72 hours
- Allow 30 minutes warming time before unwrapping for reuse
This method keeps paint-wet rollers ready for immediate application without cleaning time or reloading fresh paint. The roller remains coated with usable paint matching your project perfectly.
Long-Term Storage Techniques for Preserving Clean Foam Rollers
After complete drying, wrap your clean roller in plastic wrap or seal it in a plastic bag to protect against dust and moisture. Store in a cool, dry location away from direct sunlight—temperature fluctuations and UV exposure degrade foam over time.
Label stored rollers with their last paint color if you plan touch-ups. Properly stored rollers maintain performance characteristics for months or even years, making them ready for unexpected repairs or small projects.
Cleaning Foam Rollers Used with Latex, Oil-Based, and Waterborne Alkyd Paints
.jpg)
Different paint types demand specific cleaning approaches:
Latex and Acrylic Paints: Respond best to hot water and minimal soap. The heat breaks down water-based polymers effectively, allowing complete removal with proper technique.
Oil-Based Paints: Require paint thinner or mineral spirits with proper ventilation. Many painters find replacement more economical than solvent costs and hazardous waste disposal.
Waterborne Alkyd Paints: Clean with soap and water despite their durability. These modern paints offer oil-like performance without solvent cleanup challenges.
Metal Roller Frame Cleaning and Maintenance Procedures
The metal frame requires separate attention during cleaning. Remove the foam cover and submerge the frame in your cleaning solution. Use a wire brush to remove paint from cage components and handle connection points—pay special attention to crevices where paint accumulates.
Rinse thoroughly and dry completely before storage. Proper frame maintenance extends its life indefinitely, as metal components last virtually forever when kept paint-free. Clogged frames cause uneven paint distribution that ruins your finish.
Signs Your Foam Roller Needs Replacement After Multiple Cleanings
Even with perfect care, foam rollers eventually wear out. Watch for these replacement indicators:
– Flattened foam that won’t spring back to original thickness
– Torn or shredded edges that leave streaks in paint
– Foam shedding particles onto your painted surface
– Persistent paint residue that won’t clean from deep within foam
Water-based paint rollers can go in regular trash once paint dries completely. Check local regulations for oil-based paint disposal requirements.
Top 5 Foam Roller Cleaning Mistakes That Ruin Your Tools
Letting Paint Dry Before Cleaning
Paint penetrates foam within minutes—act immediately after painting ends. Dried paint becomes impossible to remove completely.
Storing Damp Rollers
Trapped moisture causes mold growth and material breakdown. Verify complete dryness before wrapping.
Using Excessive Soap
Residue mixes with fresh paint, affecting color and finish. Use just a few drops and rinse thoroughly.
Wringing Out Foam
Twisting permanently damages foam structure. Shake out water instead.
Cleaning with Cold Water
Heat is critical for breaking down water-based paints. Always use the hottest water safely manageable.
Proper foam roller cleaning extends tool life dramatically while ensuring consistent paint application results. By acting quickly, using appropriate techniques for your paint type, and avoiding common mistakes, you maximize your investment in quality painting tools and achieve professional results across all your projects. The small effort required for proper cleaning pays back in saved money and frustration with every reuse.


