
If your resistance band workouts have stopped challenging you, combining multiple bands is the game-changing technique you’ve been missing. Many fitness enthusiasts hit a plateau with single-band training, not realizing they can multiply resistance levels by strategically layering bands – transforming basic equipment into a progressive strength system rivaling gym machines. This simple skill unlocks continuous muscle growth without requiring additional equipment purchases, making it essential for anyone serious about home fitness. By the end of this guide, you’ll know exactly how to stack, chain, and configure resistance bands to create custom resistance levels that match your strength curve for any exercise.
The magic of combining resistance bands lies in their unique tension properties – unlike weights, bands provide increasing resistance throughout the movement, which intensifies precisely when your muscles are strongest. When you layer multiple bands, you amplify this effect while creating personalized resistance profiles that target muscles more effectively at every point in your range of motion. Whether you’re building explosive power for sports, sculpting defined muscles, or recovering from injury, mastering band combinations gives you complete control over your training intensity without needing dozens of individual bands.
Why Stacking Resistance Bands Beats Buying New Ones
Combining resistance bands solves the most frustrating limitation of elastic training: the resistance gap between bands. Most sets offer only 3-5 resistance levels, creating huge jumps that compromise form when you outgrow a band. By stacking two medium bands instead of jumping to a heavy band, you bridge this gap with precision that matches your exact strength progression. This approach saves you money while providing the consistent progressive overload essential for muscle growth and strength development.
The physics behind combined bands creates a resistance curve that better matches human biomechanics than weights alone. During exercises like squats, your muscles generate more force at the top of the movement than at the bottom. Single bands already improve on weights by increasing tension as you stand up, but stacked bands amplify this effect, making the top portion of your movement significantly more challenging when your muscles can handle it. This targeted resistance recruits more muscle fibers throughout the entire range of motion, accelerating strength gains while reducing joint strain.
Choosing the Right Band Types for Combination Training
Not all resistance bands combine equally well, so understanding your equipment options is crucial before attempting multi-band setups. Loop bands (continuous circles without handles) work best for lower body stacking, allowing you to place multiple bands around your thighs during squats or above your knees for glute activation. Their seamless design prevents weak points that could fail under combined tension, making them the safest choice for lower body stacking.
Flat therapy bands offer the most versatility for creative combinations since you can cut them to custom lengths, tie them into different configurations, or anchor multiple bands at various points simultaneously. Their thin profile distributes pressure more comfortably across hands and feet during high-tension exercises, reducing the blister risk that sometimes accompanies thicker loop bands during extended sessions. When combining flat bands, ensure you leave enough material for secure knots that won’t slip under tension.
Figure-8 bands with handles on both ends provide superior grip security when combining for pressing and pulling movements. The fixed handles prevent slippage during high-tension exercises like chest presses and rows, making them ideal for combinations requiring hand transitions. Tube bands with individual handles connect easily to carabiners or door anchors, creating endless configuration possibilities for comprehensive full-body workouts when combined strategically.
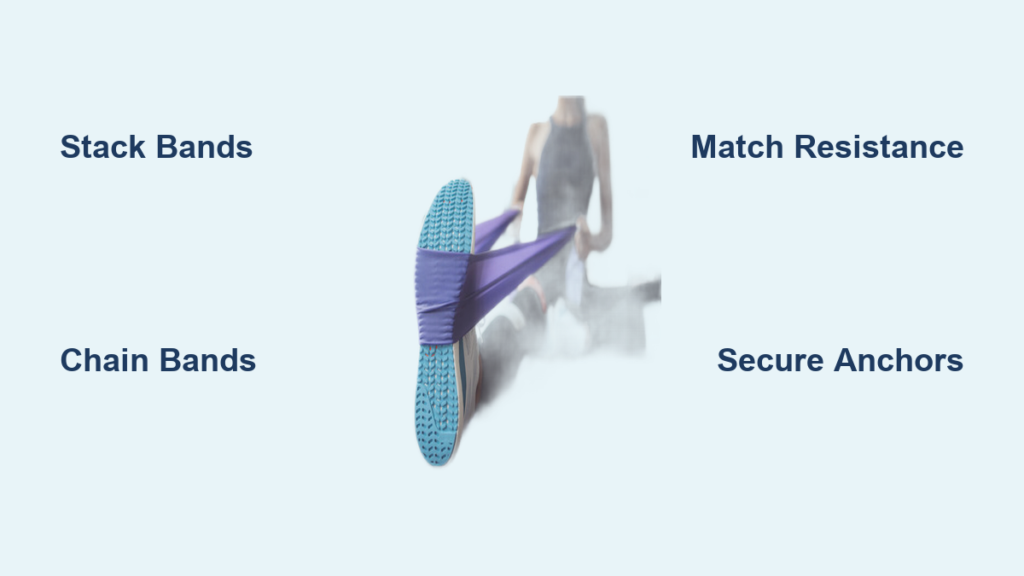
Stacking Bands for Progressive Overload
The most straightforward method for combining resistance bands involves stacking them directly on top of each other around your hands, feet, or anchor points. For upper body pressing, loop two bands behind your back and hold one handle in each hand, pressing forward against the combined resistance. Start with bands of similar resistance to maintain balanced tension, as mismatched bands can create uneven strain that throws off your form.
Lower body stacking requires precise placement to maximize muscle engagement. Position stacked loop bands above your knees for glute activation during squats, across your thighs for hamstring emphasis in deadlifts, or just above your ankles for complete lower body recruitment during lateral movements. The key is ensuring both bands maintain equal tension throughout the movement, which requires starting with proper band placement and maintaining consistent form through each repetition.
For pulling exercises like rows, anchor two bands to a secure point at chest height and grip the handles with both hands. The combined resistance creates peak tension when your arms are fully extended, challenging your back muscles exactly when they’re strongest. This technique works exceptionally well for building back thickness and strength when traditional weights aren’t available, with the added benefit of continuous tension that keeps muscles engaged throughout the entire movement.
Chaining Bands for Extended Range of Motion
Chaining resistance bands involves connecting them end-to-end to increase working length while maintaining or combining their resistance properties. This technique proves invaluable when you need extra reach to anchor points that sit farther away, such as high door anchors for pull-downs or sturdy overhead beams for mobility work. Proper chaining transforms short bands into long resistance systems that maintain consistent tension throughout extended movements.
The connection method significantly impacts safety and effectiveness. The most secure chaining technique involves tying bands together using square knots or fisherman’s knots at their ends, creating seamless connection points that won’t slip during use. Alternatively, many resistance bands feature reinforced ends with holes specifically designed for connecting to other bands or carabiners. When using these connection points, verify the knot or carabiner sits at least two inches from any anchor point to prevent slippage during exercises.
Chaining bands of equal resistance doubles your working length while maintaining the original resistance level, ideal for exercises requiring extensive range of motion. For example, chaining two medium bands creates the perfect resistance for band pull-aparts with arms fully extended, targeting your rear delts and upper back more effectively than a single band allows. This configuration works particularly well for mobility stretches where extended reach improves muscle engagement and flexibility development.
Strategic Resistance Level Combinations
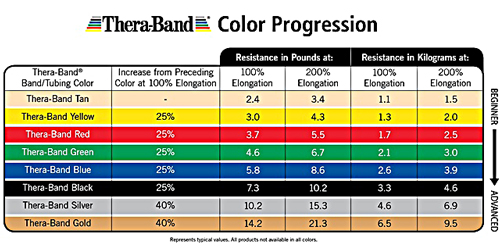
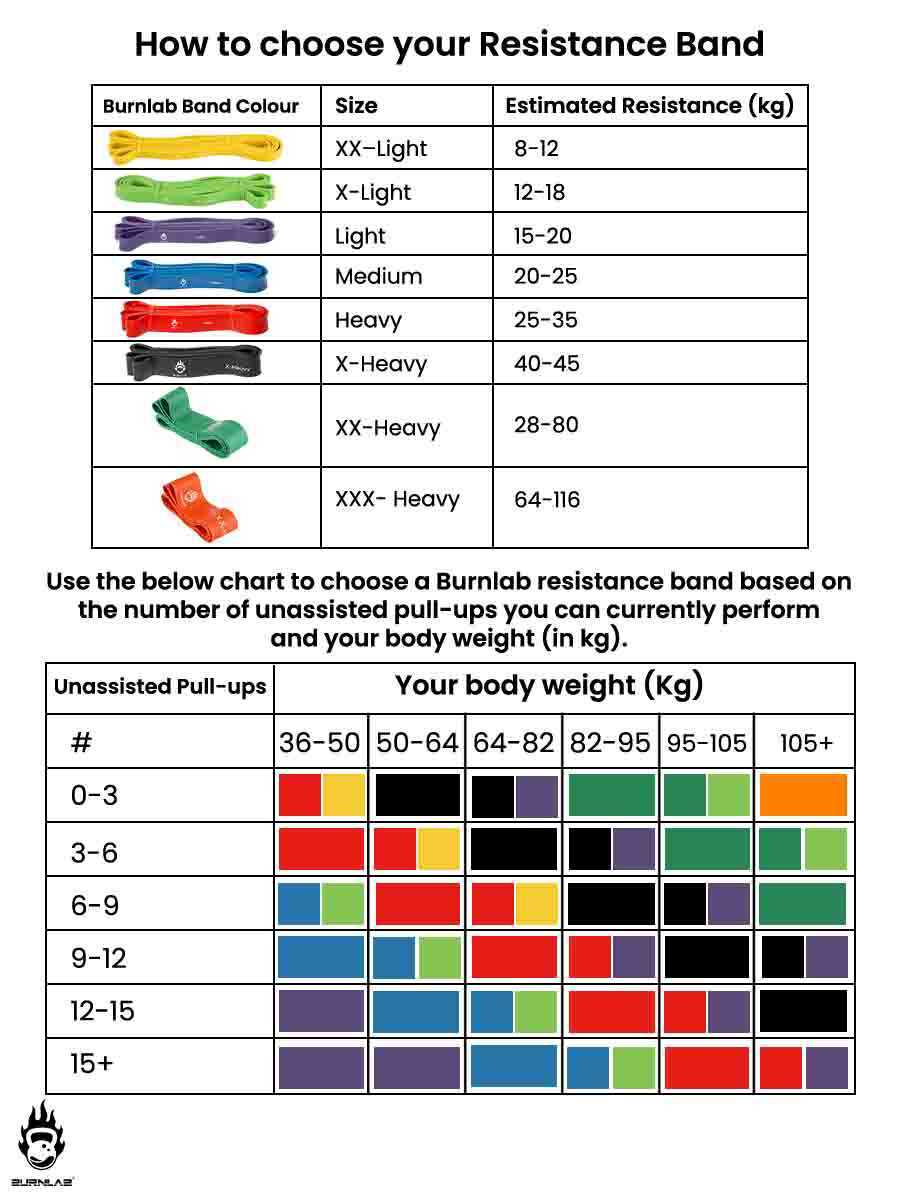
Understanding how to combine resistance bands by color-coded levels allows precise calibration of workout intensity for any fitness goal. Most bands follow a standard color progression from lightest (yellow) through red, green, blue, and black (heaviest), but resistance levels can vary significantly between manufacturers. When combining bands, focus on how they feel during actual use rather than relying solely on color labels.
Beginners should start with two identical bands to double resistance while maintaining consistent tension characteristics. This approach provides a smooth progression that builds confidence with combined training before introducing more complex combinations. As you advance, experiment with pairing adjacent resistance levels (like green and blue) to create intermediate resistance that fills the gap between single bands, preventing the common problem of jumping to a resistance level that compromises your form.
Advanced athletes often combine multiple heavy bands for compound movements that demand maximum resistance. Stacking two black bands for exercises like bent-over rows or deadlifts challenges even experienced lifters while maintaining the unique benefits of band resistance. For these high-tension combinations, ensure your anchor points and grip can handle the increased force, as combined heavy bands generate significant tension that can damage weak anchors or slip from sweaty hands.
Safety Protocols for Multi-Band Training
Combined resistance bands generate substantially more force than single bands, making safety precautions essential. Always anchor to furniture bolted to walls, sturdy door frames with proper anchors, or thick overhead beams that can handle significant pulling force without breaking or moving. Test your anchor point by applying gradual tension before starting your exercise to ensure it won’t fail under combined resistance.
Inspect all bands thoroughly before each workout, checking for micro-tears, nicks, or degradation that could cause failure under increased tension. Bands showing any signs of damage should be replaced immediately, as the added stress from combinations increases failure risk. This inspection takes seconds but prevents the sudden snaps that can cause bruises, cuts, or eye injuries from whipping bands.
Grip security becomes paramount when combining bands, as increased tension makes slippage more dangerous. Consider wearing workout gloves or wrapping band handles with athletic tape for improved grip during sweaty sessions. Additionally, keep your hands and body parts clear of the band path during exercises, as combined bands that slip from your grip can whip back with considerable force. Following these safety practices ensures your combined band training remains productive and injury-free.
Maintenance Strategies for Long-Lasting Band Combinations
Proper care significantly extends the lifespan of resistance bands used in combined configurations, which stress connection points and stretched material more than single-band use. After each workout, wipe bands down with a damp cloth to remove sweat, dirt, and oils that degrade elastic materials over time. Allow bands to air dry completely before storing, as moisture trapped in storage containers promotes mold and accelerates material breakdown.
Store bands hanging or loosely coiled rather than tightly wound, which creates stress points that lead to premature tearing. Many athletes use pegboards, hooks, or dedicated storage racks that keep each band separate and visible, making it easy to grab the exact combinations needed for each workout. This organization also allows quick inspection of each band’s condition before use, catching damage before it causes workout interruptions.
Rotating through multiple band sets prevents any single combination from experiencing excessive wear. If you combine the same two bands for every workout, they will degrade faster than if you alternate between different combinations. This rotation extends the useful life of your entire band collection while providing subtle variety in resistance patterns that challenges your muscles in slightly different ways during each session.
By mastering these combination techniques, you transform basic resistance bands into a sophisticated training system that grows with you indefinitely. The ability to create custom resistance levels means you’ll never outgrow your equipment, making resistance band training uniquely valuable for lifelong fitness that adapts seamlessly from beginner workouts to advanced strength training.


