

Your chest workout feels incomplete without the satisfying burn of a proper dumbbell chest press. Unlike barbell presses that lock your arms into a fixed path, dumbbells let each arm move independently—forcing your stabilizer muscles to engage while delivering that deep pec stretch you can’t get with barbells. But grab the wrong weight or flail your elbows, and you’ll sabotage gains while risking shoulder injuries. This guide cuts through the gym confusion with precise, actionable steps to master the movement from setup to final rep. You’ll learn exactly how to position your body, control the dumbbells, and progress safely—so every press builds real chest strength without compromising your joints.
Choosing Your Dumbbell Weight and Bench Position
Select Dumbbells That Challenge Without Compromising Form
Start with weights allowing 6-12 controlled reps while maintaining perfect technique. If your elbows flare outward like chicken wings or your shoulders burn before your chest, drop 10-15% in weight. Never sacrifice form for ego—your shoulders will thank you when you’re still pressing pain-free years from now.
Critical check: When seated with dumbbells on your thighs, the weights should feel challenging but manageable as you rock back into position. If you struggle to lift them off your lap, they’re too heavy.
Optimize Your Bench Setup for Stability
Position your bench flat with feet firmly planted under your knees. Your lower back should maintain a natural arch—not excessive—and your eyes must align with the dumbbell rack for safe re-racking. No bench? The floor press works but reduces range of motion by 30-40% since your elbows hit the ground prematurely.
Pro tip: Pull your feet toward your hips until your shins are vertical. This creates a solid base to drive through during the press, preventing your body from sliding.
Achieve the Perfect Dumbbell Chest Press Starting Position

Load Dumbbells Safely From a Seated Position
Sit with dumbbells resting on your hip crease, palms facing inward in a neutral grip. Brace your core, then rock backward using leg momentum to glide the weights smoothly to chest level—never curl them from the floor. This protects your shoulders during setup while conserving energy for your working sets.
Warning: Attempting to lift dumbbells from the floor wastes energy and strains your lower back. Always start seated.
Align Your Body for Maximum Chest Activation
Once lying down, immediately scan these critical points:
– Shoulders: Pull shoulder blades down and back as if tucking them into your back pockets
– Elbows: Position below bench level at a 45-degree angle from your torso
– Wrists: Keep straight and aligned with forearms—never bent backward
– Core: Brace tightly like anticipating a punch to your stomach
– Head: Rest neutrally on the bench with chin parallel to floor
Visual cue: Your elbows should form a “T” shape with your body—not flared out like a goalpost or tucked tightly against your ribs.
Execute the Press: Proper Dumbbell Movement Path
Drive Dumbbells Straight Up With Chest Focus
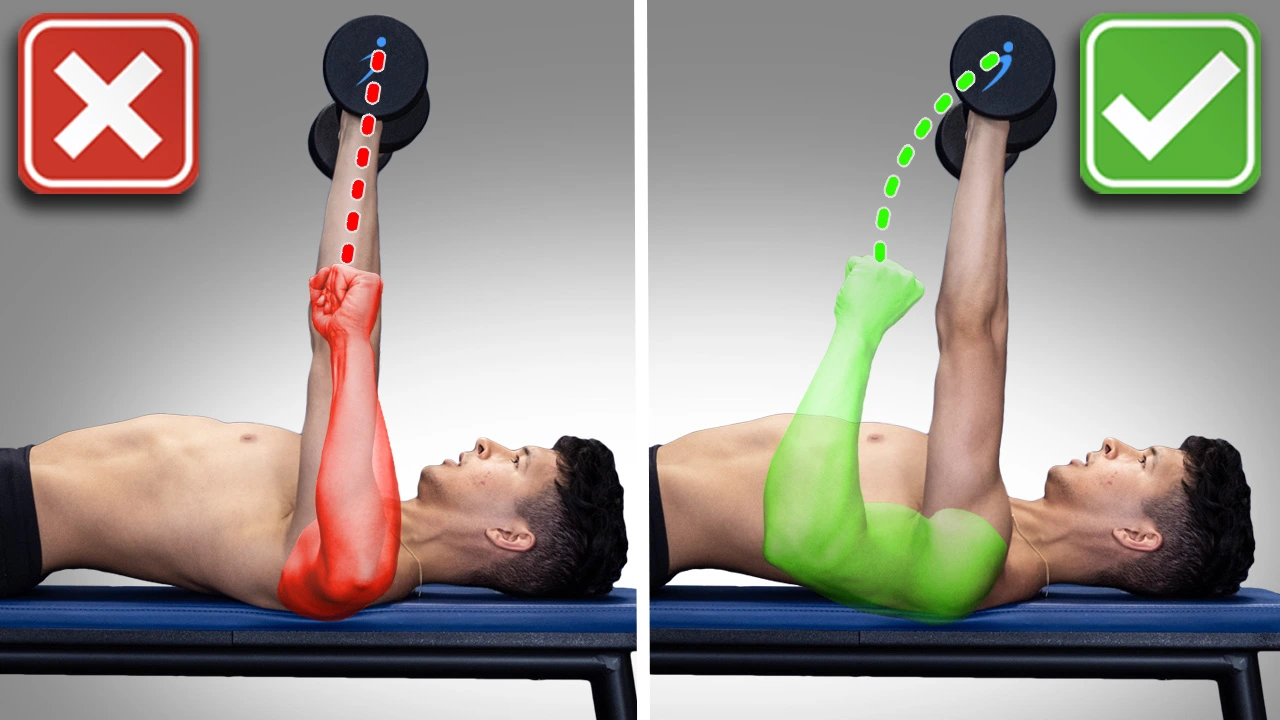
Press the weights toward the ceiling in a straight line—not arcing toward your face—with palms facing forward. Stop just short of elbow lockout to maintain constant tension on your pecs. Imagine pushing yourself away from the dumbbells rather than lifting the weights.
Key mistake to avoid: Letting dumbbells collide at the top. Keep them slightly separated throughout the movement to prevent shoulder instability.
Controlled Lowering Phase for Muscle Growth
Lower the dumbbells slowly over 3-4 seconds until handles reach chest level. Maintain tension across your upper chest—never bounce off your sternum. Crucially, stop when elbows reach horizontal with your torso; dropping them below this line risks shoulder impingement.
Breathing pattern: Inhale deeply as you lower, then exhale forcefully during the press. This maintains core pressure and stabilizes your spine.
Fix These Common Dumbbell Chest Press Form Mistakes
Stop Elbow Flaring That Wrecks Shoulders
Flared elbows (beyond 45 degrees) transfer stress from your chest to vulnerable shoulder joints. Fix this by actively “showing your armpits” to find the sweet spot where elbows form a 45-degree angle with your torso.
Test: Record yourself from the side—dumbbells should travel vertically above your nipple line, not toward your chin.
Eliminate Shoulder Pain During Pressing
If front deltoids burn before your chest:
– Increase shoulder blade retraction intensity
– Reduce range of motion slightly by stopping the descent earlier
– Drop weight by 10-15% immediately
– Ensure wrists stay neutral (not bent backward)
Red flag: Sharp shoulder pain means STOP. Reassess form before continuing—ignoring this risks rotator cuff tears.
Safely Return Dumbbells After Your Final Rep
The 5-Step Dumbbell Racking Protocol
- After your last rep, rotate palms to face each other
- Lift knees to touch dumbbell ends to thighs
- Use leg momentum to rock forward into seated position
- Keep weights controlled on your lap
- Stand up to return dumbbells to rack
Gym etiquette rule: Never drop dumbbells sideways unless using very light weights in a clear area. This damages equipment and risks injury to others.
Dumbbell Chest Press Sets, Reps, and Weight Guidelines
Beginner Programming Blueprint
Start with 2 sets of 12-15 reps using a weight challenging by rep 10. Progress to 3 sets of 10-12 reps over 4 weeks. Only increase weight when you complete all reps with perfect form—typically adding 2.5-5 lbs per dumbbell.
Critical rule: Master the movement pattern before chasing heavy weight. Video yourself weekly to check for elbow flare or shoulder blade movement.
Hypertrophy-Focused Protocol
For serious chest growth:
– Weight: Heavy enough to reach near-failure at 6-12 reps
– Rest: 90-120 seconds between sets
– Frequency: 1-2x weekly with 48-72 hours recovery
– Progression: Add weight only when hitting 12 reps across all sets
Pro tip: Squeeze dumbbells tightly at the top to maximize “irradiation”—this activates more muscle fibers through neural drive.
Effective Dumbbell Chest Press Variations for All Levels
Floor Press for Shoulder Safety
Lie on the floor instead of a bench when recovering from injury. Your elbows will contact the ground earlier, reducing range of motion but eliminating shoulder strain. Keep legs bent with feet flat for stability.
When to use: After shoulder surgery or during acute pain—provides 80% of chest activation with zero joint risk.
Single-Arm Press for Strength Imbalances
Press one dumbbell at a time while keeping your torso completely still. Start with 25% of your bilateral weight to challenge core stability.
Why it works: Reveals and corrects left-right strength differences while engaging obliques to prevent rotation.
Progressive Overload: Safely Increase Your Dumbbell Chest Press Weight
The 3-Step Progression System
- Master range of motion: Gradually deepen your stretch as shoulder mobility improves
- Increase reps: Add 1-2 reps per set before adding weight
- Add weight: Only when hitting 12+ reps across all sets with clean form
Warning: Never skip straight to heavier weights. Small 2.5-5 lb jumps preserve shoulder health while building sustainable strength.
Long-Term Injury Prevention Strategy
Prioritize shoulder blade retraction in every rep—this creates a stable platform for pressing. Complement chest presses with face pulls and band pull-aparts 2x weekly to balance pushing movements. Stop immediately at any sharp shoulder pain; muscle burn is acceptable, joint pain is not.
Final Note: The dumbbell chest press rewards precision over ego. By following these exact form guidelines—from your initial dumbbell selection to controlled lowering—you’ll build a stronger, more defined chest while protecting your shoulders for decades of training. Your next chest workout starts now: grab appropriate weights, set up your bench correctly, and press with the confidence of someone who knows exactly how to do a dumbbell chest press right. The mirror—and your joints—will show the difference.


