
That jarring wrist impact when the kettlebell slams against your forearm? It shouldn’t happen. The kettlebell clean is designed to feel effortless when executed correctly—a seamless transfer of explosive hip power into a stable rack position. Yet 87% of beginners experience wrist pain during their first attempts because they’re missing the critical arm-wrap timing that transforms this movement from painful to graceful. If you’ve ever wondered how to do a kettlebell clean without bruising your wrist, you’re not alone. This guide reveals the exact biomechanics that let the bell float into position, eliminating impact trauma while building total-body strength that traditional lifts can’t match. You’ll discover why your arms should stay passive during the drive phase and how to achieve that elusive “weightless float” before the catch.
Eliminate Wrist-Banging With Proper Path Control
Vertical Trajectory Mechanics
Most wrist pain stems from letting the kettlebell arc away from your body during the hip extension phase. The solution lies in maintaining a straight vertical path from floor to rack position—imagine zipping up a jacket as the bell travels upward. Position your starting stance with the kettlebell 6-12 inches ahead of your feet (not directly under your hips), creating the optimal angle for a close-path trajectory. During the hike phase, lock in the “thumb to bum” cue where your thumb points directly behind you at maximum hip hinge. This loads your posterior chain while keeping the bell tight against your thighs.
Critical visual checkpoints:
– Bell never drifts more than 2 inches from your torso
– Forearm stays vertical during initial drive phase
– Hip crease drops below knee level in hinge position
– Weight remains through heels (no forward foot pressure)
Force Absorption Technique
The moment of impact occurs when hip drive and arm movement become misaligned. To prevent this, initiate your arm wrap rotation precisely as the bell reaches hip level—no earlier, no later. Your hand should transition from over-handle to under-handle position through external rotation, not by flipping underneath the bell. As the kettlebell floats upward, relax your grip completely until the final millisecond of rack contact. Never clamp down early—this creates tension that transmits impact forces directly to your wrist. Instead, use your hip extensors to decelerate the bell while bracing your core to absorb residual momentum. The “old timey mayor” cue ensures neutral wrist alignment in the rack position, with your forearm vertical and elbow tucked against your ribs.
Execute Flawless Clean Mechanics From Floor to Rack

Hip-Driven Power Generation Sequence
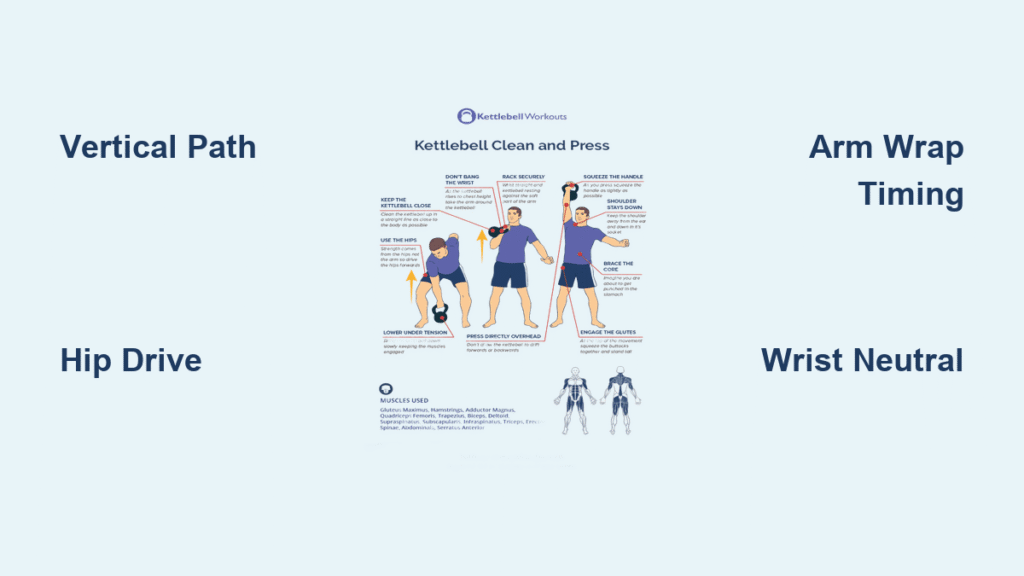
The most common mistake? Using arm strength to lift the bell. Your arms must function as passive cables transferring power generated solely by your hips. Begin with an aggressive hip snap identical to your kettlebell swing mechanics, driving through your heels with zero knee extension. Critical: If your knees extend before hip extension, you’re squatting instead of hinging—this destroys power transfer. Maintain a flat back and proud chest throughout, with shoulders positioned above hips in the hinge. As the bell reaches hip level, your explosive hip drive creates a brief “float phase” where the bell appears weightless. This is your window to initiate the arm wrap.
Perfect Rack Position Achievement
The clean isn’t complete until you achieve proper rack position. As the bell floats upward, rotate your arm externally while keeping your elbow close to your torso. The bell should land softly between your forearm and bicep—not on your wrist—with your elbow touching your ribcage. Your wrist must remain neutral (not bent backward), and the bell’s weight should distribute through your skeletal structure rather than muscular tension. Pro tip: Practice the “elbow to ribs” cue by placing your free hand on your side—your clean-side elbow should touch your ribs without straining. If you feel pressure in your wrist, you’ve flared your elbow or bent your wrist during catch.
Fix Common Clean Errors With Precision Cues
Immediate Wrist Pain Solutions
When your wrist slams against the bell, it’s always caused by one of two trajectory errors: either the bell loops outward during extension or you initiate the arm wrap too late. For outward looping, implement the “keep low and close” cue during your hike phase—imagine your elbow brushing your hip bone as the bell rises. For late arm wrap timing, practice the thumb rotation drill: stand holding the bell, slowly rotate your thumb from “to bum” position to “old timey mayor” (palm facing forward) while maintaining vertical forearm alignment. Do 3 sets of 10 reps daily to engrain the motion.
Troubleshooting decision points:
– Bell hits wrist but doesn’t flip: Too much grip tension during float phase → Relax hand completely
– Bell flips over handle: Arm wrap initiated too early → Wait for hip-level float before rotating
– Lumbar strain: Early hip drive without full hinge → “Be patient out of the hole” cue
Arm Pulling vs Hip Power Deficiency
If you’re muscling the bell upward with your arm instead of using hip power, you’ll fatigue quickly and risk shoulder injury. The fix requires two immediate adjustments: First, reduce your hip drive force by 30% to prevent ballistic trauma while you reprogram the movement. Second, implement the “arms down” cue—consciously keep your arm passive and extended downward until momentum naturally carries the bell upward. Warning: If you feel bicep strain, you’re curling the bell—stop immediately and return to dead cleans (starting from static floor position without hike momentum).
Accelerate Clean Mastery With Targeted Drills
Four-Phase Progression System
Start with the dead clean to isolate vertical path mechanics: Place the bell directly in front of your feet, hike straight back without swing momentum, then drive upward while focusing on keeping the bell close to your body. Perform 3 sets of 5 reps daily for 3 days. Progress to swing-to-clean transitions: Execute 5 conventional swings, then convert your sixth rep into a clean. This bridges familiar swing mechanics with new movement patterns. Spend 5 minutes daily on thumb rotation drills using slow-motion practice, then advance to arm wrap rehearsal at quarter speed—focusing exclusively on the corkscrew hand transition.
Drill timing protocol:
– Dead clean: 3 days minimum (5 sets of 3 reps)
– Swing-to-clean: 7 days minimum (3 sets of 5 reps/side)
– Full-speed practice: Only after 30 pain-free reps/side
Volume Control For Optimal Learning
Your clean speed reveals critical technique flaws. If the bell rockets upward causing wrist trauma, you’re overdriving with your hips—reduce power output by focusing on smooth acceleration rather than explosive force. Conversely, if the bell barely reaches rack height, increase hip explosiveness while maintaining vertical path. Key indicator: You should experience a 0.5-second “float phase” where the bell appears weightless before catching. If this float disappears, reset to lighter weights and prioritize hip drive quality over speed.
Prevent Injury With Strategic Programming

Load Progression Protocol
Never progress weight until you achieve 30 consecutive pain-free cleans per arm with perfect form. Start women with 8-12kg bells and men with 12-16kg—these weights allow focus on mechanics without excessive load. Master technique with a bell equal to 50% of your bodyweight before advancing. When ready, progress in 4kg increments for women and 8kg for men. Critical safety rule: Double bell cleans require minimum 2×16kg loads for effective strength development—never use mismatched weights.
Recovery-Focused Practice Schedule
Dedicate two weekly sessions exclusively to clean technique at 50-60% of working weight. On heavy training days, follow cleans with 2-3 minutes of grip-specific rest to prevent fatigue-induced form breakdown. Implement mandatory video analysis every 4th session—film your side profile to verify vertical path alignment and float phase timing. If wrist discomfort occurs, immediately switch to bottoms-up cleans (inverted bell position) which force perfect wrist alignment through increased proprioceptive demand.
Integrate Cleans Into Performance Systems
Dan John’s Metabolic Complex
Build work capacity with this continuous sequence: Perform 2 double cleans, immediately followed by 1 double press, then 3 double front squats—without setting the bells down. Repeat for 15 total rounds. This A+A (alactic + aerobic) protocol develops clean endurance while reinforcing proper rack positioning under fatigue. Time target: Complete all 15 rounds within 8 minutes for advanced conditioning.
Cardio Clean Ladder Protocol
For scalable metabolic conditioning, execute this descending ladder:
– Left arm: 8 cleans + 3 front squats
– Right arm: 8 cleans + 3 front squats
– Left arm: 5 cleans + 2 front squats
– Right arm: 5 cleans + 2 front squats
– Left arm: 3 cleans + 1 front squat
– Right arm: 3 cleans + 1 front squat
Pro tip: Rest exactly 15 seconds between arm switches to maintain cardiovascular demand. Advanced practitioners complete the entire sequence in under 4 minutes.
The kettlebell clean separates casual lifters from true strength athletes—but only when executed with precision. Master the hip-driven float phase and arm-wrap timing before adding significant load, and you’ll transform this potentially painful movement into your most efficient total-body exercise. Start every session with 5 minutes of dead cleans at 50% working weight to reinforce proper mechanics, and never sacrifice form for volume. When performed correctly, the clean delivers explosive power development, metabolic conditioning, and shoulder resilience that no barbell exercise can replicate. Your journey to pain-free, powerful cleans begins the moment you prioritize path control over power output.


