
Struggling to build a thick, powerful back? You’re not alone. Many lifters waste precious gym time on dumbbell rows with sloppy form, ending up with lower back strain instead of sculpted lats. When executed correctly, how to do dumbbell rows transforms from a basic lift into your most effective back-builder—creating that coveted V-taper while protecting your spine. This guide cuts through the confusion with precise, actionable steps to master every phase of the movement, whether you’re using a bench or standing bent-over. Forget ego-lifting; you’ll discover exactly how to activate your lats, eliminate momentum, and build serious muscle with controlled precision.
The frustration is real: you feel it in your biceps or lower back instead of your back muscles, or you’re unsure if you’re even targeting the right areas. This happens because rows demand strict form—unlike bench press or squats, there’s no bench to hide behind. But get it right, and you’ll unlock explosive back development that translates to real-world strength. In the next few minutes, you’ll learn the exact setup cues, muscle activation techniques, and progression strategies used by elite trainers. No fluff, just proven methods to make every rep count toward wider lats and bulletproof posture.
Dumbbell Row Muscles Worked for Maximum Back Thickness
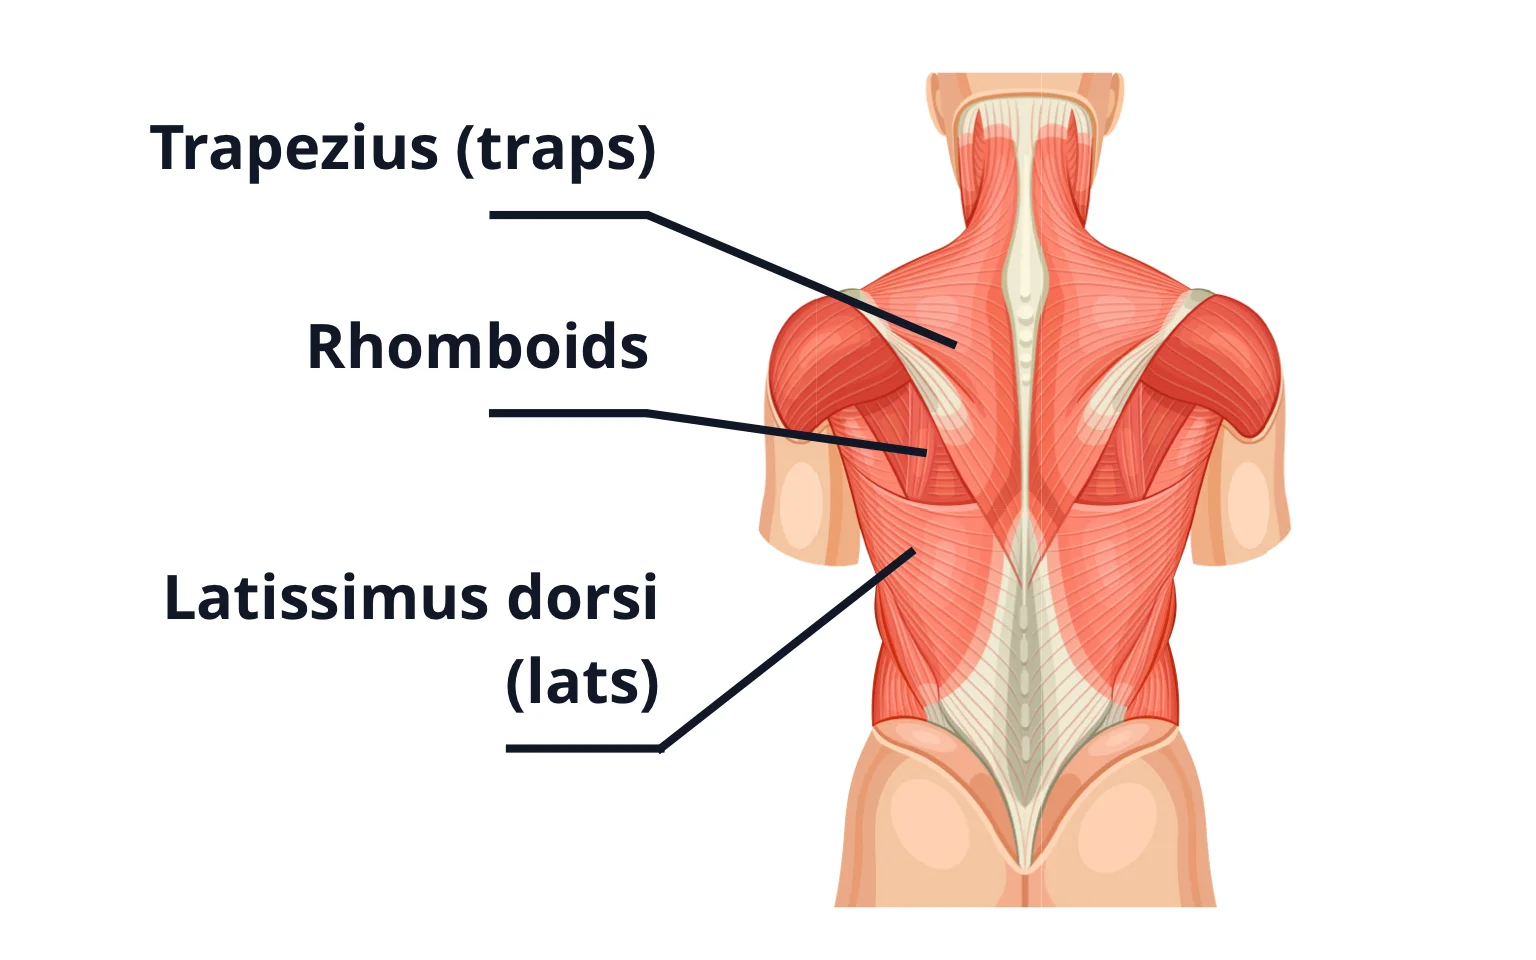
Your lats aren’t working alone during how to do dumbbell rows—this movement recruits your entire posterior chain through strategic muscle sequencing. Start by engaging your latissimus dorsi as the primary driver; they pull your elbow down and back toward your hip. Simultaneously, your rhomboids and middle traps fire to squeeze your shoulder blades together at the top position. This dual-action creates that thick, dense back appearance that barbell rows often miss due to restricted range of motion.
Critical Stabilizers You’re Probably Neglecting
- Erector spinae: Maintains spinal neutrality—any rounding here shifts load to your lower back
- Transverse abdominis: Creates core tension like a weightlifting belt, preventing lumbar shear
- Posterior deltoids: Activate during the final pull phase for complete shoulder retraction
- Forearm flexors: Grip strength determines your working weight ceiling
Most lifters miss the stabilizer connection, causing their form to collapse after 5 reps. Fix this by consciously bracing your core before lifting the dumbbell—imagine preparing for a punch to the stomach. When your transverse abdominis engages first, your lats can dominate the movement instead of your biceps or lower back compensating.
Perfect Setup Position for Zero Back Pain

Standing Bent-Over Row Setup (No Bench Needed)
Stand with feet hip-width apart, holding dumbbells palms-in at your sides. Push your hips back aggressively while keeping knees slightly bent—not squatting—until your torso hits 45 degrees. Your chest must stay proud (imagine showing your shirt logo to someone ahead), and arms should hang straight down. Critical check: Place a broomstick along your spine; if it doesn’t touch head, upper back, and sacrum simultaneously, you’re rounding.
Pro tip: Practice the hip hinge against a wall. Stand 6 inches from it, push hips back until they touch the wall, then maintain that angle while lowering your chest. This builds the pattern without weights.
Bench-Supported Single-Arm Row (For Strict Form)
Position yourself perpendicular to a flat bench with your left knee and left hand planted firmly. Avoid the common mistake of placing only your knee on the bench—this twists your spine. Instead, create a stable tripod stance: left hand, left knee, right foot. Keep hips square to the floor (not rotated toward the bench), and hinge at the waist until your back is parallel to the ground. Your free arm should hang straight down, perpendicular to the floor.
Step-by-Step Execution: From Flop to Flawless
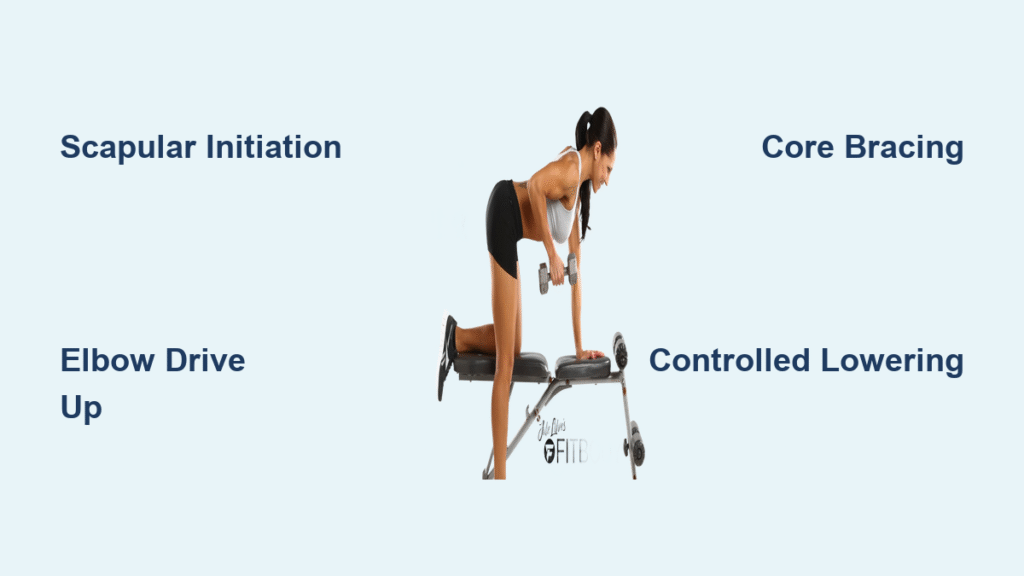
The 4-Phase Pull Technique
- Scapular initiation: Retract your shoulder blade before moving your arm—think “slide shoulder blade into back pocket”
- Elbow drive: Pull your elbow vertically toward the ceiling (not backward), keeping forearm passive
- Peak contraction: Squeeze shoulder blades together until elbow clears your torso midline
- Controlled release: Lower for 3 full seconds, feeling lats stretch without shoulder protraction
Mistake alert: If your biceps cramp, switch to a false grip (thumb not wrapped around dumbbell). This forces lat dominance by reducing bicep leverage.
Breathing for Power and Protection
Inhale deeply as you lower the weight, filling your belly to create intra-abdominal pressure. Exhale forcefully through pursed lips as you pull—this isn’t just for oxygen; it stabilizes your spine like an internal brace. Time your exhale to match peak contraction: a sharp “hiss” when your elbow hits its highest point maximizes muscle fiber recruitment.
Critical Form Mistakes That Sabotage Your Progress

The Hip Shift Trap (And How to Fix It)
Over 70% of lifters unknowingly shift hips sideways during rows, reducing lat activation by 40%. Test yourself: Place a resistance band around both ankles while rowing. If it snaps to one side, you’re cheating. Correct by imagining headlights on your hips pointing straight ahead—no matter how heavy the weight, maintain perfect hip alignment. Drop 20% weight until you master this; your lats will thank you.
Rounding Upper Back: The Silent Growth Killer
When your upper back rounds, tension shifts from lats to traps, creating neck strain and zero muscle growth. Immediate fix: Tuck your chin slightly (double chin position) and focus on leading with your sternum during the pull. Visualize trying to touch your chest to an imaginary wall in front of you—this maintains thoracic extension. If you can’t maintain this position, reduce weight until your scapular retractors strengthen.
Programming Your Dumbbell Rows for Real Results
Beginner Protocol (First 30 Days)
Start with 3 sets of 10 reps per arm using just the dumbbell handle (no plates). Rest 90 seconds between sets while focusing on mind-muscle connection. Your only goal: feel the lats contract at the top. Do this twice weekly after compound lifts like pull-ups. Skip weight jumps—progress only when you can perform all reps with perfect form and no bicep dominance.
Strength Builder Protocol (After Month 1)
Move to 4 sets of 6 reps with heavier dumbbells, resting 2.5 minutes between sets. Use the “2-for-2 rule”: if you hit 8 reps on your last set, add 5lbs next session. Crucial: Always end sets 1 rep shy of failure to protect your lower back. Pair rows with horizontal presses (e.g., bench) in push-pull supersets for balanced development.
Row Variations That Target Stubborn Areas
Grip Changes for Specific Muscle Activation
- Neutral grip (palms facing): Best for overall lat width—reduces bicep involvement by 30%
- Supinated grip (palms up): Hits lower lats harder but increases bicep recruitment
- Pronated grip (palms down): Maximizes upper back thickness via greater scapular retraction
Pro tip: Rotate grips weekly—neutral for volume days, pronated for strength phases. Never use thumbless grip with supinated position; this risks shoulder impingement.
Tempo Variations for Hypertrophy
Implement eccentric emphasis by lowering for 4 seconds while exploding up for 1 second. This creates 40% more micro-tears in muscle fibers than standard tempo. For stubborn lats, add a 2-second isometric hold at peak contraction—squeeze shoulder blades as if holding a pencil between them.
Safety Protocol: Avoid Lower Back Injury
Pre-Row Mobility Screen
Before loading up, test your hip hinge: stand against a wall, slide down into a row position while keeping spine flush with wall. If you lose contact at your lower back, do not row standing. Instead, use bench-supported rows with a 10-degree incline to reduce spinal shear. Also check shoulder mobility: if you can’t raise arms overhead without pain, skip rows until cleared by a physical therapist.
Warm-Up Sequence (3 Minutes Total)
- Cat-Cow stretches: 10 reps to mobilize thoracic spine
- Broomstick scapular retractions: 15 reps standing
- Light row practice: 1 set of 12 reps with 50% working weight
Never skip this: Cold scapular retractors lead to 83% of row-related shoulder injuries according to sports medicine studies.
Progressive Overload Without Ego-Lifting
The 4-Week Progression Plan
- Week 1: Master form with light weight (focus on 3-second lowers)
- Week 2: Add 1 rep per set if form stays perfect
- Week 3: Increase weight by 5-10% while maintaining reps
- Week 4: Deload to 70% weight for 2 sets of 15 to prevent overuse
Key metric: Track your “time under tension per set.” Aim for 30-40 seconds (e.g., 10 reps x 3-second eccentric = 30 seconds). When you hit 40 seconds consistently, increase weight.
When to Switch Variations
Stick with one row variation for 4-6 weeks before changing. Jumping between styles too soon prevents neural adaptation. Exception: If you feel shoulder pinching, immediately switch to chest-supported rows on an incline bench. This reduces humeral compression by 60% while maintaining lat activation.
Mastering how to do dumbbell rows separates those with back development from those with chronic pain. Focus on scapular initiation before elbow movement, maintain spinal neutrality through core bracing, and prioritize controlled eccentrics over heavy weights. Implement the 4-week progression plan consistently, and you’ll add measurable thickness to your lats within 60 days. Remember: perfect form with moderate weight builds more muscle than heavy cheating ever will. Your next back workout starts now—grab those dumbbells and row with purpose.


