

Your hamstrings burn while your lower back screams for mercy—yet you’re still not feeling that deep stretch through your posterior chain. You’re not alone. Most lifters perform barbell Romanian deadlifts (RDLs) with critical errors that shift tension away from hamstrings and overload the spine. This isn’t just ineffective; it’s dangerous. Master the exact hip-hinge mechanics, bar path control, and core bracing techniques that transform your RDL from a back-risking chore into your most powerful hamstring builder. Within 7 minutes, you’ll know precisely how to load your hamstrings while protecting your spine.
Why Your Hamstrings Aren’t Firing During Barbell RDLs
The barbell drifts 3 inches from your thighs. This tiny separation shifts load from hamstrings to your lower back within seconds. The fix? Wear compression socks and consciously “pull the bar into your quads.” Your lats—not just your grip—must stay engaged throughout the movement. Test this by lowering with just a PVC pipe; if it loses contact with your legs, your lats aren’t active.
Your knees bend like you’re squatting. Excessive knee flexion (beyond 20 degrees) turns the RDL into a hybrid squat, bypassing hamstring tension. Stand sideways to a mirror and focus on pushing your hips backward—not downward—until you feel a deep stretch behind your knees. If you see your knees traveling past your toes, reset immediately.
You’re lifting from the floor like a conventional deadlift. RDLs start from a standing position with the bar at hip height. Position your Olympic barbell on a power rack at mid-thigh level before gripping. Starting from the floor forces premature knee bend and destroys the hip-hinge pattern that makes RDLs unique.
How to Lock Your Spine in Neutral Position
Brace like you’re about to take a punch. Inhale 70% of your lung capacity into your belly (not chest), then contract your abs as if tightening a corset. This intra-abdominal pressure creates a rigid cylinder around your spine. Hold this tension until you complete the rep—exhaling too early causes spinal collapse.
Fix your gaze 8 feet ahead. Looking up arches your neck; dropping your chin rounds your upper back. Pick a spot on the floor 6-8 feet in front of you. This automatically aligns your head with your spine and prevents the upper back rounding that triggers lower back strain.
Check your shoulders in the mirror. Retract your shoulder blades by pulling them down and back like you’re tucking them into your back pockets. This “proud chest” position maintains thoracic extension and stops the forward shoulder roll that compromises spinal alignment.
Execute Flawless Barbell RDLs in 4 Steps
Drive Hips Back, Not Down (The Critical First Move)
Initiate with your glutes, not your spine. Imagine closing a car door with your butt. Your hips should travel horizontally backward while your torso lowers at a 45-degree angle. If your hips drop vertically, you’re squatting—not hinging. Practice this movement pattern daily with no weight: stand against a wall, touch it with your head, shoulders, and butt, then slide down by pushing hips back.
Maintain 15-20 degrees of knee bend. Lock this slight flex at the start and never change it. Too straight? You’re doing a stiff-leg deadlift. Too bent? You’ve drifted into squat territory. Use a training partner to monitor your knee angle or film yourself from the side.
Keep the bar glued to your thighs. As you hinge, the barbell must slide down your quads and shins like it’s magnetized to your body. Any gap means you’re losing leverage and shifting stress to your lower back. Wear long socks initially—you should feel consistent fabric friction against the bar.
Hit Perfect Depth Without Rounding
Stop where your hamstrings stretch—not your lower back. For most lifters, this occurs when the bar reaches mid-shin level. If you feel sharp lower back tension before then, reduce weight immediately. Your flexibility—not ego—determines depth. Advanced lifters may reach just below knees, but only if spinal neutrality is maintained.
Check your hip height at the bottom. Your hips must stay higher than your knees but below your shoulders. If hips drop below knees, you’ve lost the hip hinge. If they stay too high, you’re not achieving sufficient hamstring stretch. Film yourself to verify this critical alignment.
Feel the tension behind your knees. At proper depth, you should experience significant pull through your hamstrings—not your lower back. If you don’t feel this, straighten your knees slightly more and slow your descent to 3 seconds.
Drive Up With Explosive Hip Power
Thrust hips forward like a pendulum. The concentric phase starts with a violent glute contraction—not back extension. Imagine squeezing a tennis ball between your cheeks as you stand. Your hips should snap forward to meet the bar, not pull it upward with your back.
Maintain bar-to-leg contact on the ascent. The bar must ride back up your shins and thighs. If it drifts forward, engage your lats harder by thinking “pull the bar into your body” throughout the lift. This keeps the load on your posterior chain.
Lock out without hyperextending. At the top, stand tall with glutes fully contracted—but never lean backward. Overextension at lockout is the #1 cause of RDL-related lower back pain. Squeeze your glutes for 1 full second before lowering.
Breathe for Maximum Stability and Power
Inhale deeply at the top position. Take a full belly breath before initiating the descent. This creates the intra-abdominal pressure that stabilizes your spine during the eccentric phase.
Hold your breath until hip drive. Maintain this pressure throughout the lowering phase. Exhaling too early reduces core rigidity and invites spinal rounding. Only release air forcefully as you thrust your hips forward.
Reset your breath between reps. Never perform multiple reps on one breath. Take a fresh belly breath at the top of every repetition to maintain optimal spinal protection.
Stop These 3 RDL Mistakes Before They Injure You
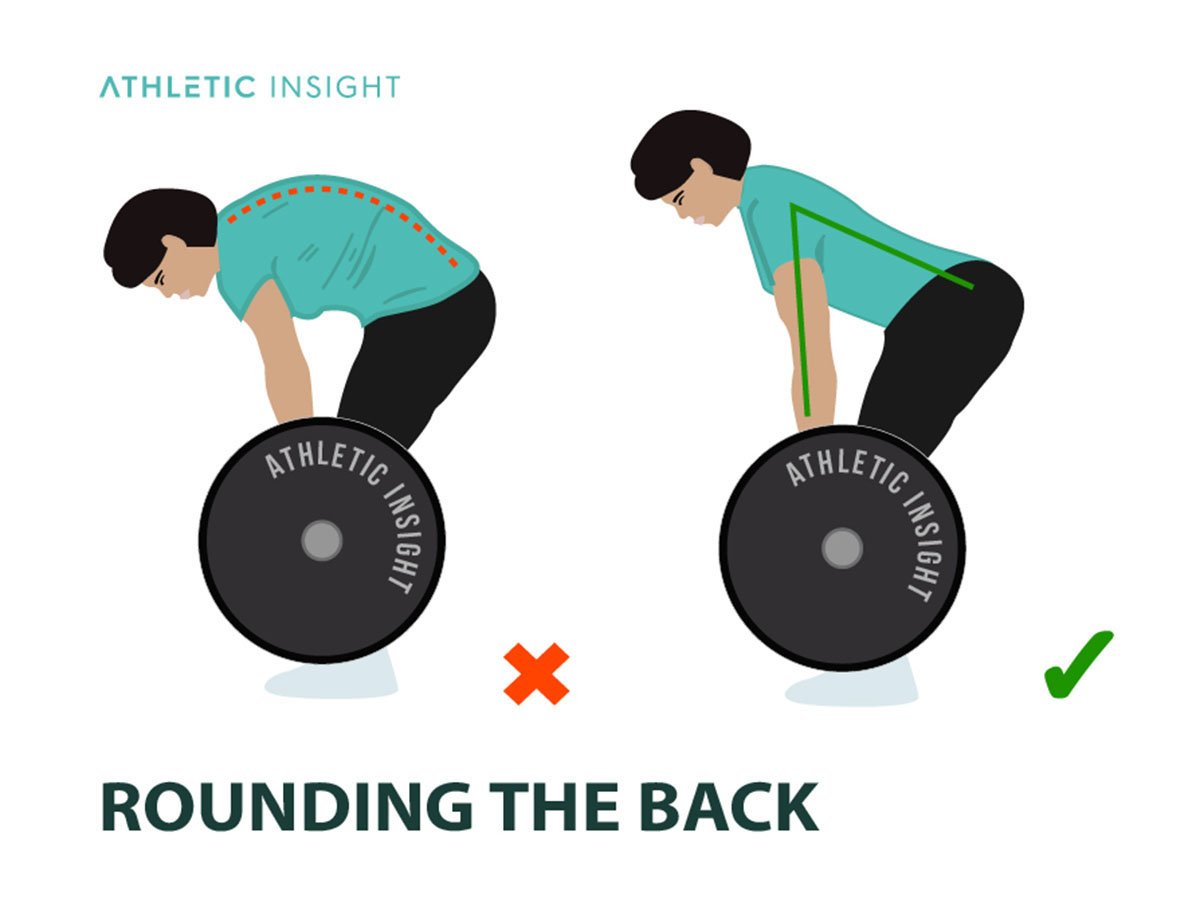
Why Your Lower Back Rounds (And How to Fix It)
The real cause: Weak core bracing combined with excessive weight. Your erector spinae can’t maintain spinal position under load. Immediate fix: Drop weight by 40% and practice hip hinges with just a broomstick. Place your hands behind your back to prevent using arms for momentum—this forces pure hip hinge mechanics. Do 3 sets of 15 reps daily until neutral spine feels natural.
Why You’re Not Feeling Hamstring Burn
The real cause: Knees bending too much or insufficient depth. Immediate fix: Stand with your heels 2 inches from a wall. Hinge backward until your butt touches the wall while keeping knees stationary. This trains the “hips back” motion without squatting. Perform 2 sets of 10 reps before every RDL session.
Why the Bar Floats Away From Your Legs
The real cause: Disengaged lats and poor scapular positioning. Immediate fix: Grip the bar, then pinch your shoulder blades together like you’re holding a pencil between them. Now pull the bar toward your thighs without bending elbows. This lat activation keeps the bar path vertical. Do this “lat pull” drill for 30 seconds before each set.
Program Barbell RDLs for Explosive Hamstrings

Beginners: 3 sets of 10 reps at 50% of your 1RM, resting 90 seconds. Focus solely on bar-to-leg contact and hip hinge depth. Stop if form breaks before 8 reps.
Intermediate lifters: 4 sets of 8 reps at 70% 1RM with 3-second eccentric phase. Add 5 lbs when you hit all reps with perfect form.
Advanced lifters: 5 sets of 5 reps at 85% 1RM with 2-inch deficit (standing on plates). Rest 3 minutes between sets to maintain power output.
Progressive overload secret: When adding weight stalls, slow your eccentric phase to 4 seconds for 2 weeks. This builds tendon resilience and dramatically increases hamstring activation without heavier loads.
Warm Up Like a Pro to Prevent Injury
Skip this sequence at your peril:
1. 5 minutes rowing (light resistance)
2. 10 leg swings per leg (front/back and side-to-side)
3. 15 glute bridges with 2-second squeeze at top
4. 3 warm-up sets: empty bar × 12, 40% × 8, 60% × 5
Critical check before loading: Perform 5 bodyweight hip hinges against a wall. If you can’t maintain neutral spine, stop and address mobility issues. Never add weight to faulty movement patterns.
Troubleshoot Your Specific RDL Problem Now
“I feel it only in my lower back”: Reduce weight by 30% and place a resistance band above your knees. Push knees outward against the band as you hinge. This activates glutes to share the load with hamstrings.
“My grip fails before my hamstrings burn”: Use lifting straps for sets above 80% 1RM—but never on warm-ups. Grip strength should develop naturally through lower-weight sets. Add farmer’s carries twice weekly.
“I lose balance backward”: Shift weight to your mid-foot (not heels). Place a 5-lb plate under your toes to force forward weight distribution. This instantly improves bar path and stability.
Master these barbell RDL techniques and you’ll build hamstrings that power through sprints, protect your spine during deadlifts, and eliminate deadlift plateaus. Start with 50% of what you think you can lift, prioritize bar-to-leg contact on every rep, and never sacrifice form for weight. In 4 weeks, you’ll feel—and see—the difference in your posterior chain strength. Your hamstrings aren’t lazy; they’ve just been waiting for you to do RDLs right.


