
Have you ever tried to sketch a yoga mat only to end up with a flat, lifeless rectangle that doesn’t capture the authentic look of this essential fitness accessory? Learning how to draw a yoga mat properly requires understanding its unique physical properties beyond just its basic shape. A yoga mat has subtle texture, characteristic curling edges, and distinctive patterns that differentiate it from ordinary rectangles. Whether you’re an art student practicing still life, a yoga instructor creating visual materials, or simply someone looking to improve their drawing skills, mastering how to draw a yoga mat introduces you to valuable techniques for rendering textured surfaces and curved forms.
What makes drawing a yoga mat particularly interesting is how it combines geometric precision with organic elements. The mat’s slightly flexible material creates natural curves at the edges, while its surface texture varies significantly depending on the material—whether it’s rubber, PVC, or cork. By focusing on these distinctive characteristics rather than treating it as a simple geometric shape, your drawing will gain authenticity and visual interest. This guide breaks down the process into manageable steps that build upon each other, helping you create a realistic yoga mat drawing regardless of your current skill level.
Gather Your Drawing Supplies
Before starting your yoga mat drawing, assemble the appropriate materials that match your artistic style and desired outcome. The right supplies significantly impact your ability to capture the mat’s unique texture and form.
For traditional pencil drawings, collect graphite pencils ranging from hard (2H) to soft (4B or 6B). Harder pencils create precise initial shapes and fine details, while softer pencils build rich shadows that define the mat’s texture. A mechanical pencil with 0.5mm HB lead works exceptionally well for preliminary sketching because it produces consistent, easily erasable lines. Pair these with quality drawing paper that has enough texture to hold graphite—medium-weight paper around 100lb or 180gsm provides the ideal surface for most yoga mat drawings.
Artists preferring more dramatic effects might choose charcoal or conté, which excel at capturing the textured surface of yoga mats through subtle gradations and rich dark values. Charcoal sticks in soft and medium grades, combined with a kneaded eraser for lifting highlights, create striking results that emphasize the mat’s three-dimensional qualities. Digital artists can utilize programs like Procreate, Photoshop, or Clip Studio Paint, which offer textured brushes that simulate traditional mediums while providing unlimited undo options and layer management.
Complete your toolkit with a smudge-resistant plastic eraser for clean corrections, a blending stump for smoothing graphite transitions, and a reference photo of a yoga mat in your desired orientation. Having all materials prepared before beginning ensures uninterrupted progress through each drawing stage.
Essential Paper Selection Tips
The paper you choose dramatically affects your yoga mat’s final appearance. For graphite drawings, select paper with a slight tooth that can hold multiple layers of graphite without becoming shiny. Hot-pressed paper creates smoother results suitable for detailed texture work, while cold-pressed paper’s subtle texture helps capture the mat’s surface characteristics. Avoid smooth Bristol board for this subject, as it doesn’t grip enough graphite to build the necessary texture depth.
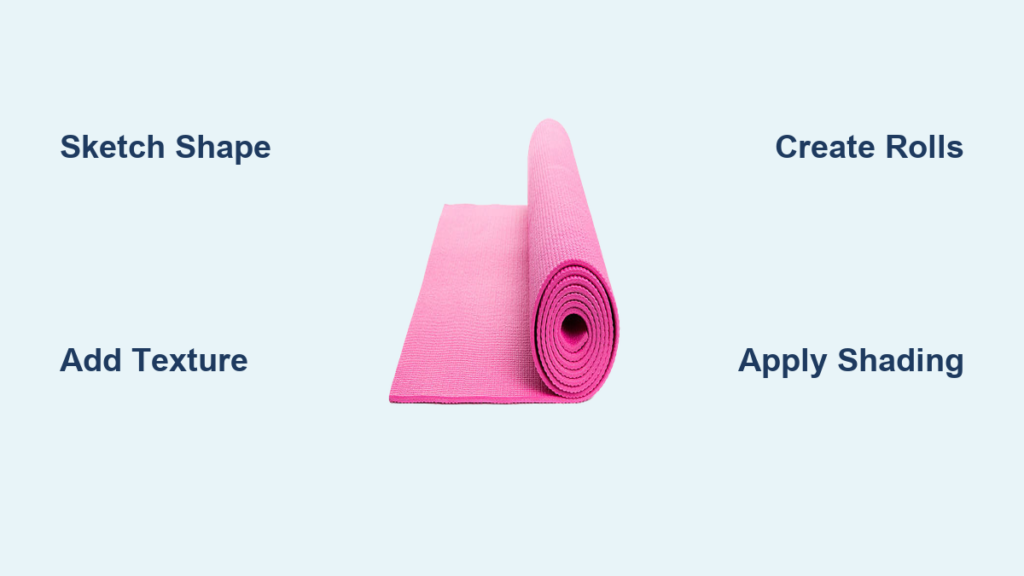
Sketch the Basic Mat Shape
Establishing accurate proportions forms the foundation of your yoga mat drawing. Whether depicting a flat mat or one partially rolled, getting this initial shape correct prevents significant correction work later.
Begin with light sketch lines using your hardest pencil (2H or HB). For a flat yoga mat viewed from above, draw a long rectangle with slightly rounded corners—real yoga mats feature subtle curves rather than sharp 90-degree angles. Most standard mats measure approximately 24 inches wide by 68 inches long, creating an elongated rectangular shape. If working from a photo reference, hold your pencil up to the image to gauge the width-to-length ratio before drawing. Lightly mark corner positions and connect them with gentle strokes, keeping your hand loose to avoid harsh lines.
When drawing a rolled yoga mat, sketch the outer edge as a long, slightly tapered cylinder, then add the spiral oval at the end. The unrolled portion extending from the roll should appear flatter and wider as it extends away, creating visual depth. Many beginners make the mistake of drawing rolled sections with uniform width; in reality, the roll tapers slightly where it meets the flat portion.
Checking Your Proportions
Verify your basic shape before adding details by stepping back from your drawing or viewing it in a mirror. This technique reveals proportion issues invisible when working closely. The overall silhouette should immediately read as a yoga mat—nothing more, nothing less. Correct any major proportion issues now, as details will make corrections more difficult later.
Add Realistic Texture Details

Yoga mats feature distinctive textured surfaces that vary by material type, and capturing this texture is essential for authenticity. The texture differs significantly: cork mats show natural cellular patterns, rubber mats display subtle dimpling, and PVC mats typically feature consistent grid or dot patterns.
Start building texture by establishing a base tone across the entire mat surface using medium-grade pencils (2B or 4B). Work in small circular motions or gentle hatching that mimics the mat’s natural grain. For dot-patterned mats common in fitness brands, create the pattern by dotting small circles in consistent rows, varying pressure slightly to suggest dimension rather than creating identical mechanical dots.
Cork yoga mats require sketching irregular rounded shapes that connect in organic patterns, leaving some areas lighter (cork cell tops) and others darker (recessed cell walls). Build this texture gradually with multiple light layers rather than attempting dark cells in a single application. The key is natural variation—cork isn’t uniform, so your drawing should reflect these organic inconsistencies.
Texture Application Technique
Apply texture more densely in areas showing natural wear, such as near the center where hands and feet contact the mat most frequently. For rubber mats, use subtle cross-hatching or fine stippling to suggest the smooth-yet-grippy quality that characterizes quality rubber yoga mats. Avoid making the texture overwhelming; it should feel present but not rough.
Create Fold and Roll Effects
Natural curls, folds, and rolls transform your drawing from a flat diagram to a realistic representation. These organic deformations create shadows and highlight areas that add immediate three-dimensionality.
When a yoga mat lies on the floor, edges typically curl upward slightly, especially if new or recently unrolled. Observe where curling occurs in your reference and sketch these curved edges rather than maintaining straight lines. The curled sections create shadow areas beneath them and lighter areas along the curl’s edge where the mat catches light. This contrast between shadow and highlight defines the curl’s shape.
For partially rolled mats, the transition zone between tight roll and flat unrolled section requires careful attention. This area typically shows the mat bending rather than sharply creasing, creating subtle ripples. Sketch these as gentle curved lines following the material’s flow, then shade along one side of each ripple to suggest depth. Ripples closest to the roll appear tighter and more compressed.
Fully Rolled Mat Technique
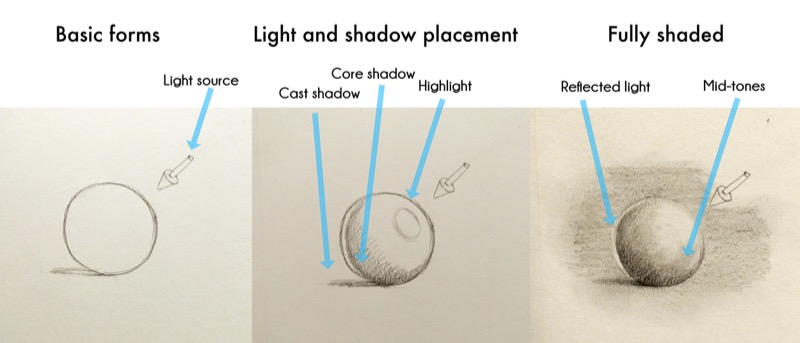
A fully rolled mat demands attention to cylindrical form and light interaction. One side catches light (appearing lighter), while the opposite side falls into shadow. The rolled edges create concentric rings that spiral inward, with each ring slightly darker than the one before it when viewed from the end. These value gradations communicate the mat’s cylindrical form more effectively than any outline.
Apply Shading and Depth
Effective shading transforms your outline into a three-dimensional object. Building values gradually ensures smooth transitions and natural-looking results that suggest the mat’s slightly yielding texture.
Identify your light source direction before beginning serious shading. A consistent light source determines where highlights and shadows appear across your drawing. The side facing the light receives lighter values, while the opposite side falls into shadow. Where the mat curves or rolls, values shift gradually following the surface’s orientation relative to the light.
For a flat mat viewed from above, subtle shading occurs at curling edges and areas where the surface isn’t perfectly level. Rather than heavy shading across the entire surface, concentrate darker values near the mat’s perimeter and keep the center slightly lighter. This suggests a subtle dimensional curve and prevents your mat from appearing flat.
Rolled mats require more dramatic value contrasts to communicate their cylindrical form. The roll’s side facing the light appears significantly lighter than the shadowed side, with a gradual transition between them following the curve’s contour. The spiral pattern benefits from dark values in the innermost spiral and progressively lighter values outward.
Finish Your Drawing
The final stage involves refining details, correcting inconsistencies, and adding finishing touches that elevate your work from practice piece to polished artwork.
Evaluate your drawing as a whole by viewing it from a distance or in a mirror, which reveals proportions and values invisible when working closely. Check that the mat’s overall shape reads correctly at a glance. If it looks like a simple rectangle with no texture or dimension, additional shading or edge refinement is needed.
Clean up any remaining smudges or visible grid marks, and erase construction lines that might show through your final rendering. Consider adding subtle details like a slight cast shadow grounding the mat in space, but avoid adding unnecessary background elements—a simple, well-executed yoga mat often makes a stronger statement.
Sign and date your finished drawing, and photograph it under even, diffused lighting for digital preservation. Original artwork can yellow or become damaged over time, while digital copies allow you to share your work and reference it for future pieces.
Mastering how to draw a yoga mat builds skills applicable to countless other subjects. The techniques you’ve practiced—creating realistic texture, depicting cylindrical forms, building gradual value transitions, and incorporating surface details—transfer directly to drawing other rolled goods and textured surfaces. Keep reference photos handy, practice with different mat orientations, and remember that each drawing builds your skills for the next one.


