
Your living room just became a fully equipped gym. Learning how to exercise with resistance bands unlocks professional-grade strength training without bulky equipment or expensive memberships. These elastic powerhouses deliver variable resistance that intensifies as you stretch, forcing muscles to work harder at the peak of each movement—something traditional weights can’t replicate. Unlike dumbbells that hammer your joints, resistance bands build functional strength while protecting vulnerable areas, making them perfect for post-injury rehab, travel fitness, or anyone craving effective home workouts. By the time you finish this guide, you’ll have everything needed to transform any space into your personal strength studio.
The magic happens through progressive tension—your muscles face minimal resistance at the start of a movement but battle maximum challenge when fully engaged. This unique physics activates more muscle fibers during the critical “lockout” phase where traditional weights actually get easier. Best of all, a single band weighing less than a pound replaces an entire rack of dumbbells. Whether you’re a time-crunched professional, frequent traveler, or fitness newbie, mastering how to exercise with resistance bands delivers gym-quality results anywhere life takes you.
Why Resistance Bands Outperform Traditional Weights
Your muscles respond differently to elastic resistance than constant-weight systems. As you stretch the band during exercises like bicep curls or rows, tension increases dramatically at full contraction—precisely when your muscles can generate the most force. This peak contraction overload triggers greater strength gains and muscle development compared to dumbbells, which actually decrease resistance at the top of movements. The bands also force stabilizer muscles into action throughout each rep, improving functional strength that translates directly to real-world activities like lifting groceries or playing with kids.
Three game-changing advantages you get only with bands:
– Joint-friendly progression: Gradually increase tension without sudden weight jumps
– Travel-ready power: Pack a full strength program in your laptop bag
– 24/7 accessibility: No more skipping workouts during hotel stays or busy weeks
Unlike clanging gym equipment requiring dedicated space, resistance bands fit in desk drawers and hotel suitcases. This eliminates the #1 excuse for skipping strength training—lack of equipment access. The portability factor means you can finally achieve workout consistency that builds real results.
Essential Gear Setup for Maximum Results

Before performing your first resistance band exercise, proper setup prevents frustration and injury. Your primary tool should be a looped band with moderate resistance—thicker bands provide heavier tension. Always inspect for these critical wear signs before use:
– Frayed edges or thinning material
– Small nicks or tears
– Loss of elasticity (band doesn’t snap back quickly)
Stand firmly on the band’s center during upper body exercises, ensuring equal tension on both sides. For lower body work, secure the loop just above your knees—too high risks slipping, while too low restricts movement. Place your exercise mat on smooth flooring away from sharp objects that could damage the band during use.
Master These Upper Body Resistance Band Exercises
Perfect Your Band Pull Technique
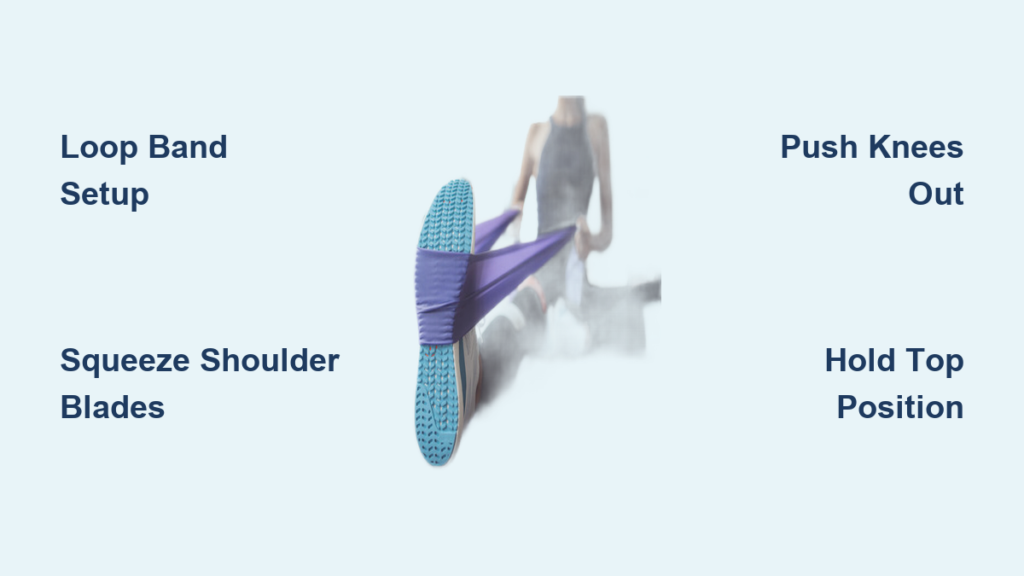
This back-strengthening move fixes rounded shoulders from desk work. Stand with feet hip-width apart, holding the band’s center at chest height. Pull hands apart until elbows reach shoulder level, squeezing shoulder blades together like you’re pinching a pencil between them. Maintain this tension for 2 seconds before slowly returning. Complete 12 reps with controlled movements—rushing sacrifices back engagement.
Bent-Over Row for Sculpted Lats
Hinge forward 30 degrees with knees slightly bent, keeping your back perfectly flat. Grip both band ends shoulder-width apart with palms facing inward. Pull the band toward your lower ribs while keeping elbows tight to your sides. Key mistake to avoid: Using momentum by swinging your torso—this shifts work from lats to hip flexors. Perform 12 slow reps focusing on back muscle contraction.
Bicep Curl Form That Builds Real Strength
Stand on the band’s center with feet hip-width apart, palms facing forward. Curl hands toward shoulders while keeping elbows locked at your sides. At the top position, squeeze biceps hard for 1 second before lowering over 3 seconds. This negative phase builds more muscle than the lifting portion. Complete 12 reps with strict form—no body swinging allowed.
Transform Your Lower Body With Band Power
Squat with Band: Glute Activation Secret
Loop the band just above your knees and stand with feet slightly wider than hip-width. Lower into a squat while pushing knees outward against the band—this engages gluteus medius muscles ignored in regular squats. Descend until thighs reach parallel, then drive through heels to stand. Perform 12 reps feeling the burn in your glutes, not knees.
Lateral Lunge for Athletic Power
Take a giant step sideways while keeping the other leg straight. Bend the stepping knee to 90 degrees while sitting hips back. Critical tip: Keep your stepping foot pointed forward—not outward—to protect knee ligaments. Push off through the heel to return to start. Complete 12 reps per side for basketball-ready lateral explosiveness.
Hip Thruster Progression System
Lie on your back with band looped above knees, feet flat on floor. Drive through heels to lift hips until your body forms a straight line. At the top position, squeeze glutes hard for 2 seconds before lowering. For advanced training, add a 3-second pause at the peak contraction. Complete 15 reps to build posterior chain strength that improves everything from running to lifting form.
Core Stabilization Routines That Actually Work
Glute Bridge with Band: The Forgotten Core Builder
This move targets deep core stabilizers most planks miss. With band above knees, lift hips while actively pushing knees outward against resistance. Pro tip: Imagine crushing a yoga block between your knees to maximize muscle engagement. Hold the top position for 3 seconds while breathing deeply. Perform 15 reps to strengthen the pelvic floor and prevent lower back pain.
Standing Glute Kick Back Variations
Loop the band around both ankles and stand tall. Shift weight to one leg while kicking the other straight back 6 inches—keep your core tight and avoid leaning forward. Point toes downward to engage hamstrings. Complete 12 reps per leg for sculpted glutes that look great in jeans. For extra burn, add a 2-second pulse at full extension.
Create Your Custom Resistance Band Workout
20-Minute Express Routine for Busy Schedules
Complete one set of these exercises back-to-back with 30 seconds rest between:
1. Band Pull (12 reps)
2. Squat with Band (12 reps)
3. Bent-Over Row (12 reps)
4. Glute Bridge (15 reps)
5. Bicep Curl (12 reps)
This scientifically designed sequence alternates upper/lower body to maximize efficiency. You’ll finish strong without waiting for muscle recovery between sets.
40-Minute Comprehensive Strength Builder
Perform two full circuits of:
– Upper body series (all exercises)
– Lower body series (all exercises)
– Core series (all exercises)
Rest 60 seconds between exercises and 2 minutes between circuits. Track your progress by noting when bands feel too easy—this signals it’s time to upgrade resistance levels.
Safety Precautions That Prevent Common Injuries
Critical mistake #1: Using bands with visible wear. A snapped band can cause facial injuries—inspect before every use. Critical mistake #2: Overextending shoulder joints during upright rows. Keep elbows below shoulder height to avoid impingement. Critical mistake #3: Locking knees during standing exercises. Maintain a soft bend to protect ligaments.
Stop immediately if you feel sharp pain—not muscle burn—during any movement. Consult a physical therapist before starting if you have previous joint injuries. Proper form trumps resistance level every time.
Learning how to exercise with resistance bands delivers gym-quality strength without the commute, equipment costs, or intimidation factor. Start with moderate resistance, master perfect form, and gradually increase difficulty as muscles adapt. Within weeks, you’ll notice stronger lifts, better posture, and functional strength that transforms everyday movements. Your journey to a stronger, more capable body begins today—with nothing more than a simple band and this knowledge.


