
Your walking pad suddenly jerks to a stop mid-stride, leaving you stumbling forward. The familiar hum is replaced by a burning rubber smell and an unsettling squeal. This frustrating scenario happens to thousands of walking pad owners when the drive belt fails—the critical component transferring power from the motor to your walking surface. Learning how to fix a walking pad belt isn’t just convenient; it saves you hundreds in replacement costs and extends your machine’s life significantly. Unlike treadmills, walking pads use a smaller drive belt that connects the motor to the walking surface, making belt issues the most common failure point. This guide shows you exactly how to diagnose, replace, and maintain your walking pad belt properly—so you never face another unexpected shutdown during your workout.
The drive belt’s vulnerability stems from manufacturers’ cost-cutting practices. Most walking pads ship with belts featuring fewer ribs than their pulleys can accommodate—a 5-rib belt on an 8-groove pulley, for example. This mismatch creates inherent slippage problems from day one, accelerating wear and triggering the symptoms that prompt owners to search for how to fix a walking pad belt. When your belt fails, it’s rarely an isolated issue; it’s usually both a symptom and cause of broader system problems. Addressing only the belt without evaluating the entire system leads to repeated failures, so this guide covers comprehensive solutions that tackle root causes.
Recognize Belt Failure Signs Before Damage Spreads
A burning rubber smell is your walking pad’s urgent distress signal—immediate action prevents motor damage. This odor accompanies visible symptoms: inconsistent belt motion, jerky movement when you step on it, or a belt that only moves when manually pushed. Squeaking, screeching, or grinding noises also indicate belt-related issues, though they might point to bearing problems too. Run your finger across the belt’s inner surface; black powder confirms rubber breakdown from excessive heat and slippage. This inspection takes seconds but determines whether replacement is truly needed or if adjustment might suffice.
The relationship between belt condition and overall treadmill health operates bidirectionally. A failing drive belt typically indicates problems elsewhere—misaligned rollers, worn bearings, or insufficient lubrication—while simultaneously creating new problems through increased motor strain. This explains why isolated belt replacements often fail to resolve underlying issues. When your walking pad exhibits these symptoms, plan for a full system evaluation rather than assuming a simple part swap will solve everything.
Gather Required Tools and Parts for Belt Replacement
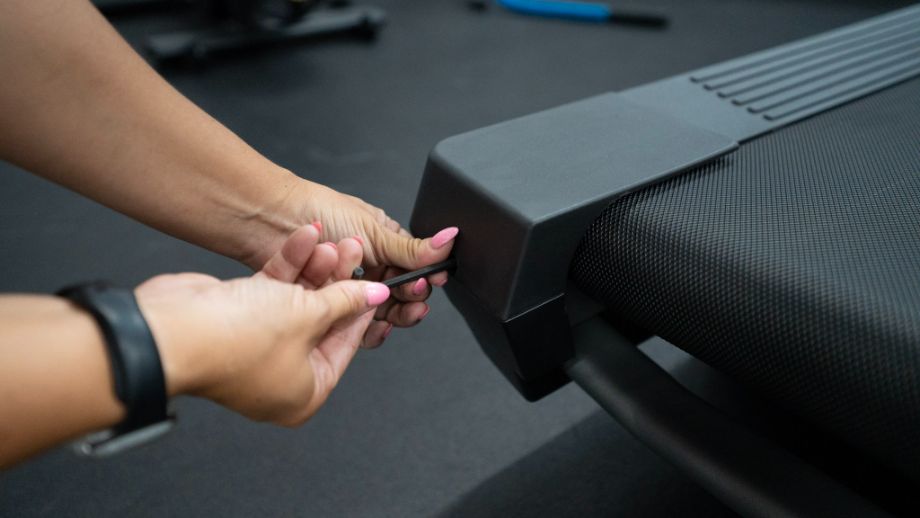
Before disassembly, collect these essentials: 4mm and 5mm Allen wrenches for adjustment bolts, a screwdriver set for housing fasteners, and compressed air for cleaning debris. Taking photos during disassembly preserves wire routing and bracket configurations, preventing reassembly confusion. The replacement belt requires careful specification—count the ribs (ridges) on your pulley’s inner surface manually, as this must match your new belt’s rib count.
Amazon rarely stocks the exact specifications needed, making AliExpress or eBay better sources. Expect to pay $10-$15 per belt, but factor in 2-3 weeks shipping time from Chinese suppliers. Smart owners order 2-3 replacements during initial purchase, as the drive belt inevitably fails first when problems develop. Keep silicone-based lubricant and clean rags on hand for deck cleaning and reapplication during reassembly.
Replace the Drive Belt Step-by-Step Without Mistakes
Begin by removing the motor chamber housing—unscrew fasteners while noting wire routing, as many manufacturers use hot glue in addition to screws. Take photos at each stage to ensure accurate reassembly. With the chamber removed, inspect all components before proceeding. The walking deck likely has accumulated dust that formed an abrasive slurry with old lubricant; wipe thoroughly with clean rags followed by a microfiber cloth.
When installing the new belt, ensure rib count matches your pulley groove count—this is critical. If your SpaceWalk 5L came with a 5-rib belt on an 8-groove pulley, upgrading to an 8-rib belt eliminates inherent slippage problems. Stretch the new belt over both pulleys, ensuring proper alignment in each groove. Reassemble components in reverse order of disassembly, referring to your photos for wire connections and bracket placement.
Clean All Components Thoroughly to Extend Lifespan

Comprehensive cleaning during reassembly prevents accelerated wear. The motor compartment benefits from compressed air blow-out to remove dust that impairs cooling and creates electrical hazards. The deck cleaning process deserves special attention—silicone lubricant attracts dust over time, forming a grey paste that functions as sandpaper against both belt and deck. Wipe this abrasive buildup completely before applying fresh lubricant.
After cleaning, apply silicone lubricant in a zig-zag pattern beneath the walking belt. Run the treadmill at 1 mph for two minutes without anyone on it, allowing lubricant to distribute evenly. This few-minute process prevents the accelerated degradation that turns maintenance into a worsening cycle. Never lubricate over existing buildup—that simply layers new lubricant on top of an abrasive surface.
Adjust Belt Tension and Tracking for Smooth Operation
Proper tension sets the foundation for successful belt operation. Lift the walking belt at the deck’s center—it should rise 3-4 inches. Below 3 inches is too tight, straining components; above 4 inches is too loose, causing slippage. When the belt drifts to one side, tighten the Allen bolt on the tight side (not the slack side). This counterintuitive approach creates a slope that encourages the belt to track back toward center.
Make adjustments in quarter-turn increments while the belt runs, waiting 15 seconds between adjustments to observe effects. Front roller alignment requires millimeter-level precision—use alignment notches as guides while visually verifying the roller sits perfectly centered. The “gut check” approach—stepping back to evaluate if the installation “looks right”—often catches errors precise measurements miss.
Implement Daily Maintenance Habits to Prevent Future Issues
Dust and pet hair are your walking pad’s primary enemies. Establish a daily de-dusting routine using compressed air blown into motor vents—this prevents abrasive conditions that accelerate wear. Never stand on the belt when pressing start; instead, step on side rails first, start the machine, wait for consistent motion, then step onto the moving surface. This prevents locked rotor amperage that damages controller boards.
For first daily use, run the belt at maximum speed for 1-2 minutes before stepping on it. This warm-up expands the drive belt’s ribbing through thermal action, improving grip and reducing slippage. Structured walking intervals (30-45 minutes of walking followed by 1-5 minute breaks) allow heat dissipation and component rest, preventing thermal accumulation that accelerates wear.
Keep Spare Parts on Hand for Quick Repairs

Maintaining a spare drive belt inventory eliminates downtime during failures. The 2-3 week shipping time from overseas suppliers makes reactive ordering impractical. Purchase replacements immediately upon acquiring your walking pad—open the motor chamber on day one to note belt specifications while original equipment is accessible. Understanding your specific model’s configuration (like the CyberPad Home’s 6-rib belt on an 8-groove pulley) ensures correct future replacements.
The modest $10-$15 investment in spare belts represents insurance against frustration and workout interruptions. When failures occur (and they will), having replacements ready transforms your experience from reactive crisis management to prepared response. This simple strategy keeps your walking pad operational while others wait weeks for parts.
Know When Repair Makes Sense vs. Replacement
Decide between repair and replacement by weighing multiple factors. New walking pads in warranty may qualify for free replacement, making repair economically irrational. Out-of-warranty machines, particularly premium models, often justify repair investment that extends service life by years. Budget machines present more complex calculations, as repair costs may approach replacement value.
Your capability matters most—walking pads are mechanically simple enough that most users can perform routine maintenance with basic tools. Those who develop this competence transform their relationship with the machine, treating maintenance as familiar ritual rather than intimidating mystery. If you’re uncomfortable with bearing replacement or electrical components, consider professional service or replacement.
Learning how to fix a walking pad belt transforms you from passive owner to active maintainer of your fitness investment. By understanding your machine’s systems, keeping replacement parts on hand, and following this maintenance schedule, you ensure reliable performance for years. The daily de-dusting, weekly lubrication checks, and periodic adjustments become muscle memory that prevents problems before they start—turning potential frustration into confidence in your equipment’s continued performance.


